Introduction
Last updated: 2022-04-17
Woogoods is a complete mobile app for both Android & iOS based on Woo-commerce buy and sell using Flutter Framework. You can convert your Woo-commerce into a native Android and iOS App within a few hours. We have used Flutter from Google to build this entire application and used lots of animations to make this app user-friendly. It could be able to satisfy users with impressive UI design and smooth performance on both iOS and Android devices. We have also used Firebase Push Notification to send notifications to the user and also used live chatting service. The app will always be synced with Woo-commerce site data via WC REST API. You can customize a bit and decide what to show or not into the app real-time.
Prerequisite:
- Flutter version must be : Flutter 2.10.4 • channel stable
- Dart version must be: Dart 2.16.2 Make sure your flutter and dart versions are correct.
Follow the flutter documentation from https://flutter.dev/docs/get-started/install to install the given version of flutter in your pc/mac
Must Follow
Danger
3. Setup Firebase
For Firebase setup, you just need to change the Google json file.
5. Build the App for testing (build and apk)
- https://flutter.dev/docs/deployment/android see the doc for reference In
- terminal run : flutter build apk
- It will build an apk and show the folder. You can then install it in your phone to test, or share to multiple users for testing.
8. Generate play store uploadable files for release
Android Signing
Flow this link - https://docs.flutter.dev/deployment/android Android
iOS Signing
Flow this link - https://docs.flutter.dev/deployment/ios
PROJECT STRUCTURE
Woogoods project structure and short description for each of them is as follow:
- Assets:apps/widgets/snippets images as well as appIcon are stored here.
- Lib:Application main file and folder are located here.
- Constant: All the constant file are declared here
- colors.dart: Application colors are declared here.
- strings.dart: Application common strings are declared here.
- style.dart: Application style functions and data are declared here.
- images.dart: Application images asset data are declared here.
- controller: All API service controls are located here.
- helper: Date converter, sqlite database helper and devendency injection file here
- language: Multi-language support class is here.
- models: A base class that holds some data and allows other classes to listen to changes to that data.
- services: All API configurations and Network service are located here.
- utils: Date converter and othersMethod here.
- view: All view type class and widgets here
- widgets: All the Widgets except for screen will be declared here.
- screens: FileName contents Screen at the end of name eg. DashboardScreen.
- Constant: All the constant file are declared here
- Pubspec.yaml:Application name and other project dependencies can be found here.
FEATURES LIST
- Splash screen
- Inro Screen
- Clean UI : All screen and widgets clean ui design
- User Sign In: Register users as Wordpress user. Login & Registration Google and Facebook with username/email and password. Guest login – Access the app & contents without login.
- Shimmer Loading: Shimmer effects are loading indicators used when fetching data from a data source that can either be local or remote
- Pull Refresh: Pull to refresh feature to refresh the contents anytime user wants.
- Multi-language Support : You can add your own language to the app with the easiest way.
- RTL RTL support for rtl type languages like arabic, hebrew etc.
- Html Description: Content description supports images, gifs, videos, iframe videos, tables, lists, custom html & css designs, etc.
- Flash Deal: You can set the flash deal product directly from your wordpress dashboard and show app
- Toady's Deal: The app will show the todays deal prodcut from your wordpress site.
- Brands: The app will show the brands from your wordpress site.
- Categories, Sub-Categories & Child-Categories: The app supports both categories, sub-categories & child-categories. You can filter categories, sub-categories & child-categories product
- Review: Product all reviews show with product
- Product Reviews: Reviews and ratting show inside product
- Search And Filter: Real-time search and advance filter inside product
- Slider Banner: The app will show the promotion slider banner from your wordpress site.
- Account: User profile, order history and service.
- Coupon: The app will show the order coupon from your wordpress site.
- Cart: Product add to cart then buy cart selected item.
- Checkout: Cart item and single product checkout page redirect
- Create Order: Your favorite item buy now
- Order List: The app will show the order list base of status from your woocommerce site.
- Order Tracking: Your order tracking time and status
- Recent Views: Recent views product show from your recent views product
- Live Chat: Live chat user to admin
- Address Book: You can save shipping address and use order time.
- Dark Mode: You can change dark and light theme.
- Push Notifications : Admin can send push notifications directly from admin panel to all android & iOS users in just one click. Also send Push notification new product and update product.
- Cached Image: Used cache image service to save online images to local database for faster experience. Images.
- Bookmark : User also can save their favourite contents.
- Right-to-Left Animation: All screen open right side to left side
- Faceboook Group & Page: Joined Faceboook Group & Page just add link.
- Offline Database: SQLite.
- State Management: GetX
- Dependency Injection: Api client, Repository and controller add getx dependency injection
- Navigation Management: Open all screen use getx navigation management
- HTTP: Use flutter http package. Fetch all wordpress data this http request.
Installation
Flutter is Google’s UI toolkit for building beautiful, natively compiled applications for MOBILE, WEB, and DESKTOP from a single codebase. It is very easy to learn and currently it is getting more and more popular. With this blog post, you will learn some basic stuff about Flutter and after reading it, you will be able to create a simple application using this technology.
WordPress is a free and open-source content management system written in PHP and paired with a MySQL or MariaDB database. Features include a plugin architecture and a template system, referred to within WordPress as Themes.
Setup and Run Android studio
- Install Android Studio from https://developer.android.com/studio
- Extract the scource_code.zip. You will find this inside the main zip.
- Open the folder in your android studio.
- Even if you are building an app for ios, use android studio for the build.
- Then in your android studio terminal run:
flutter pub get ** You need this to get all 3rd party packages from pub.dev
Setup wordpress
Installation of WordPress Blog with Cpanel Requires:
- Getting Hosting & Domain Name
- Install WordPress
- Choose & Install a Theme
- Install Requires Plugin
- Write Your First Blog
WordPress Information
For WordPress Installation you can check the Famous 5-Minutes Install here: We Recommend to use Update version of PHP, Wordpress & Mysql
Recommended PHP Configuration Limits
White screen, demo content fails when importing, empty page content and other similar issues are all related to low PHP configuration limits. The solution is to increase the PHP limits. You can do this on your own, or contact your web host and ask them to increase those limits to a minimum as follows:
- 1. max_input_vars = 3000
- 2. memory_limit = 128M
- 3. max_execution_time = 300
- 4. max_input_time = 300
- 5. upload_max_filesize = 64M
- 6. post_max_size = 64M

Step 2
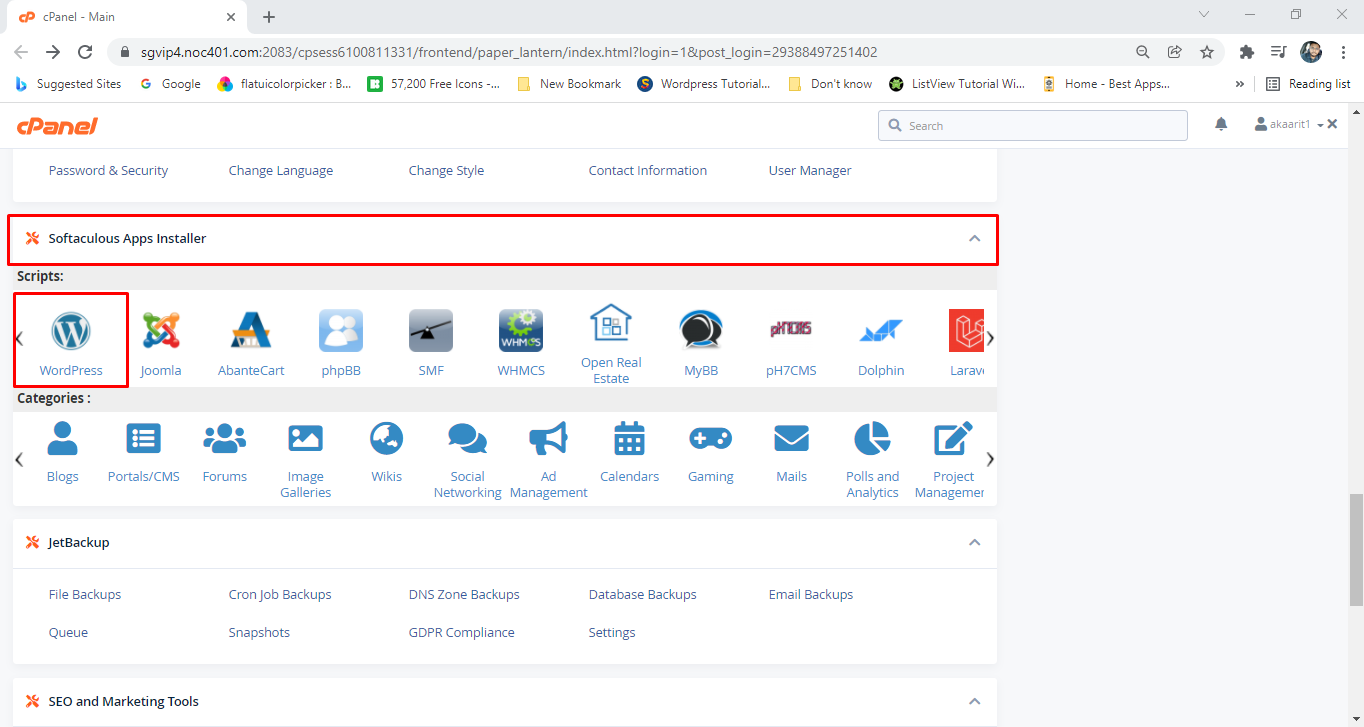
After login to cpanel, will find the softaculous apps installer or Wordpress. Click on Wordpress icon.
Step 3
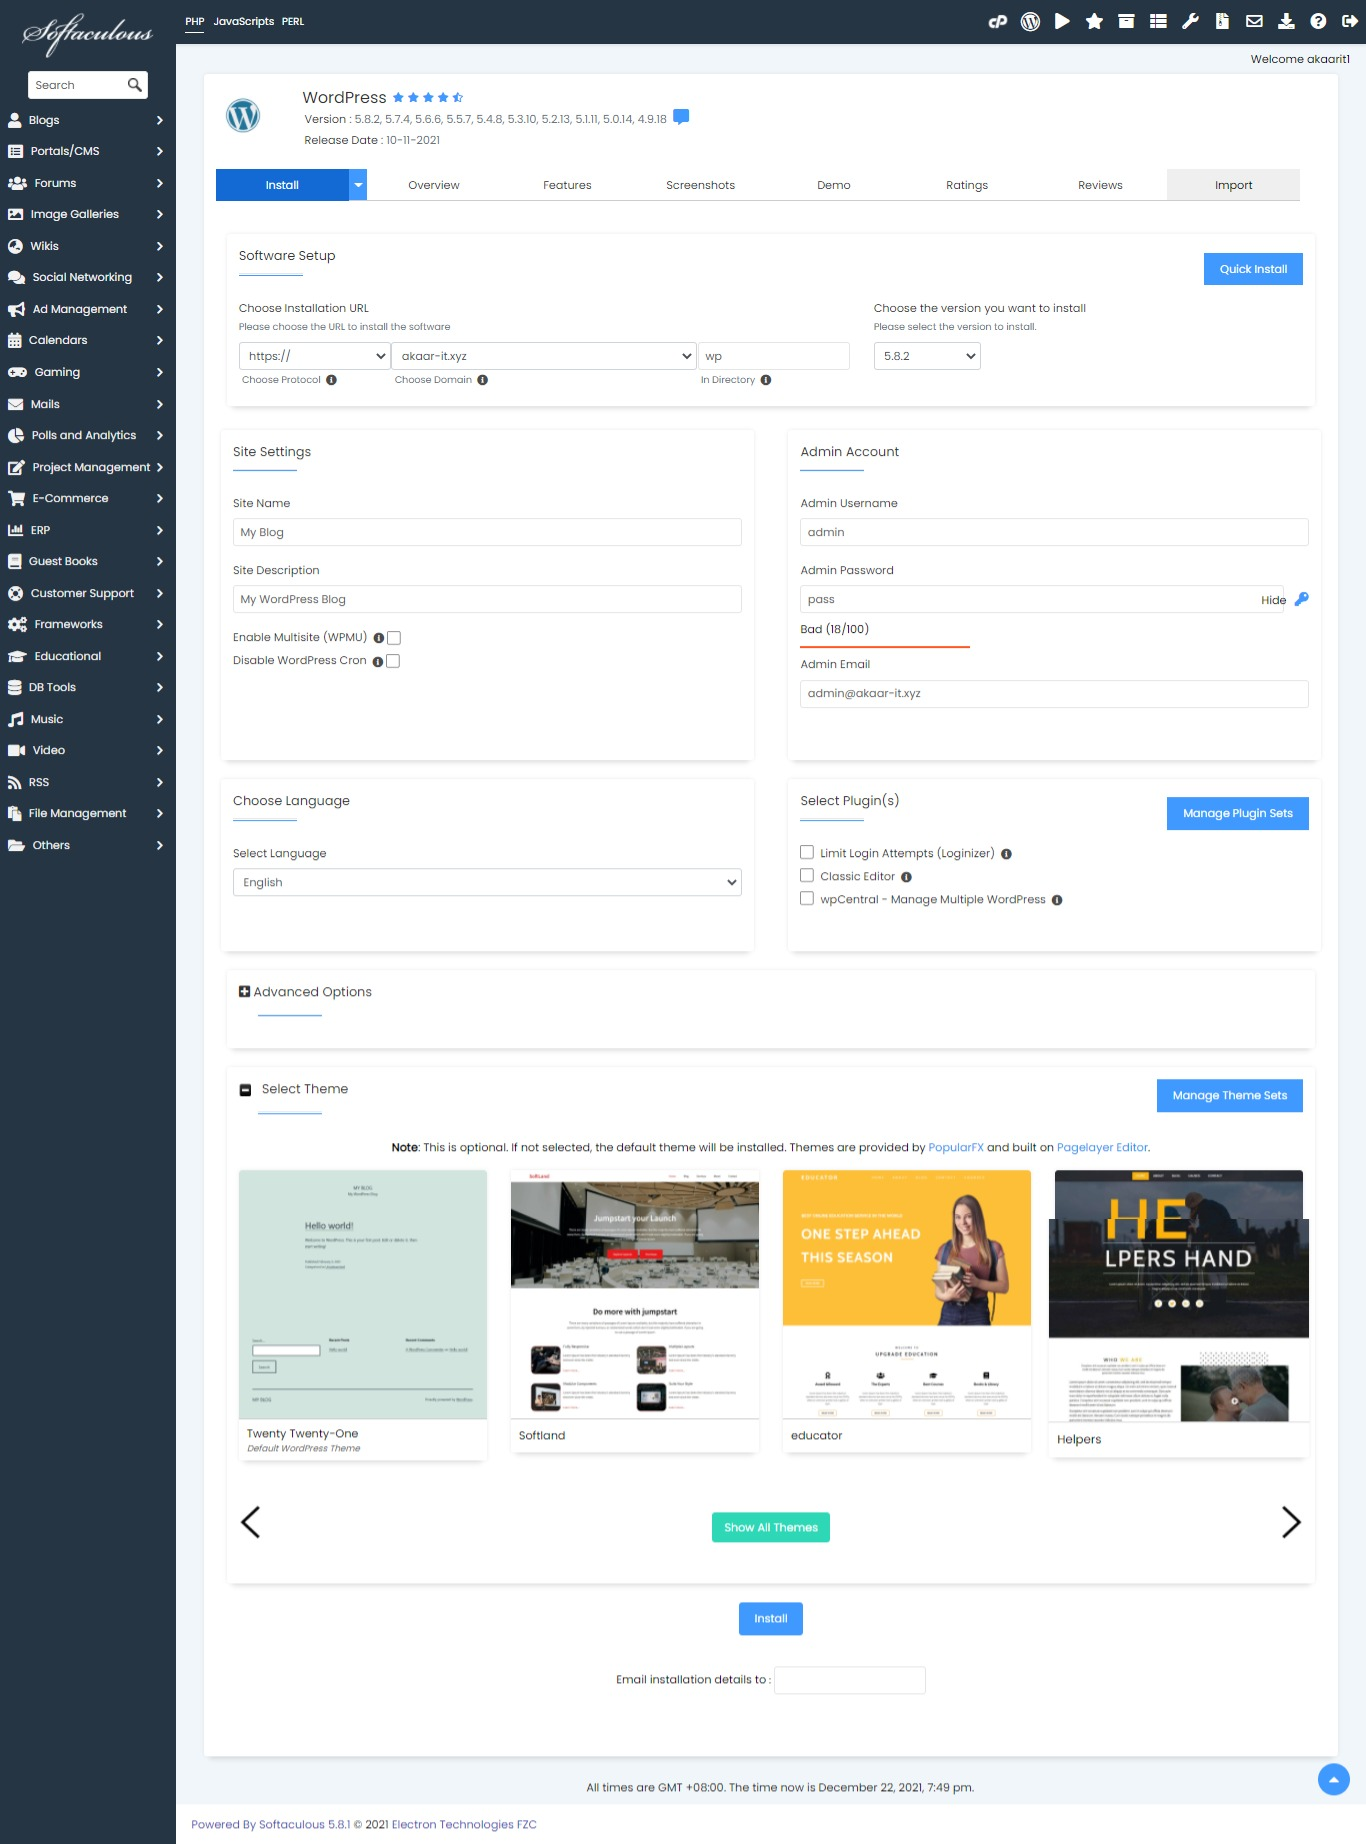
You will find the install button to install wordpress.

Step 4
After Clicking on Install button you will find a page requires to select your domain name where to install and set up the username, password. Then do the final installation of wordpress.
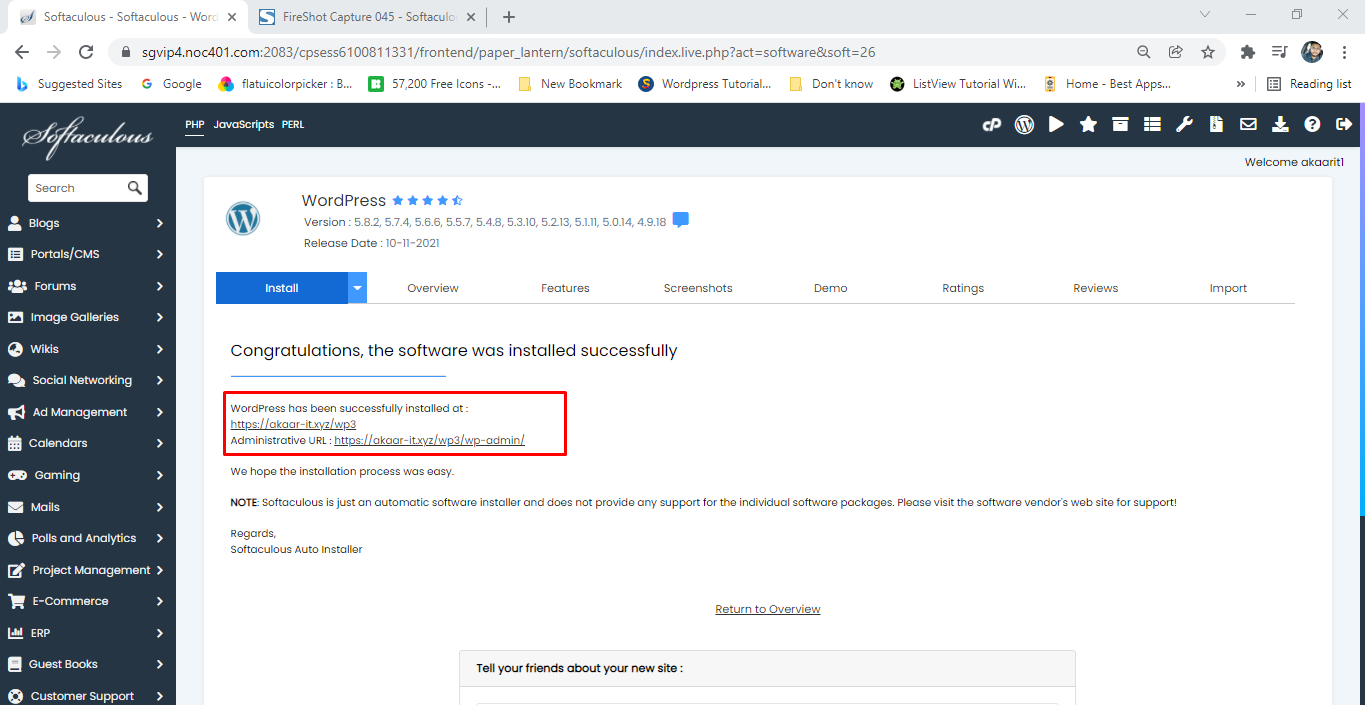
Step 5
Great! You are almost done. Now you can login via this link with username & Password.
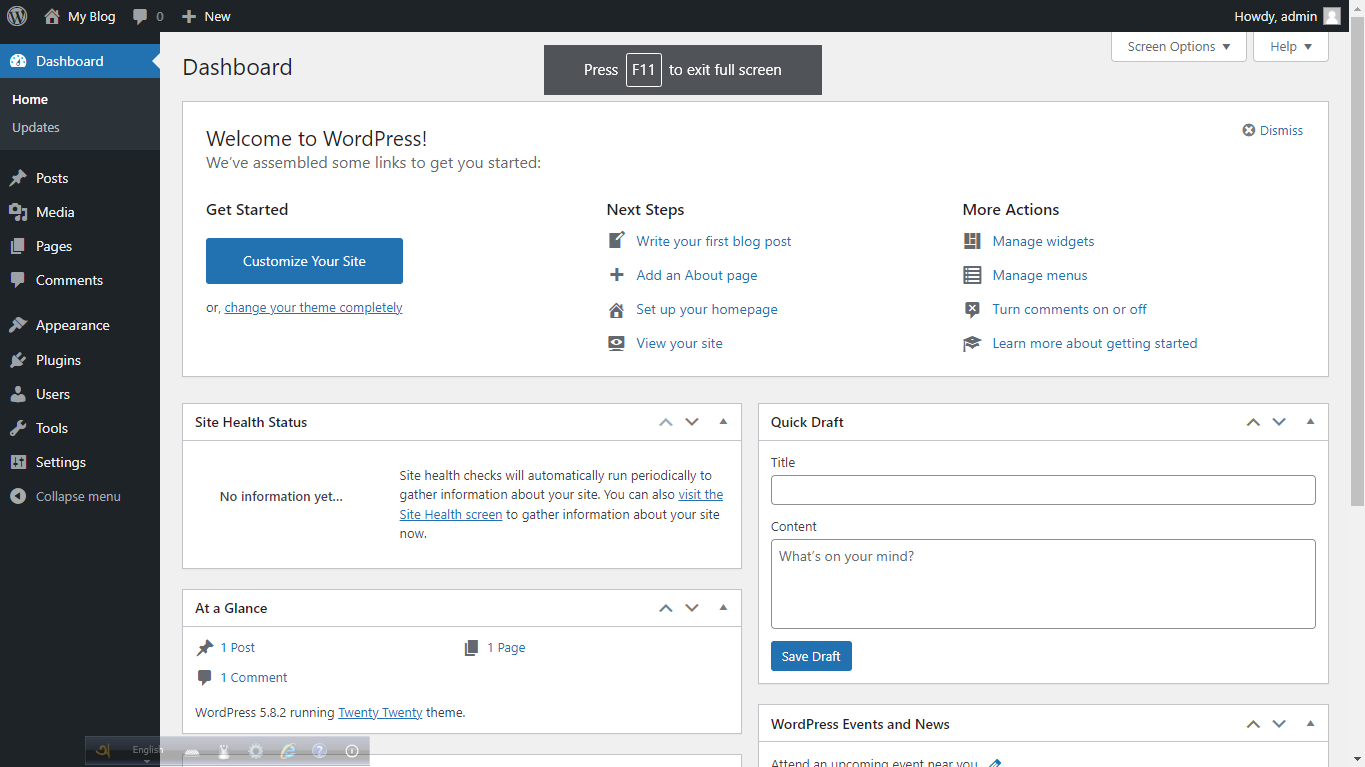
Step 6
Here the Dashboard of Wordpress Website.
Setup WooCommerce
WooCommerce can be installed the same as any other WordPress plugin. Full installation and configuration of WooCommerce on your site is an additional optional step to help with full setup, this is available in the Setup wizard
Installation via WordPress Admin
If you have an existing site and want to install WooCommerce, using the WordPress Admin is the most straightforward option as it handles everything for you.
Installation
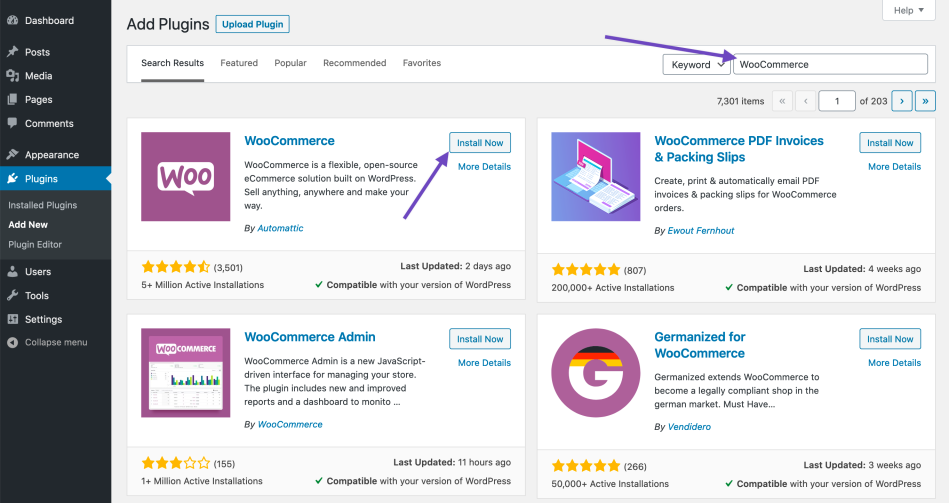
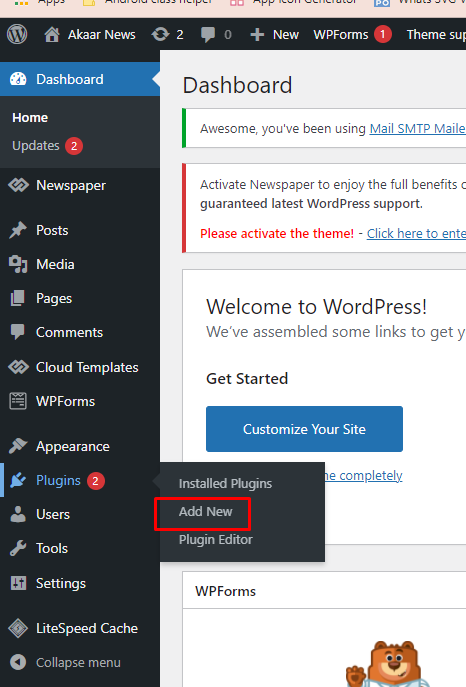
- Go to: Plugins > Add New.
- Search for “WooCommerce”.
- Click Install Now.
- Click Activate Now and you’re ready for the WooCommerce Wizard.
WooCommerce Setup Wizard
When WooCommerce is activated for the first time, the WooCommerce Setup Wizard will be the next screen you see after clicking “Activate”.
This helps you set up and configure your site with WooCommerce functionality.
For a full walkthrough of the Setup Wizard (also known as the Onboarding Wizard), please read through the WooCommerce Setup Wizard documentation.
APIs
The tawk.to Live Chat app makes it easy to monitor and chat with visitors on all your WordPress websites and Mobile App. Be there when they need you with unlimited
Setup Live Chat(tawk.to)
Follow Steps:
- For tawk.to setup, Reference Link
- Don't have an account? Create free account
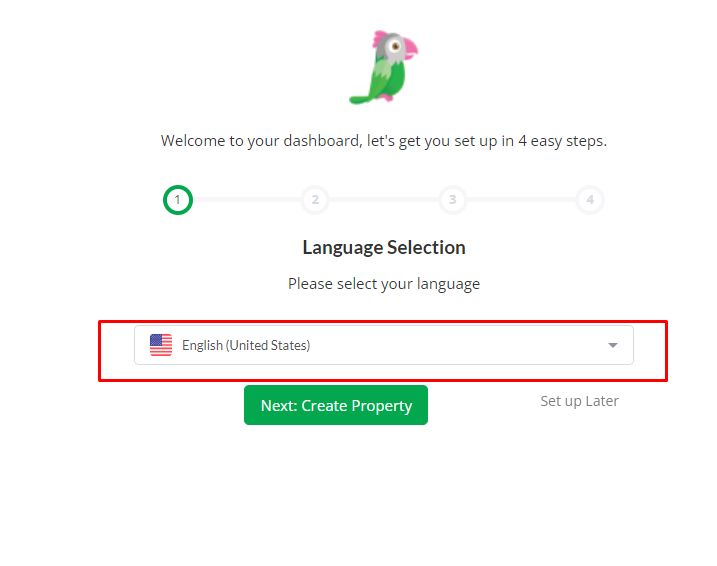
- Your name, email and password enter then create account.
- Please select your languge then click Next button
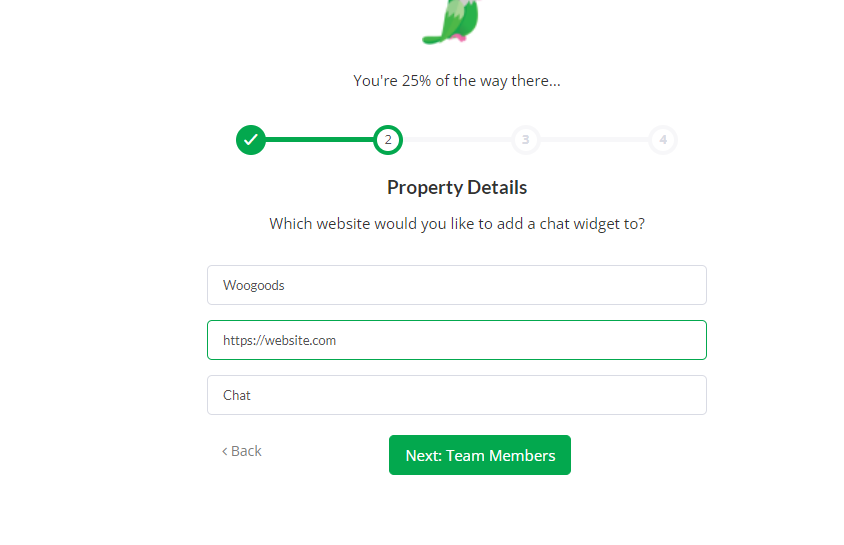
- Your website name and url enter then click Next button
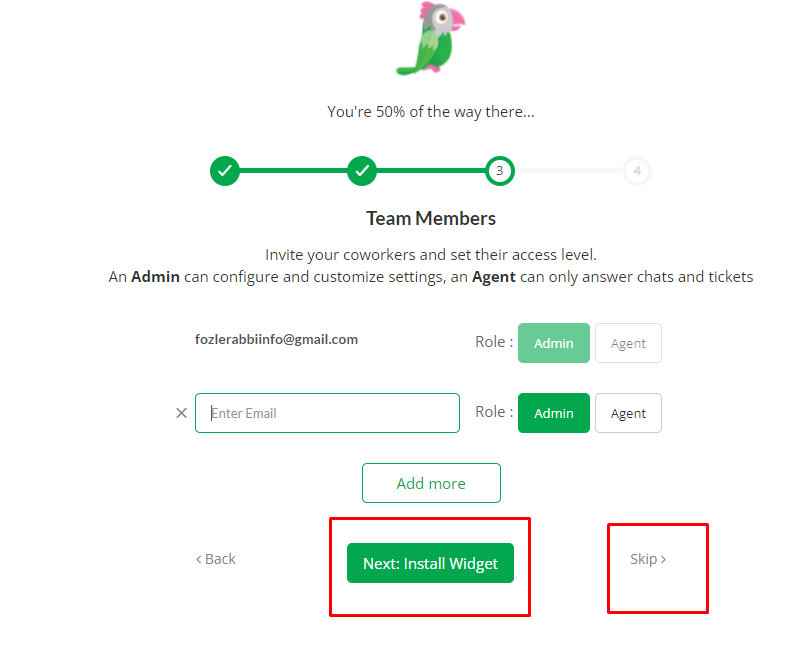
- Then click Skip button
- All create process complete then click Done button
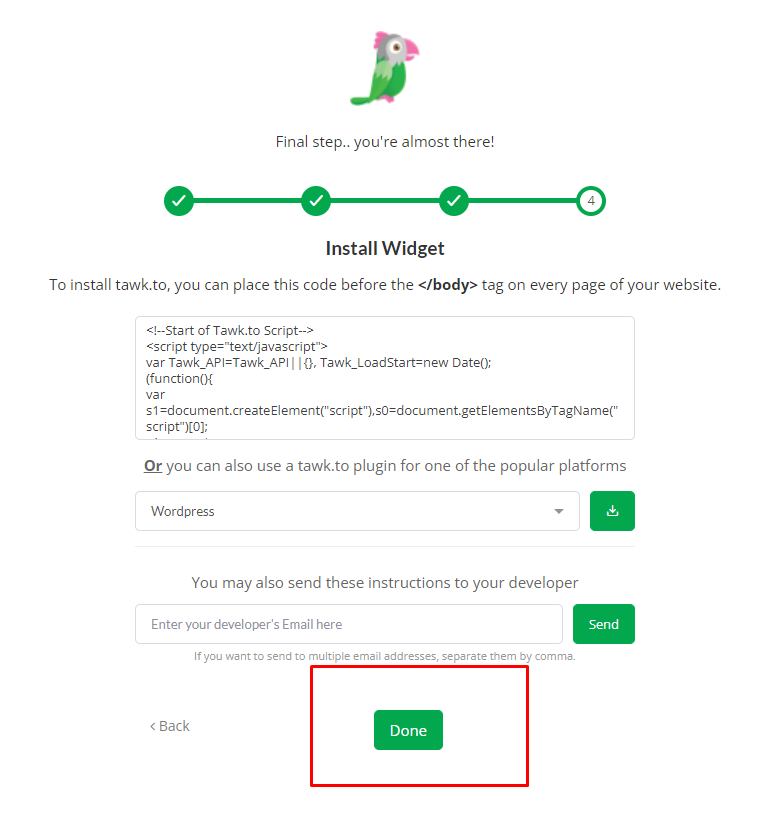
- Click setting button and open Administration section and click Chat Widget
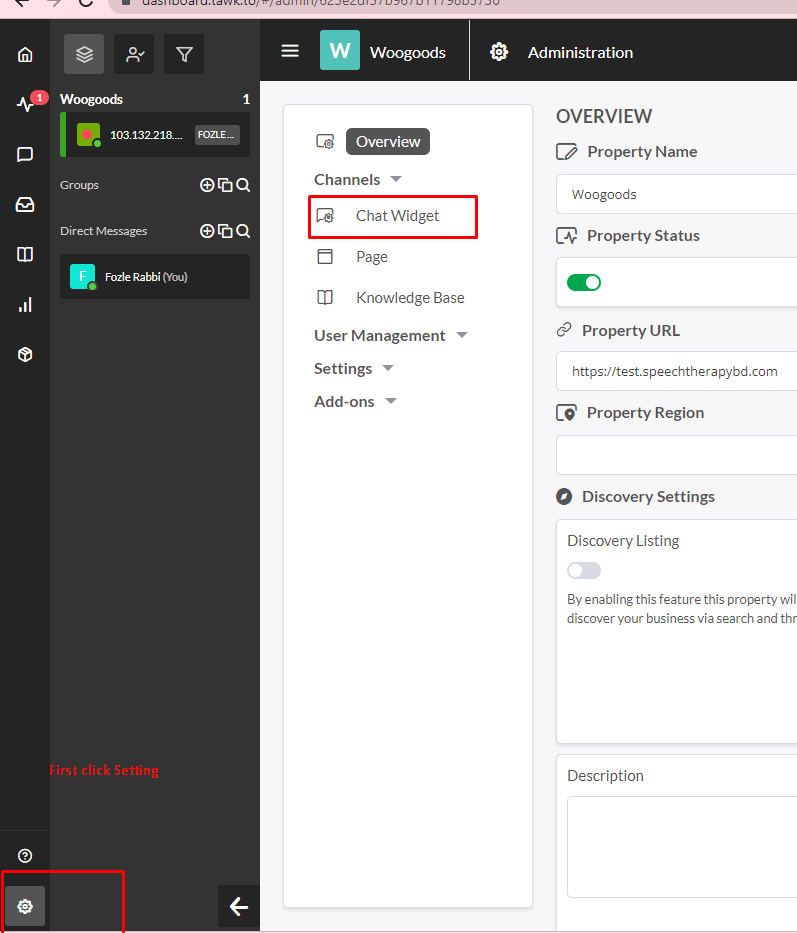
- Selected Chat Widget and copy direct chat link

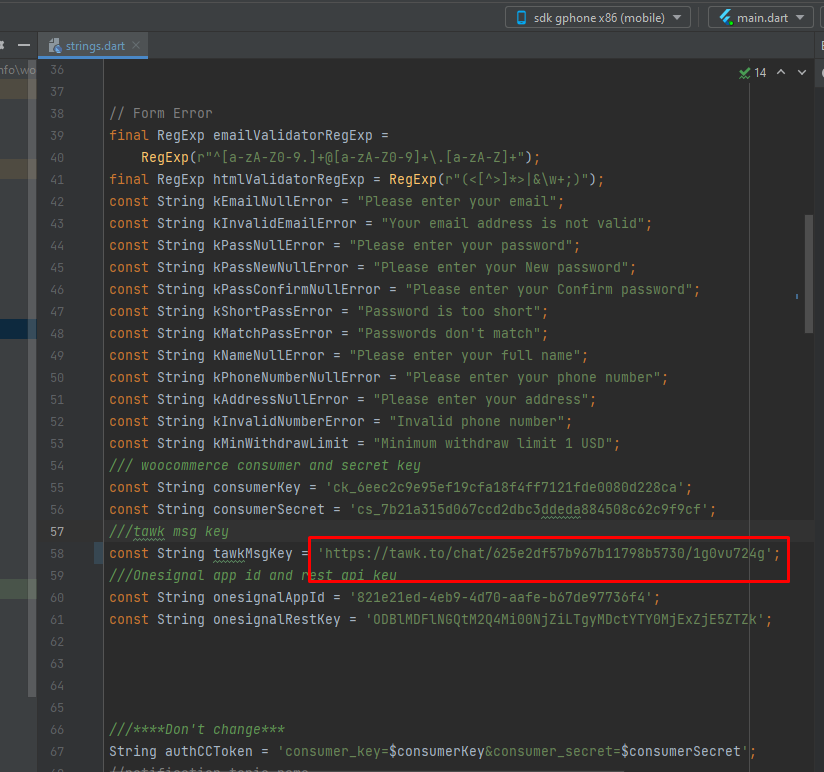
- Now come back to Application source code..
- Open lib/constants/strings.dart file. and paste direct chat link
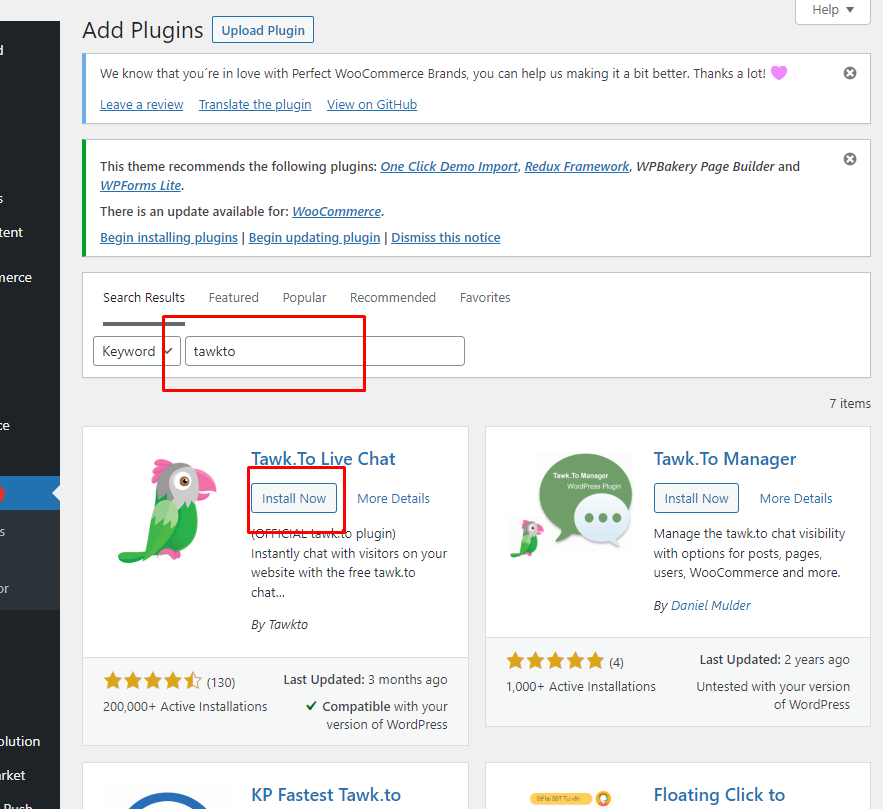
- Now come back to your website admin panel and click add plugin option.
- First search tawkto and click Install Now button with active this plugin.
- Now run the application. your live chat that complete.
Payment Gateway
A payment gateway is a technology used by merchants to accept debit or credit card purchases from customers. The term includes not only the physical card-reading devices found in brick-and-mortar retail stores but also the payment processing portals found in online stores.
Stripe Gateway
Follow Steps:
- For Stripe setup, Reference Link
- Sign In / Sign Up StripeLink
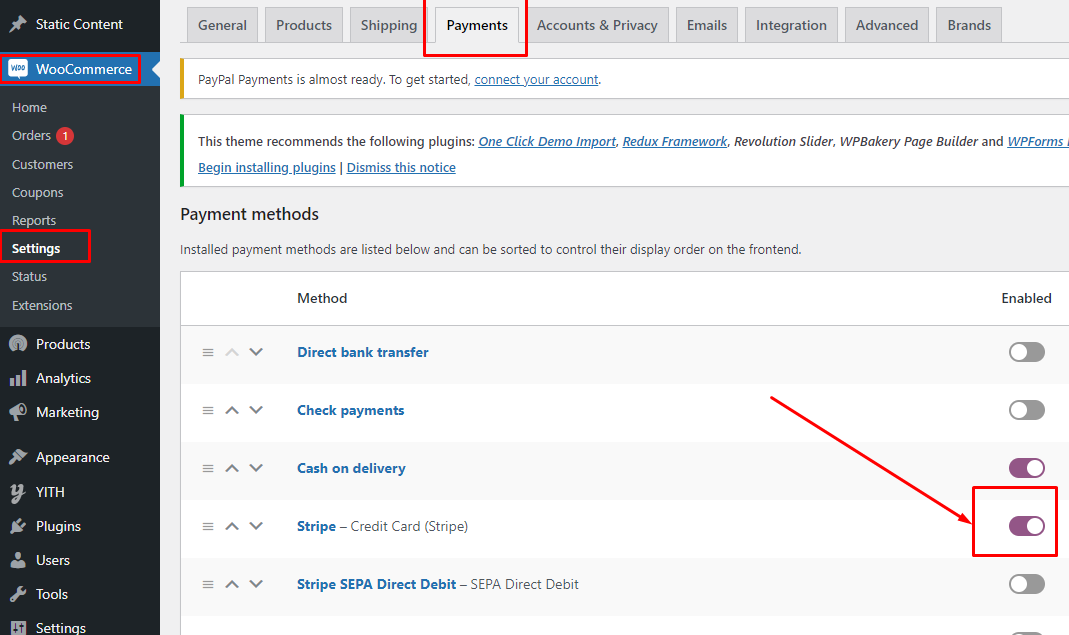
- Open your admin panel dashboard screen
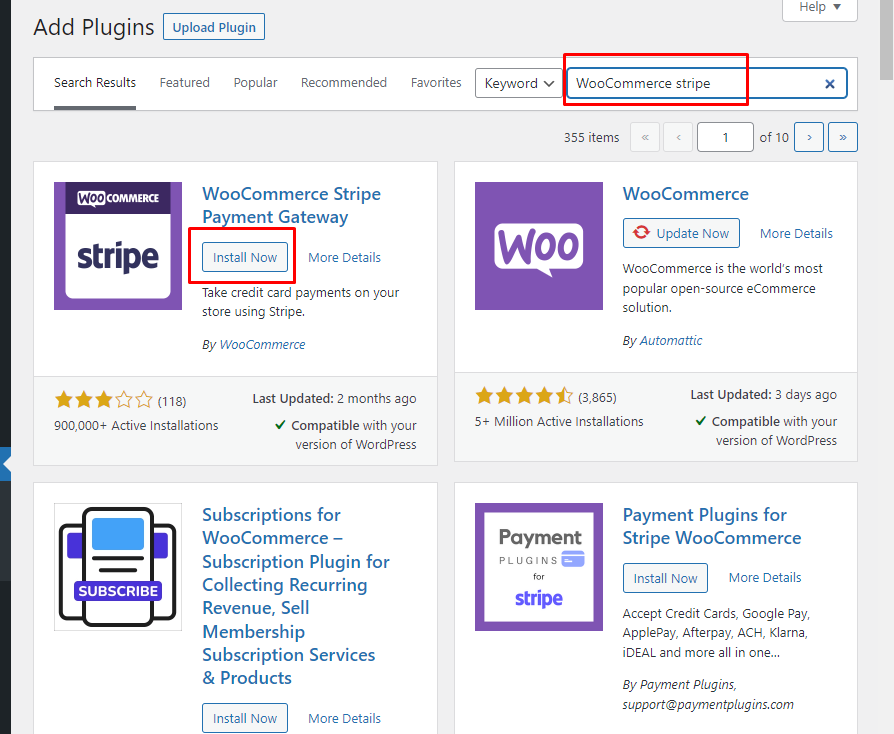
- Click Add plugin and search wooCommerce stripe then install and active this plugin.
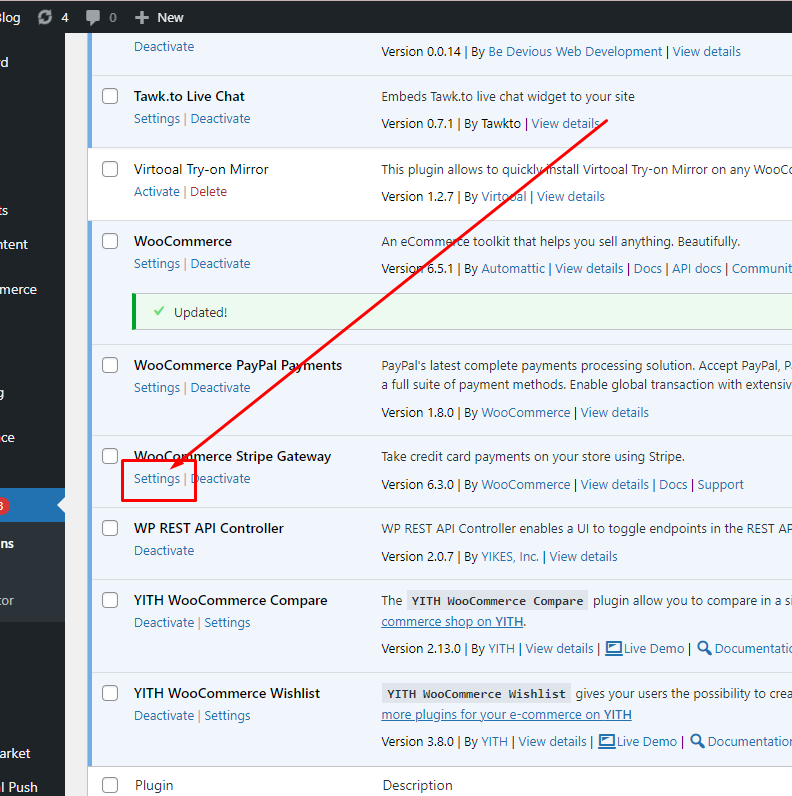
- Redirect plugin list, click wooCommerce stripe setting.
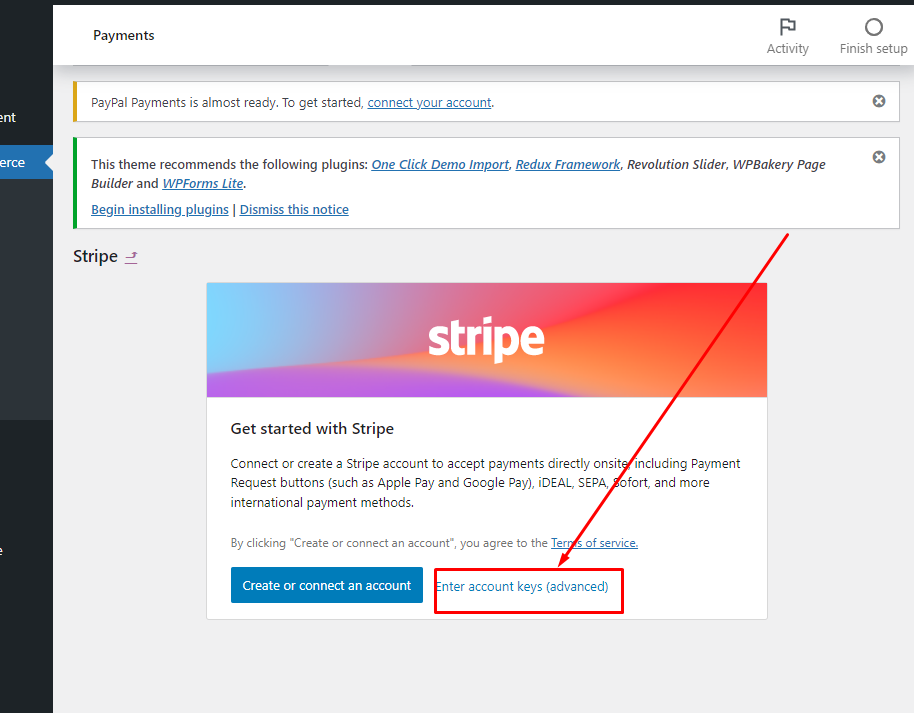
- Then click Enter account key button
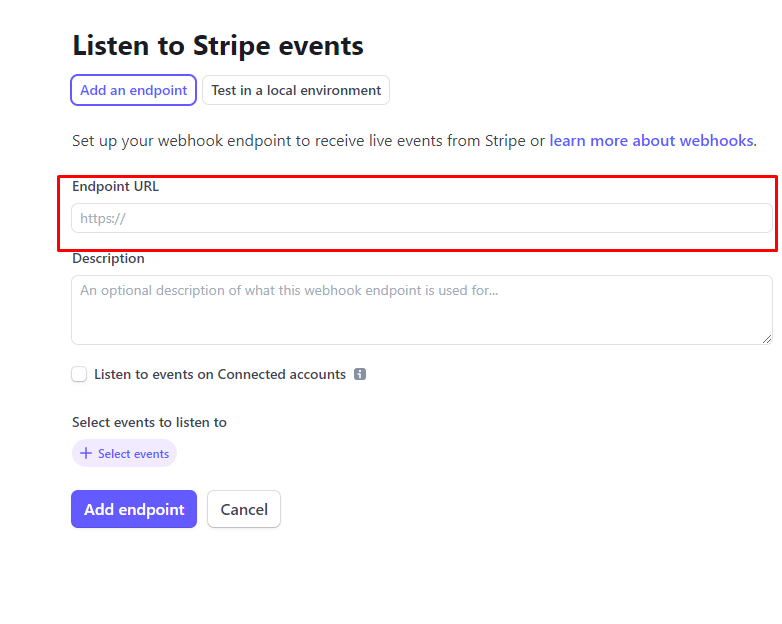
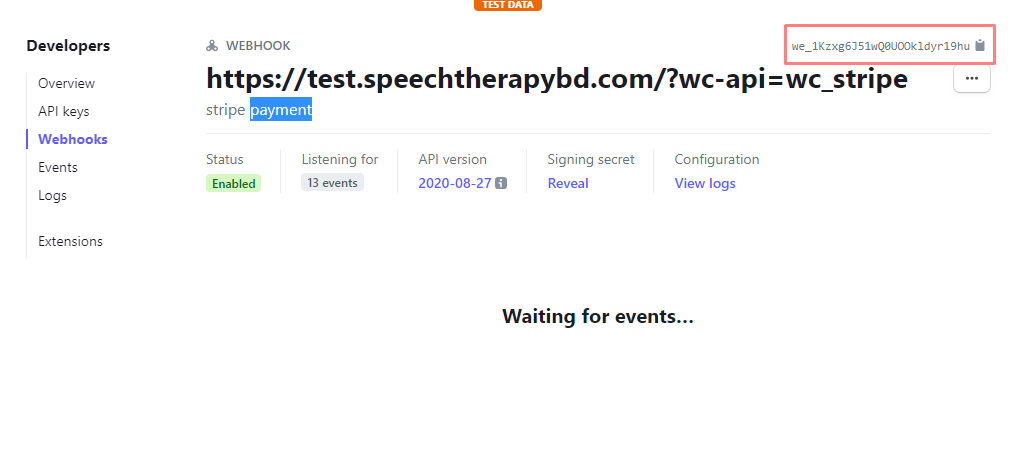
- Again open stripe dashboard/Developer/Webhooks/ and last click Add an endpoint
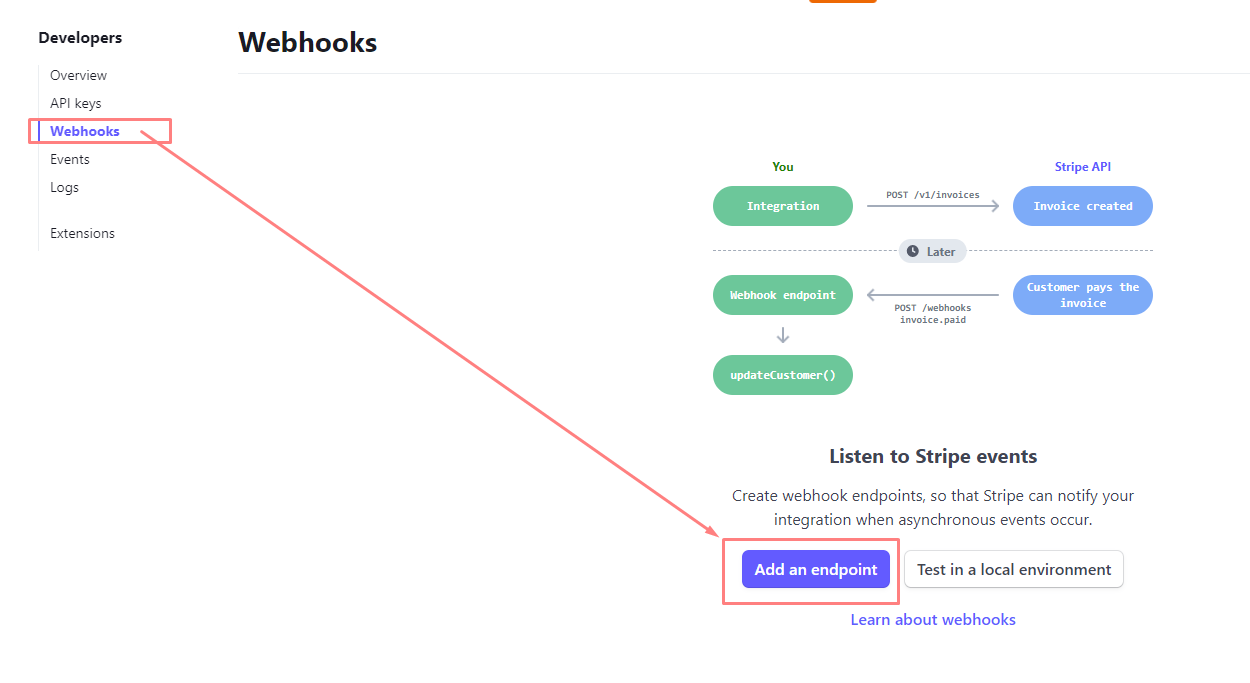
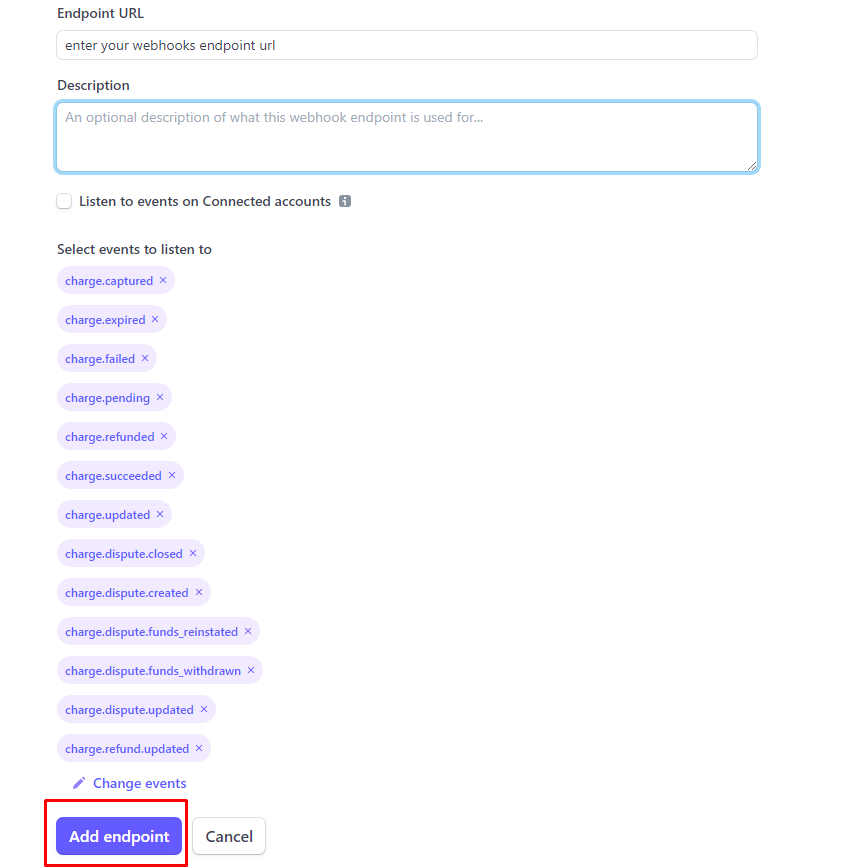
- Copy endpoint url and paste Endpoint URL filed
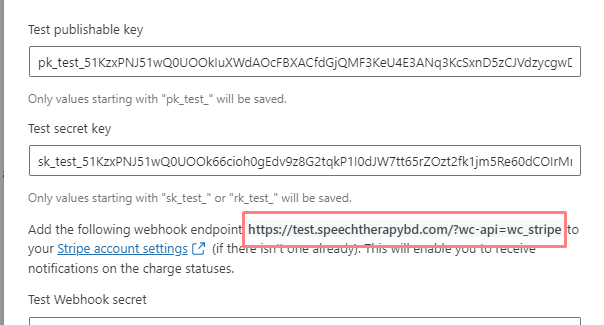
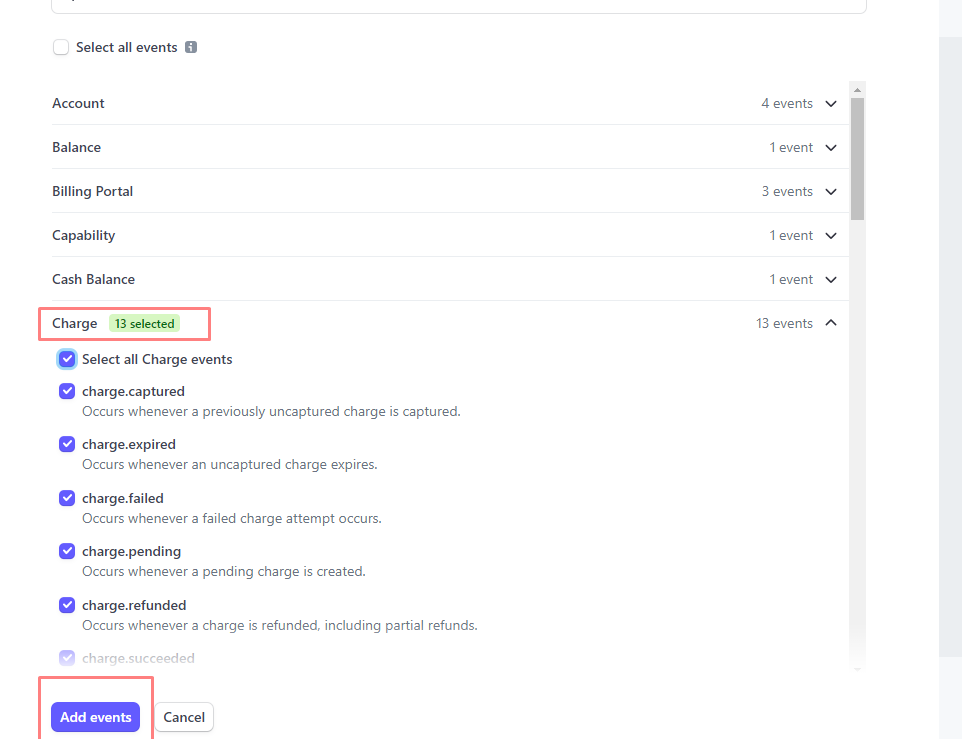
- Select charge events and click Add Events button. Then click Add endpoit button.
- Copy webhooks secret and paste your admin panel webhooks secret filed.
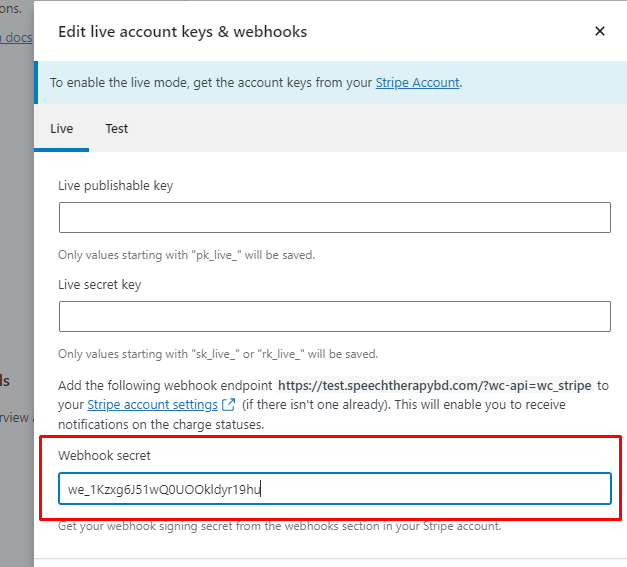
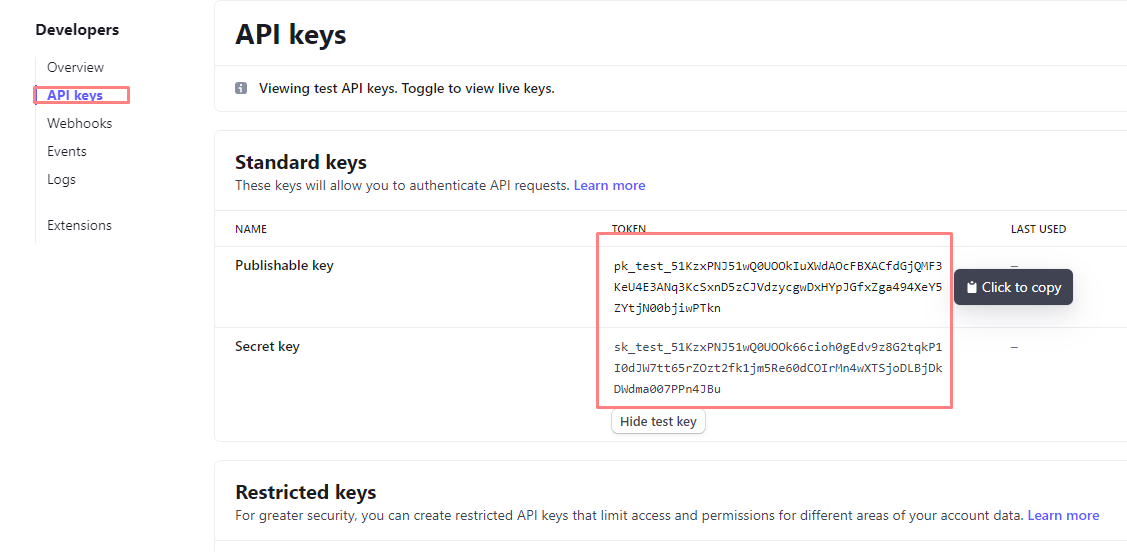
- Again open stripe dashboard/Developer/API keys/ copy Publishable and secret key then paste admin panel Publishable and secret key filed.
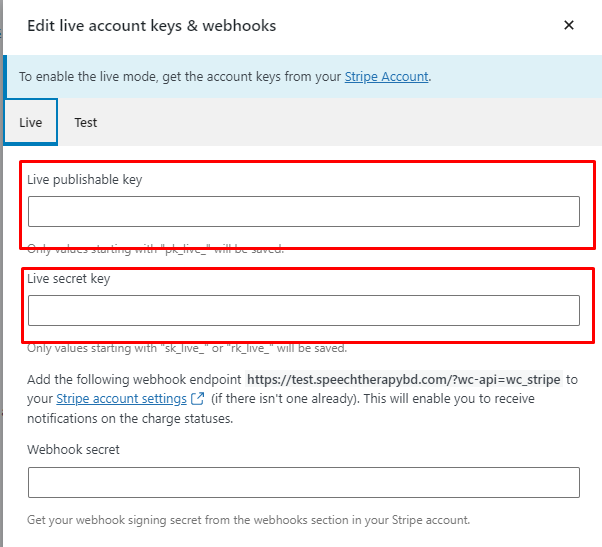
- Then check test connection and click Save live keys
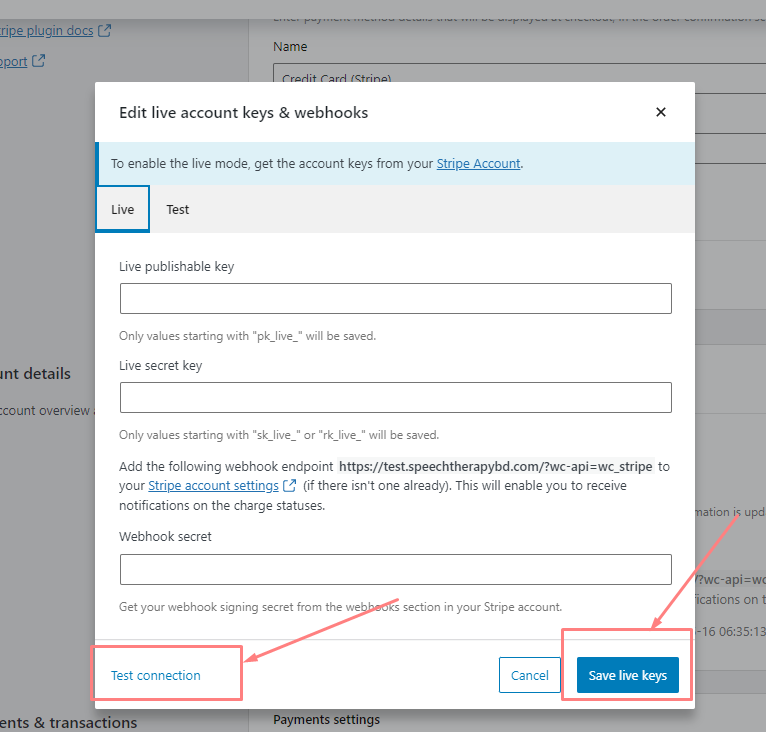
- Now all process complete then enable Stripe payment gateway.
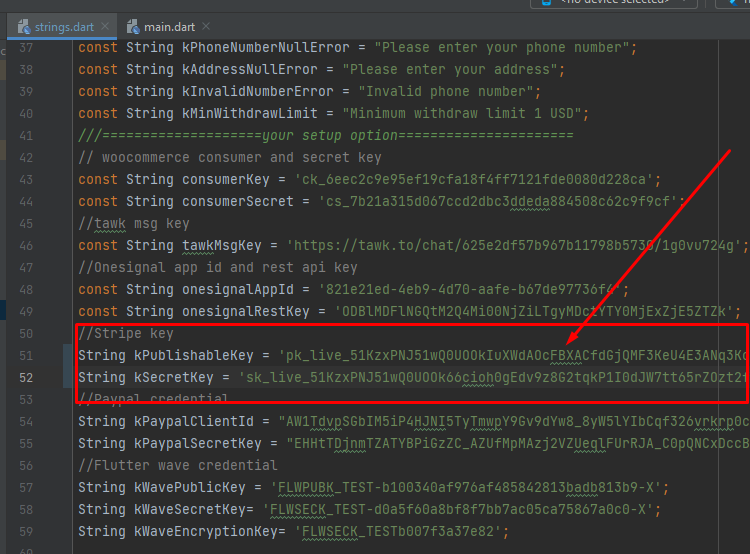
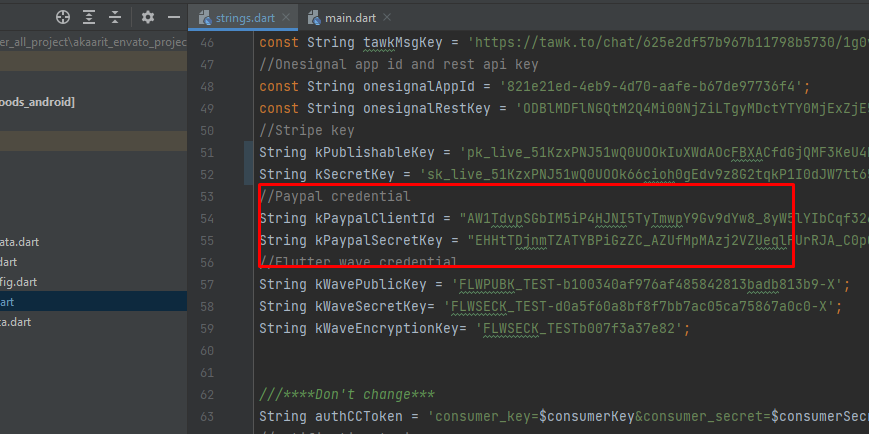
- Now come back to Application source code..
- Open lib/constants/strings.dart file. and paste Publishable and secret key
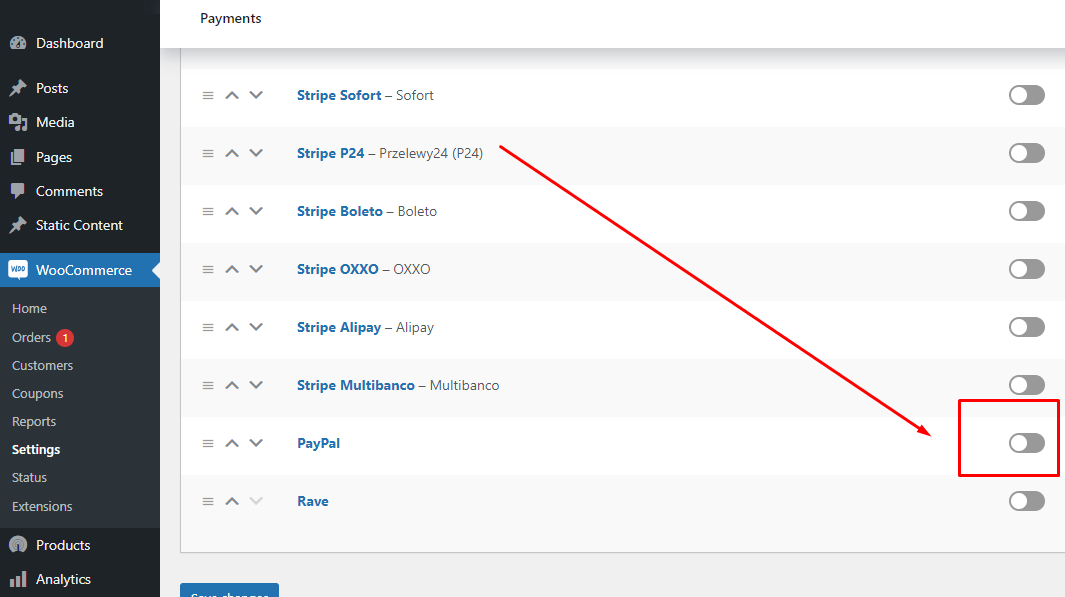
Paypal Gateway
Follow Steps:
- For Paypal setup, Reference Link
- Sign In / Sign Up StripeLink
- Open your admin panel dashboard screen
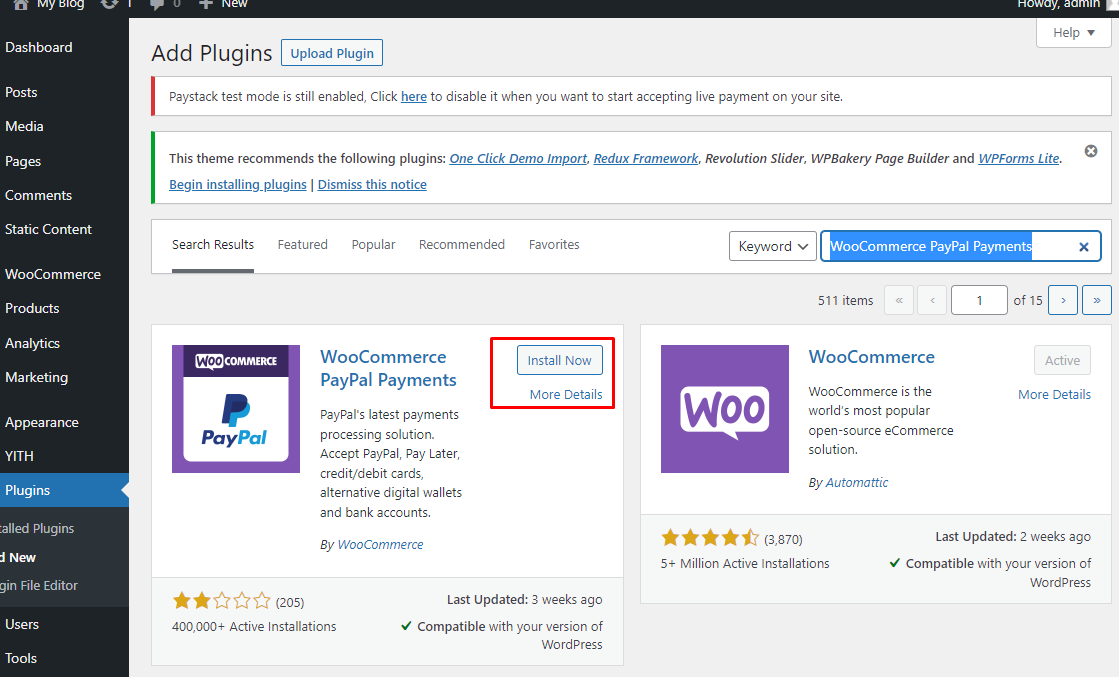
- Click Add plugin and search WooCommerce PayPal Payments then install and active this plugin.
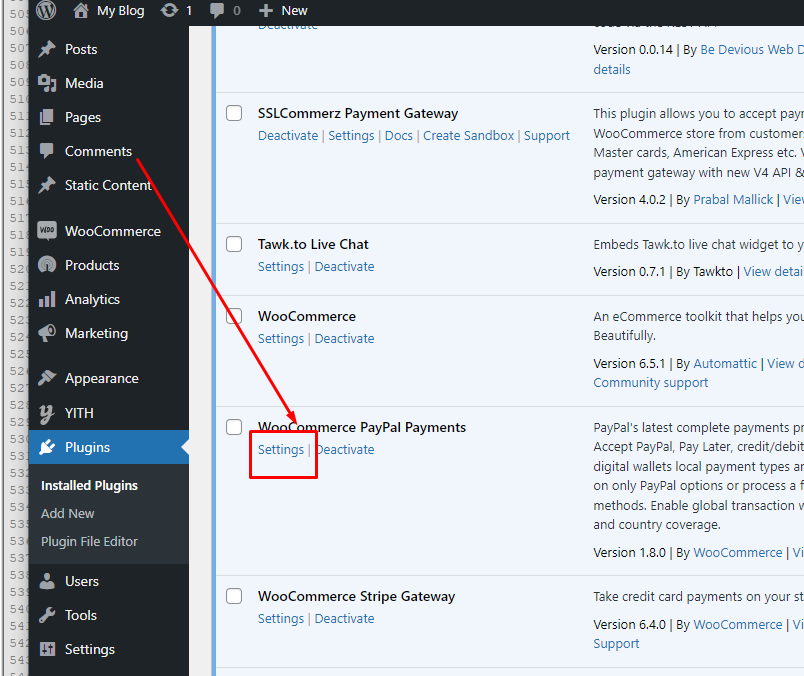
- Redirect plugin list, click WooCommerce PayPal Payments gateway Settings.
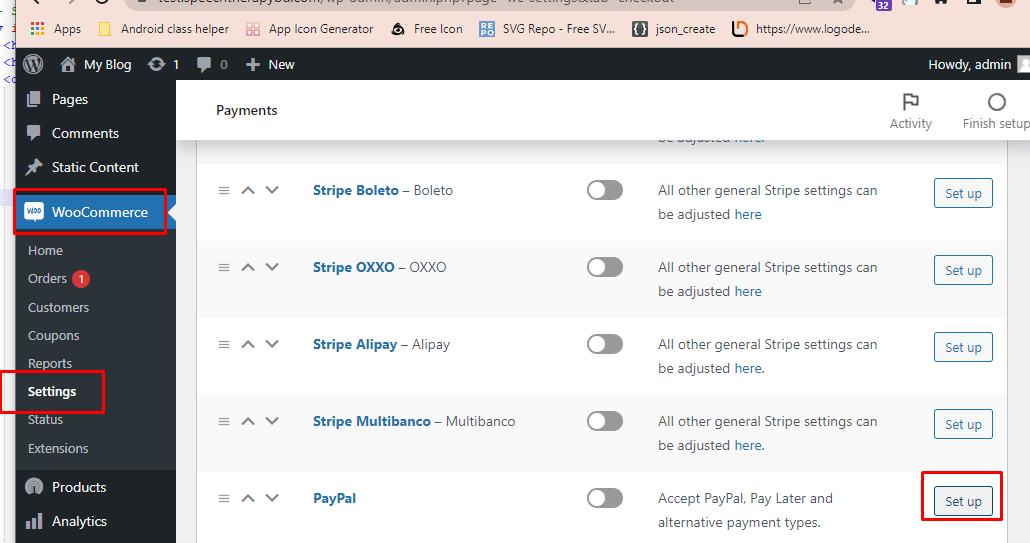
- Then open wooCommerce settins screen and click Payment tab. Now click setup button.
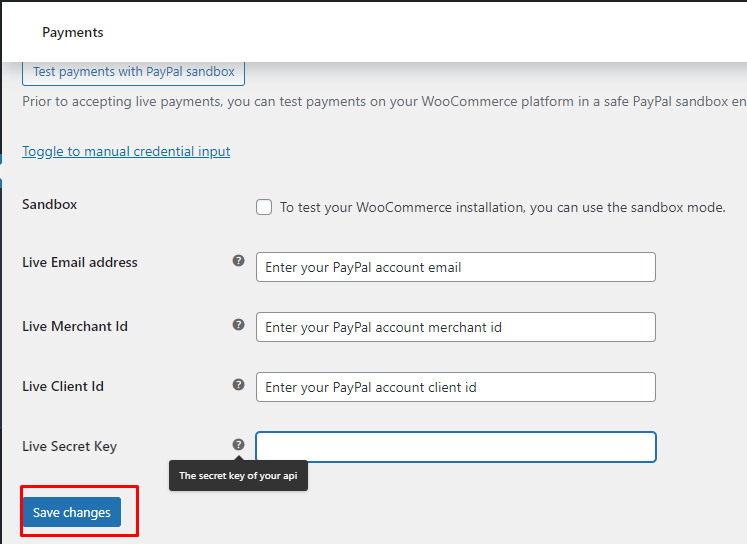
- Click Active Paypal button or menual added paypal credentials. note: your paypal credentials get paypal account dashboard
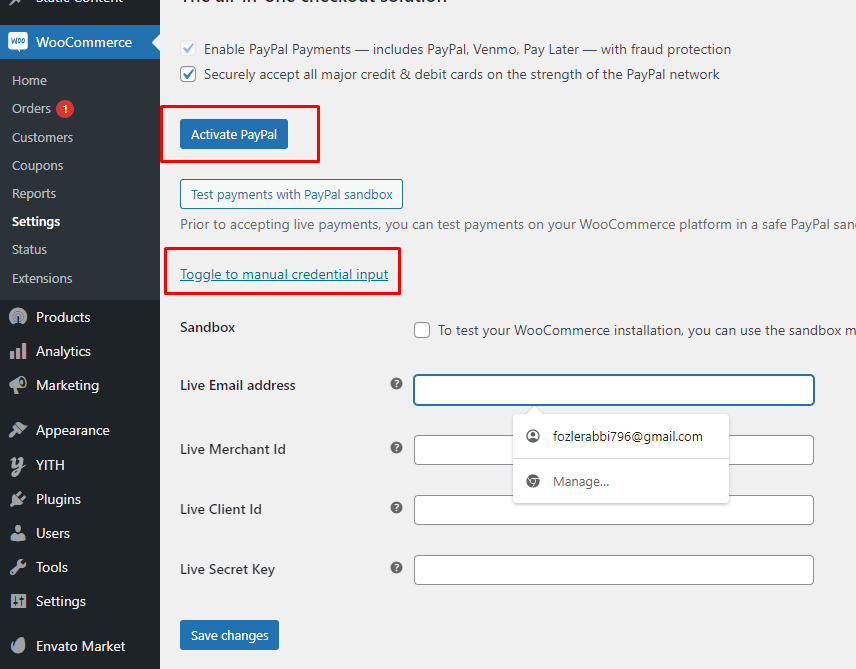
- If you have added a manual, click the Save changes button
- Now all process complete then enable Paypal payment gateway.
- Now come back to Application source code..
- Open lib/constants/strings.dart file. you paypal public and secret key get paypal account dashboard and paste Public and secret key.
Paystack Gateway
Follow Steps:
- For Paystack setup, Reference Link
- Sign In / Sign Up and Full Setup your acountLink
- Open your admin panel dashboard screen
- Click Add plugin and search wooCommerce stripe then install and active this plugin.
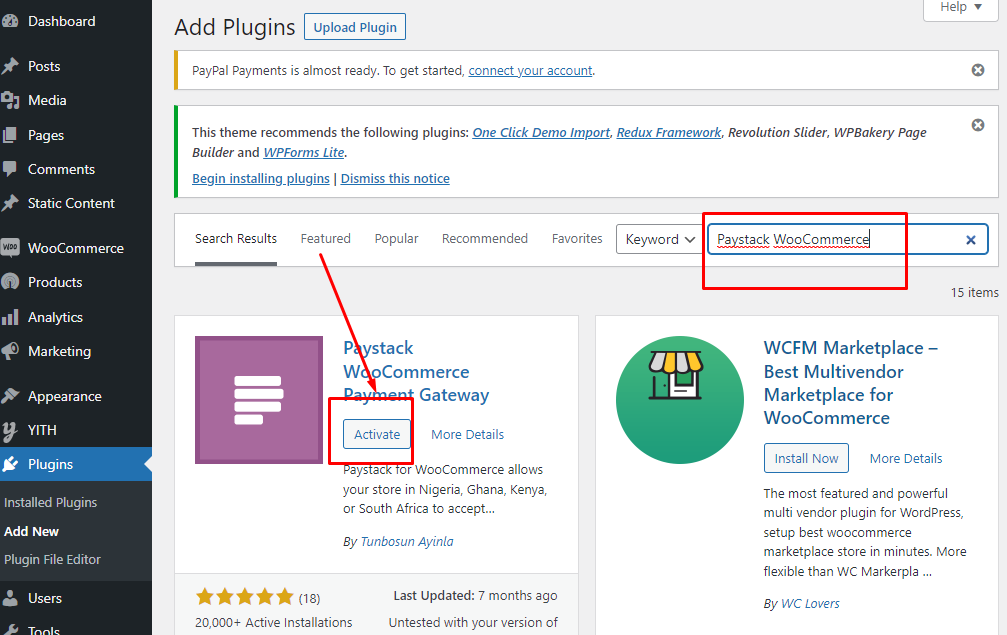
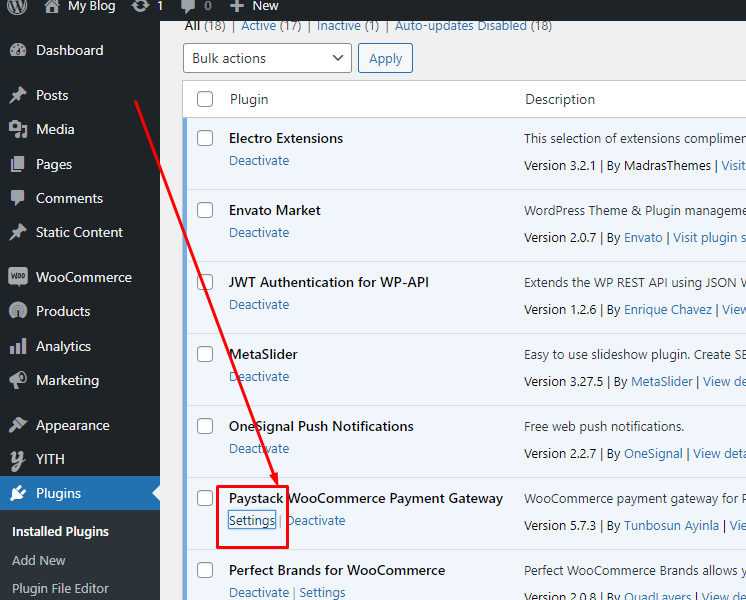
- Redirect plugin list, click Paystack wooCommerce payment gateway Settings.
- Copy webhooks URL. flow below image
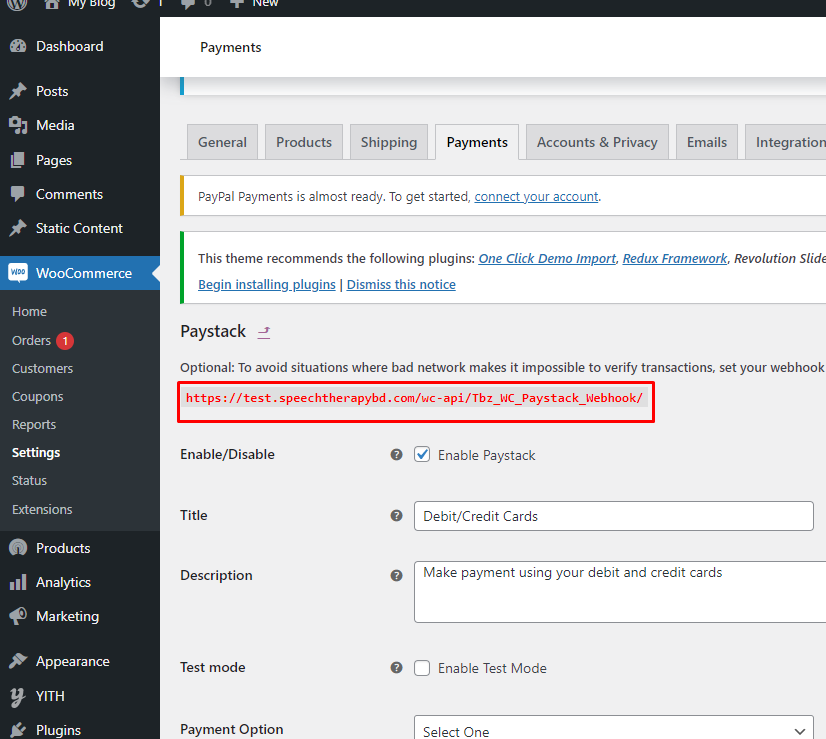
- Now open your paystact dashboard. Open setting screen then click Api keys and Woobhooks tab
- This copy URl paste Webhooks filed and click Save Changes button
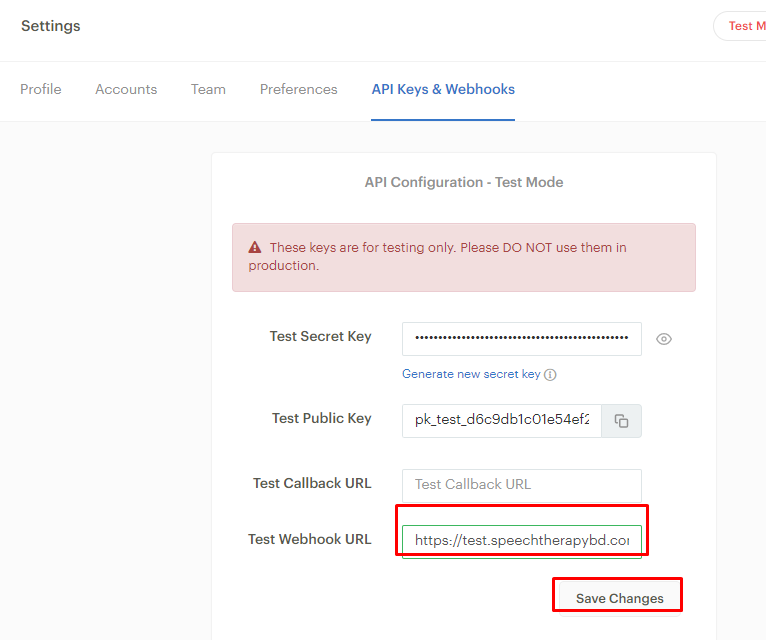
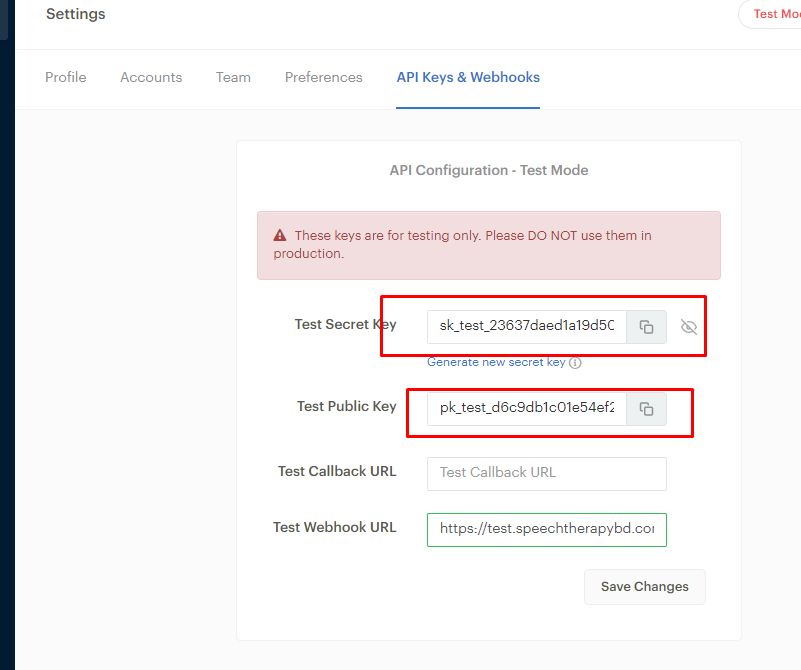
- Copy secret key and public key. flow below image
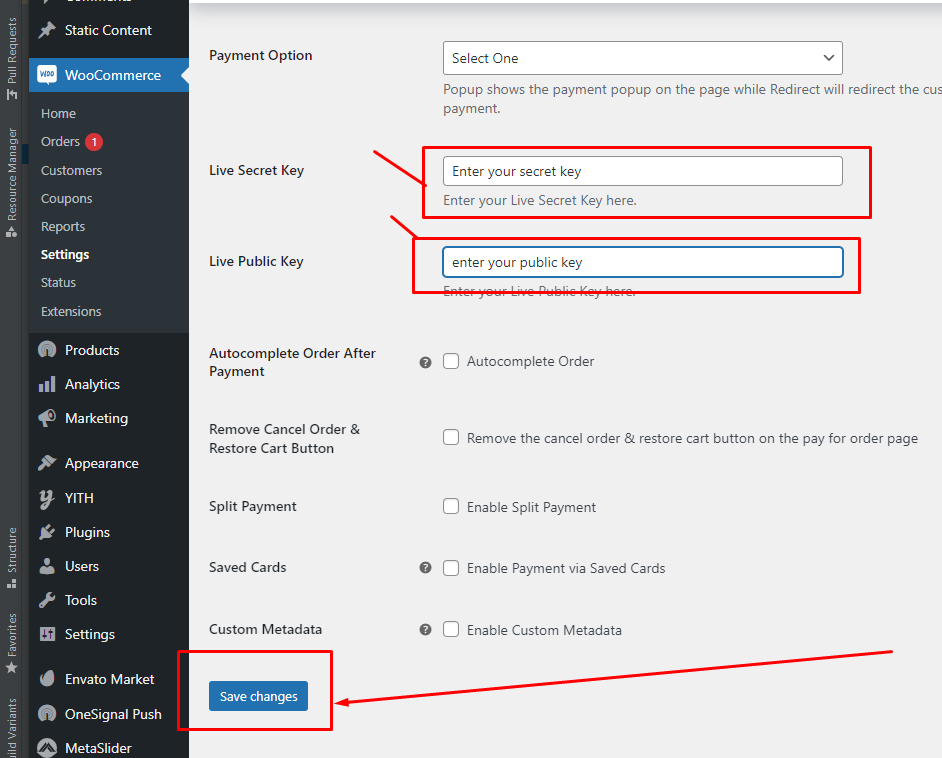
- Now back admin panel paystact payment tab
- This secret and public key copy URl paste Secret and public key filed and click Save Changes button
- Now come back to Application source code..
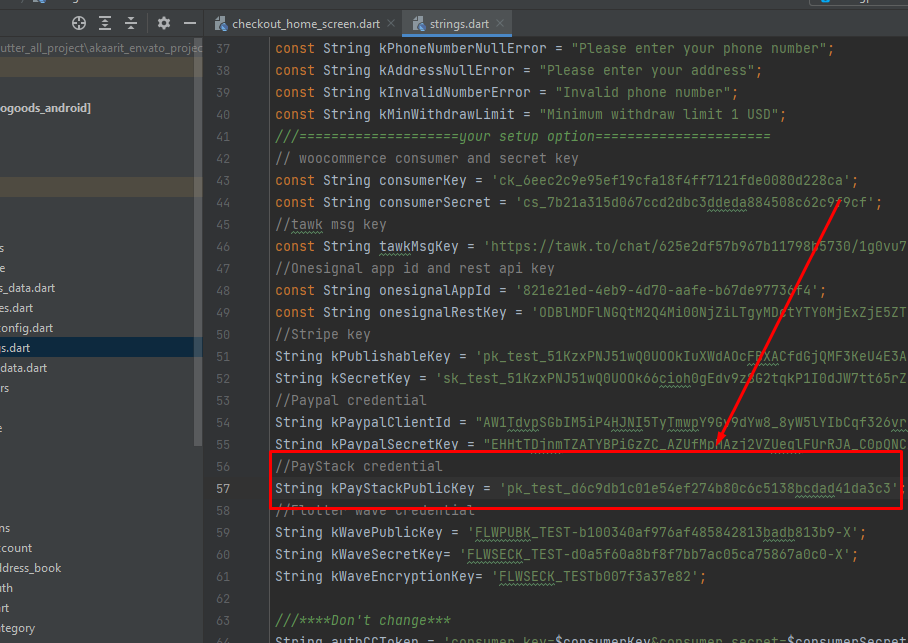
- Open lib/constants/strings.dart file. you paystack public get paystack account dashboard and paste Public.
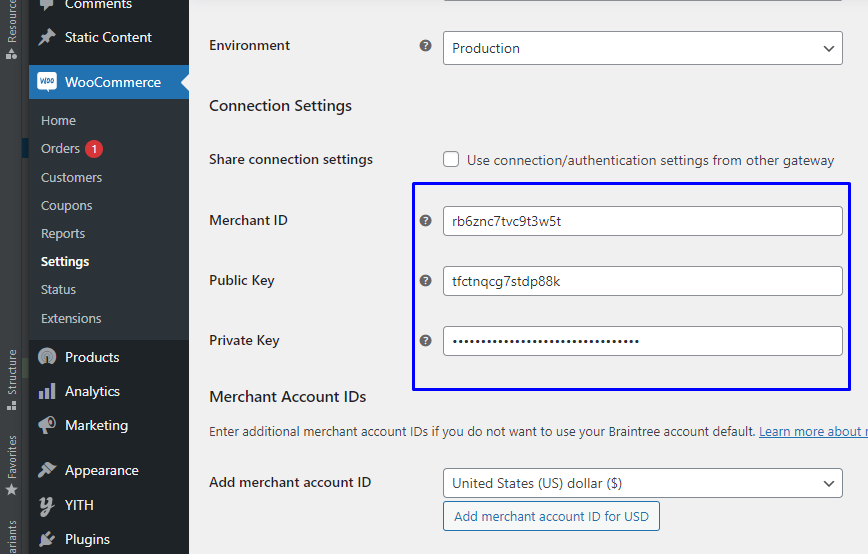
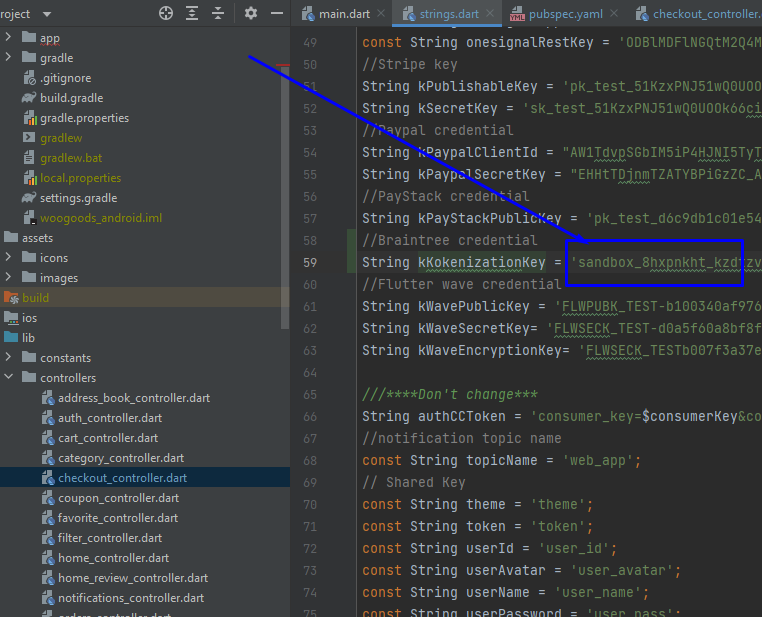
Braintree Gateway
Follow Steps:
- For Braintree setup, Reference Link
- Sign In / Sign Up and Full Setup your acountLink
- Open your admin panel dashboard screen
- Click Add plugin and search Braintree for wooCommerce then install and active this plugin.
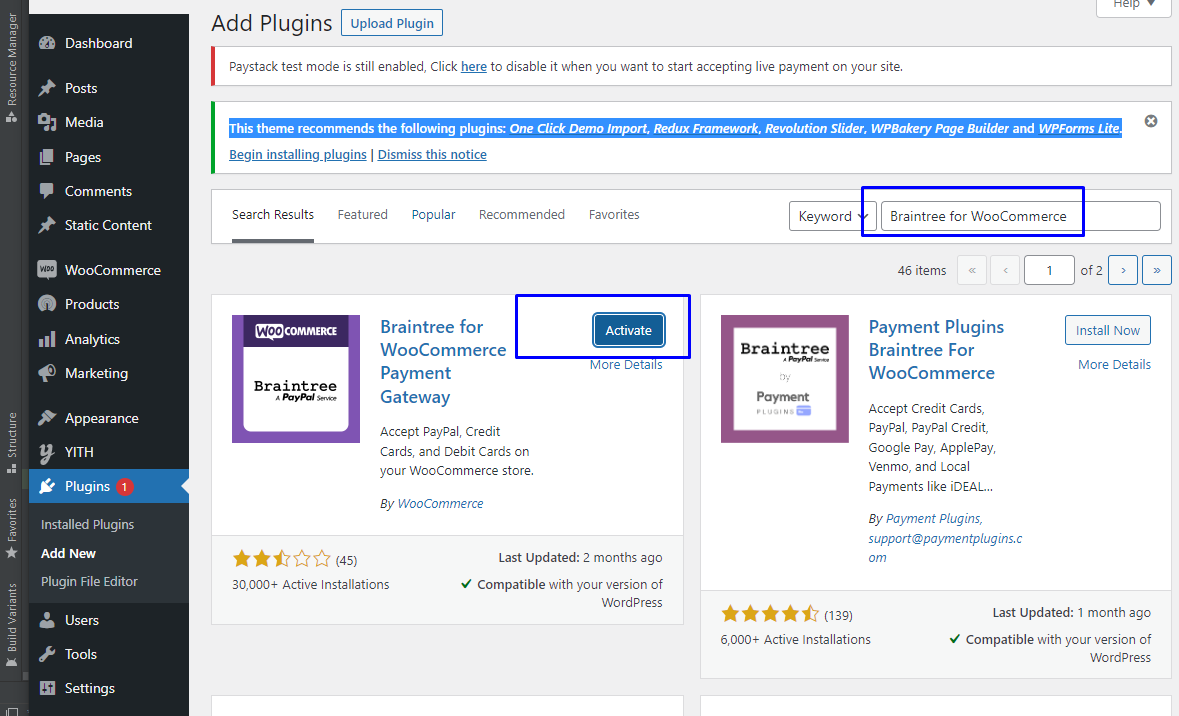
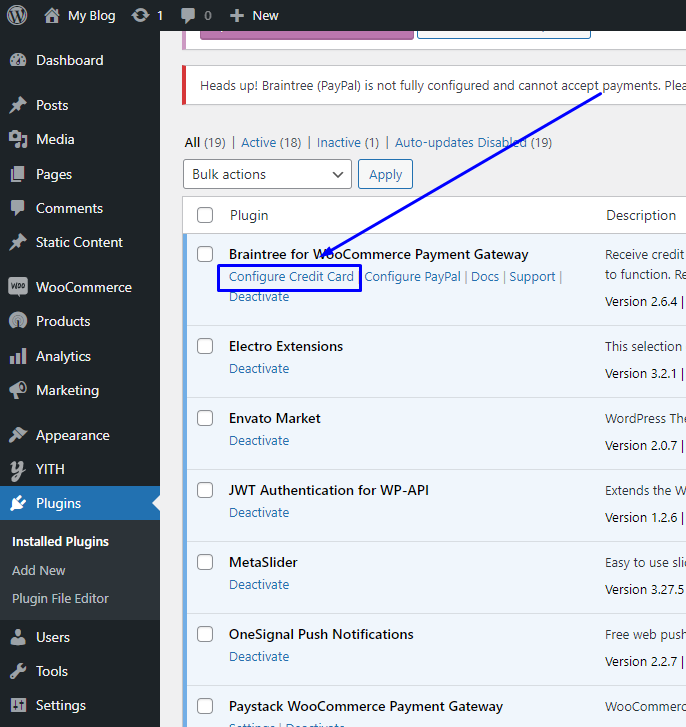
- Redirect plugin list, click Braintree for wooCommerce payment gateway Configure Credit Card.
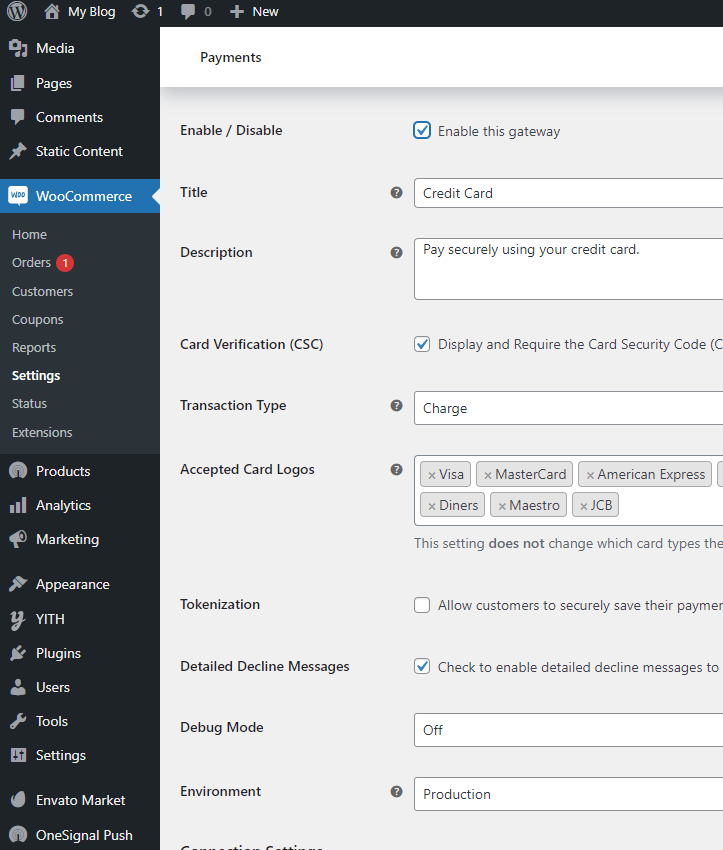
- Enable this gateway
- Now open your Braintree dashboard. Open setting screen then click Api keys
- Public key, Private key and merchant id copy. Then flow next step.
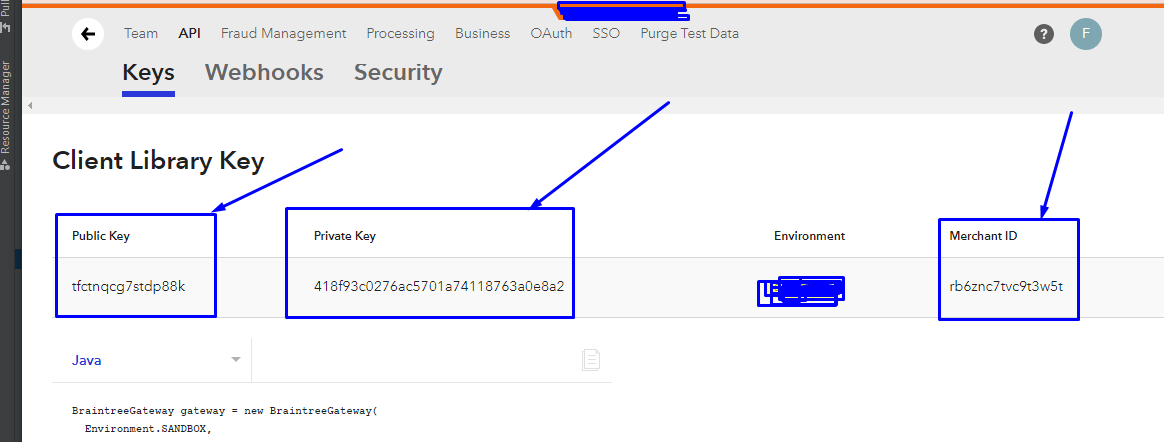
- Now back admin panel Braintree payment tab
- This copy data paste Public key, Private key and merchant id filed and click Save Changes button
- Now come back to Application source code..
- Open lib/constants/strings.dart file. you Braintree kokenization Key get paystack account dashboard and paste.
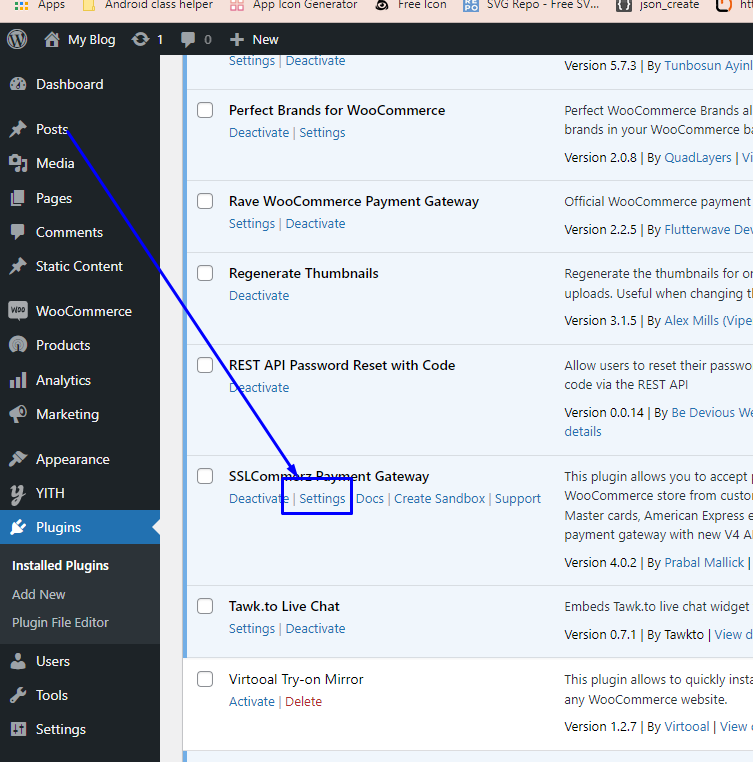
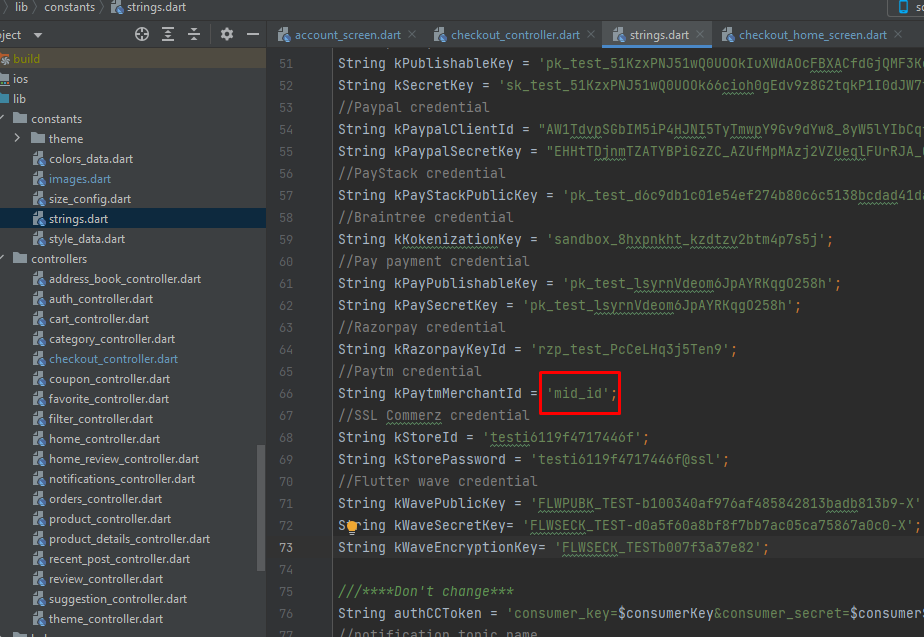
SSL Commerz Gateway
Follow Steps:
- For SSL Commerz setup, Reference Link
- Sign In / Sign Up and Full Setup your acountLink
- Open your admin panel dashboard screen
- Click Add plugin and search SSL Commerz Payment then install and active this plugin.

- Redirect plugin list, click SSL Commerz payment gateway Settins.
- Enable this gateway
- Now open your SSL Commerz dashboard. Open your storeId and StorePassword copy or StoreId password find ssl commerz email
- Now back admin panel SSL Commerz payment tab
- This copy data paste StoreId and StorePassword filed and click Save Changes button
- Now come back to Application source code..
- Open lib/constants/strings.dart file. Then SSL commerz StoreId and StorePassword paste.
Paytm Gateway
Follow Steps:
- For Paytm Wordpress setup, Reference Link
- For Paytm Fluter setup, Reference Link
- Sign In / Sign Up and Full Setup your acountLink
- Open your admin panel dashboard screen
- Click Add plugin and search Paytm Payment Gateway then install and active this plugin.
- Redirect plugin list, click Paytm Payment Gateway Settings.
- Enable this gateway
- Now open your Paytm dashboard. Open setting screen get MerchantId and Merchant Key
- keyId and secret key copy. Then flow next step.
- Now back admin panel Paytm payment tab
- This copy data paste MerchantId and Merchant Key filed and click Save Changes button
- Now come back to Application source code..
- Open lib/constants/strings.dart file. you Paytm MerchantId get paystack account dashboard and paste.
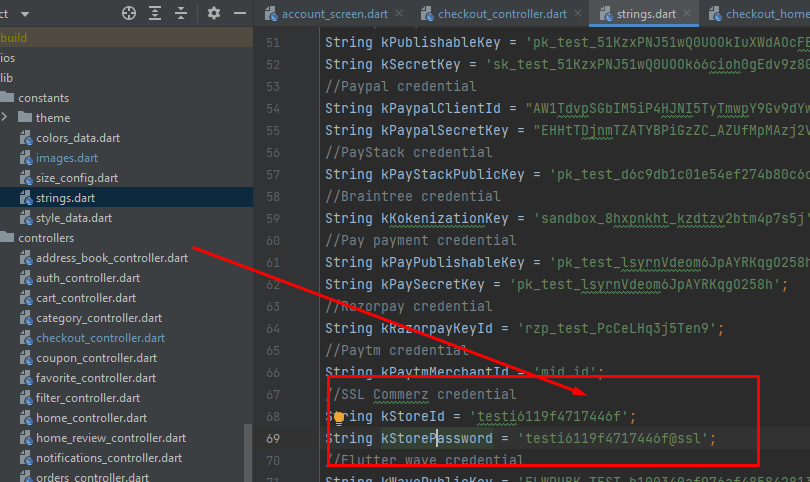
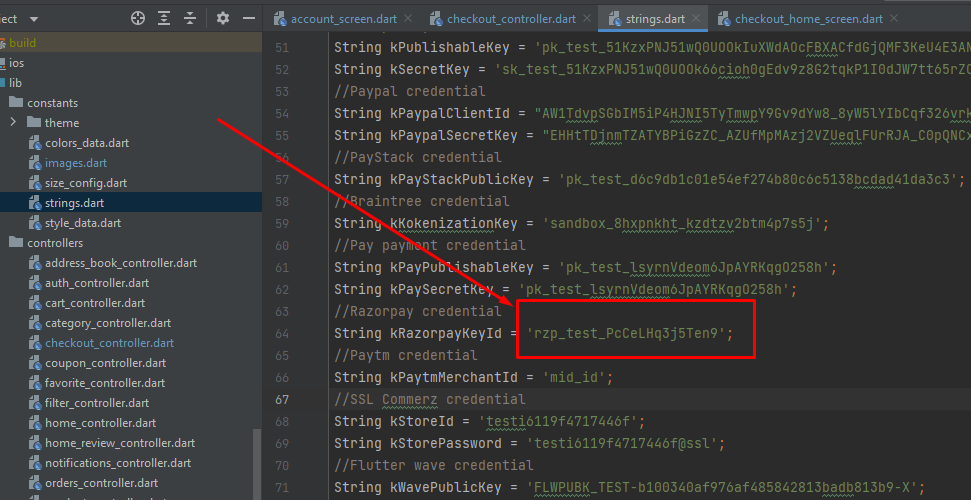
Razorpay Gateway
Follow Steps:
- For Razorpay setup, Reference Link
- Sign In / Sign Up and Full Setup your acountLink
- Open your admin panel dashboard screen
- Click Add plugin and search Razorpay quick payments then install and active this plugin.
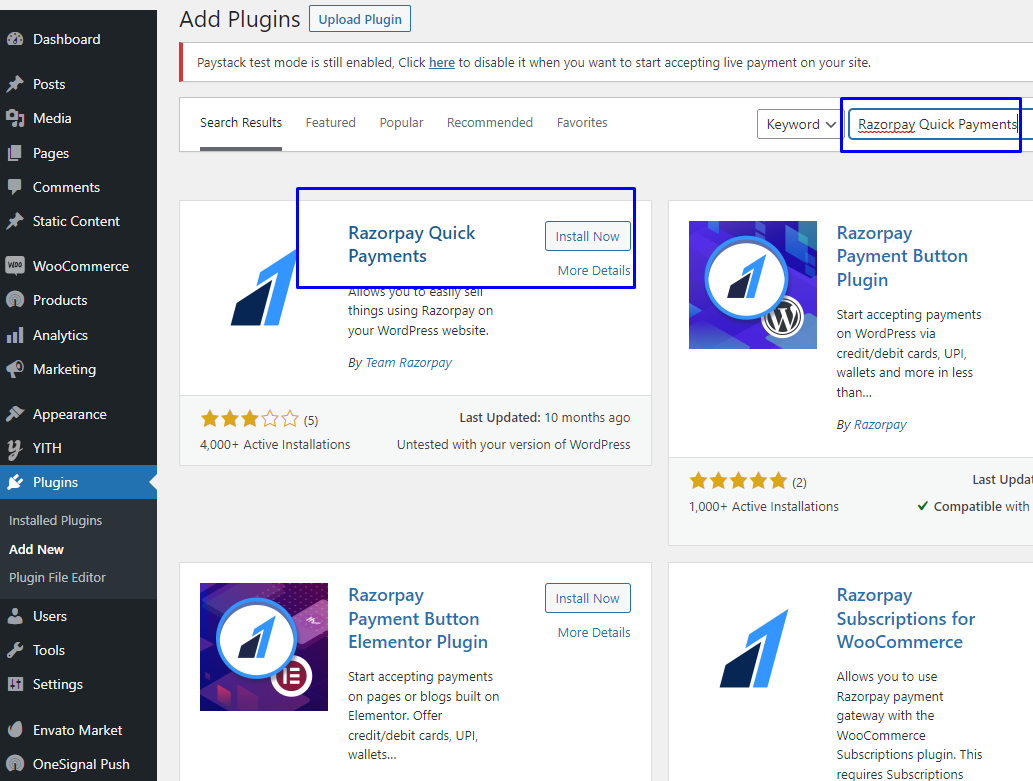
- Redirect plugin list, click Razorpay quick payments gateway Settings.

- Enable this gateway
- Now open your Razorpay dashboard. Open setting screen get keyId and secret key
- keyId and secret key copy. Then flow next step.
- Now back admin panel Razorpay payment tab
- This copy data paste keyId and secret key filed and click Save Changes button

- Now come back to Application source code..
- Open lib/constants/strings.dart file. you Razorpay keyId and secret key get paystack account dashboard and paste.
Setup Finishing
Follow Steps:
- Open your admin panel dashboard screen
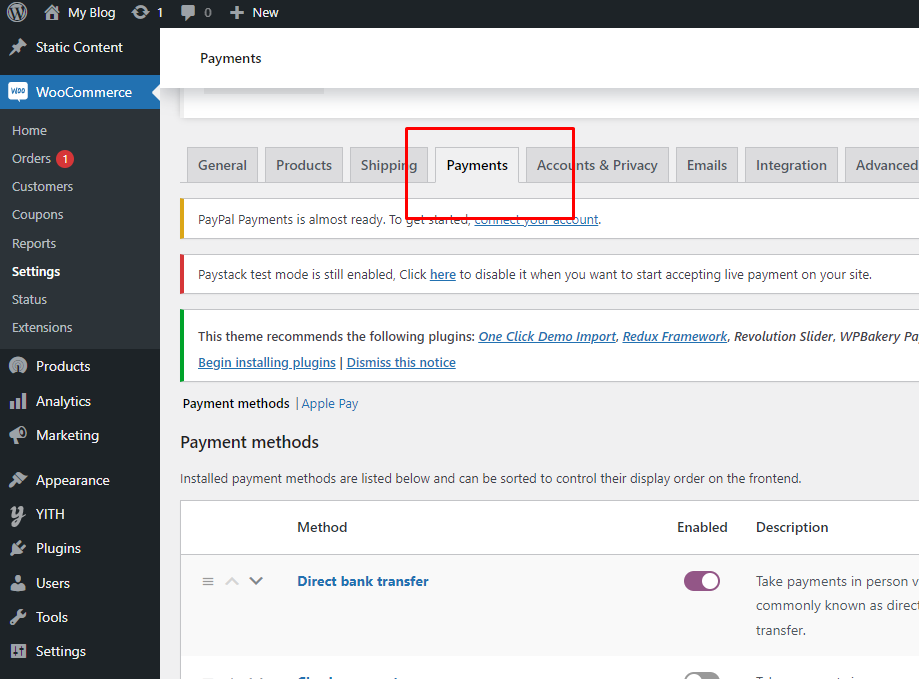
- Click WooCommerce Setting button
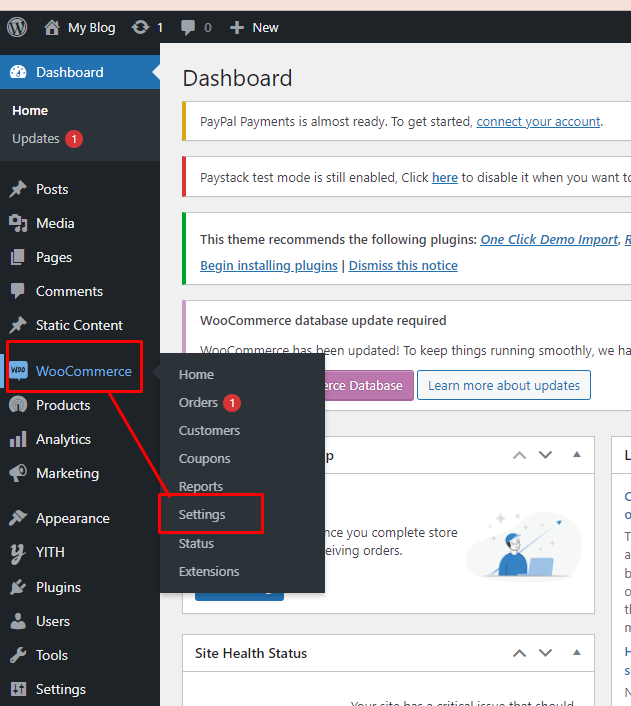
- Then click Payment Tab
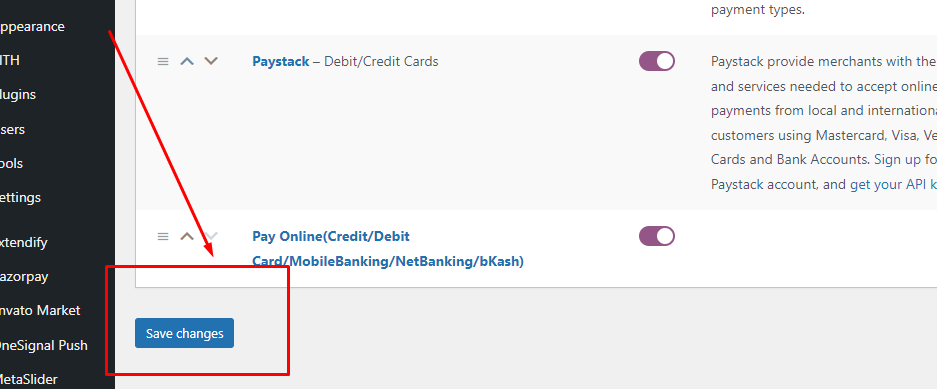
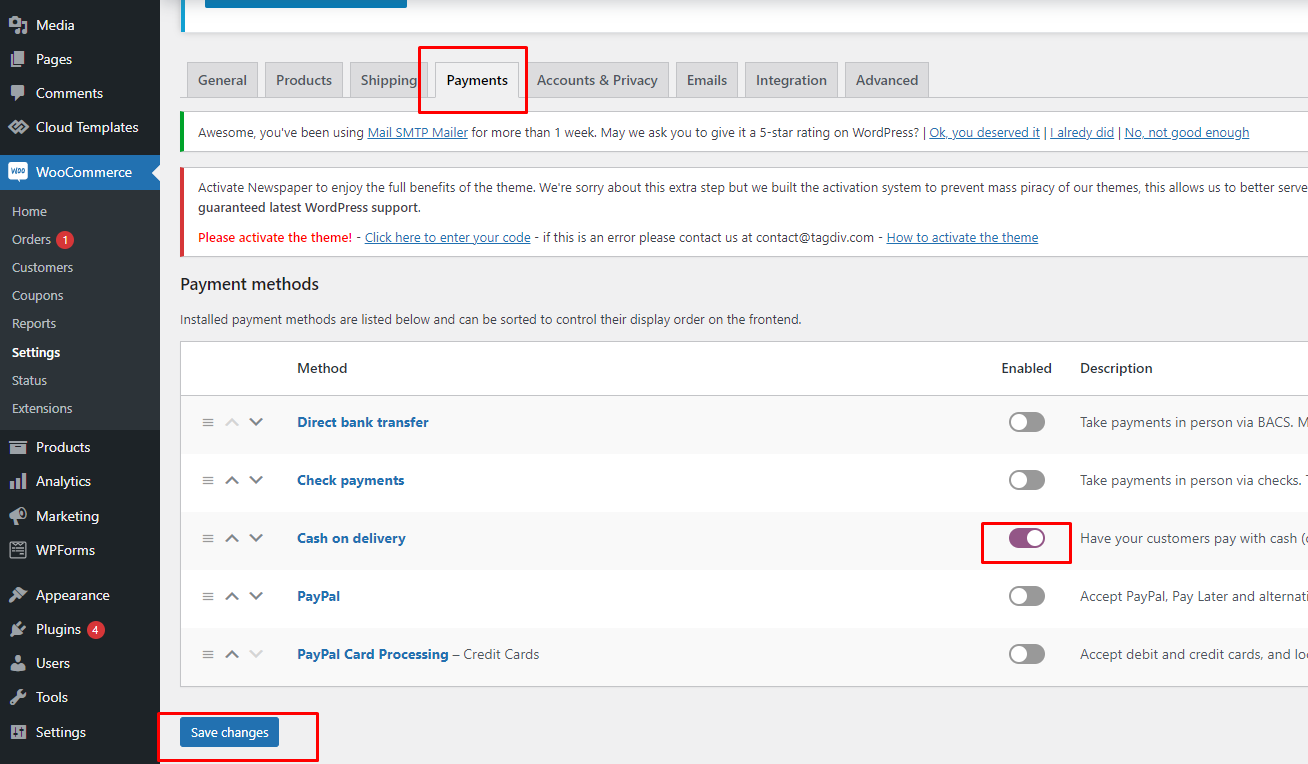
- Enable your needed gateway then flow next setup. Must Enable cash on delivery(default payment method for App)
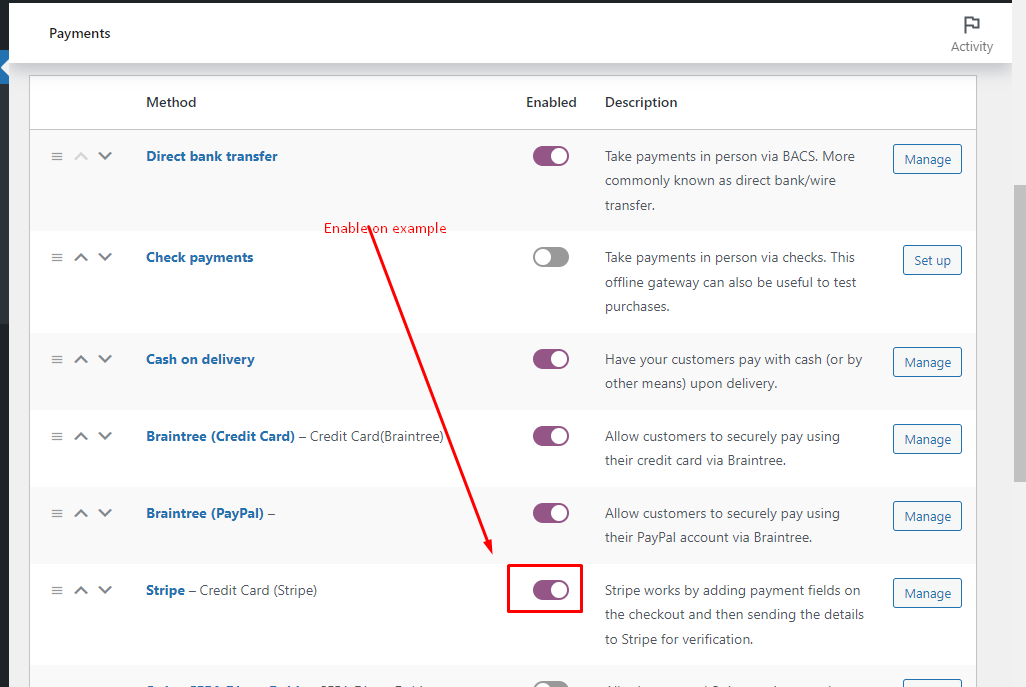
- Then click Save Changes button. Now your website this payment gateway visitble.
- Now come back to Application source code..
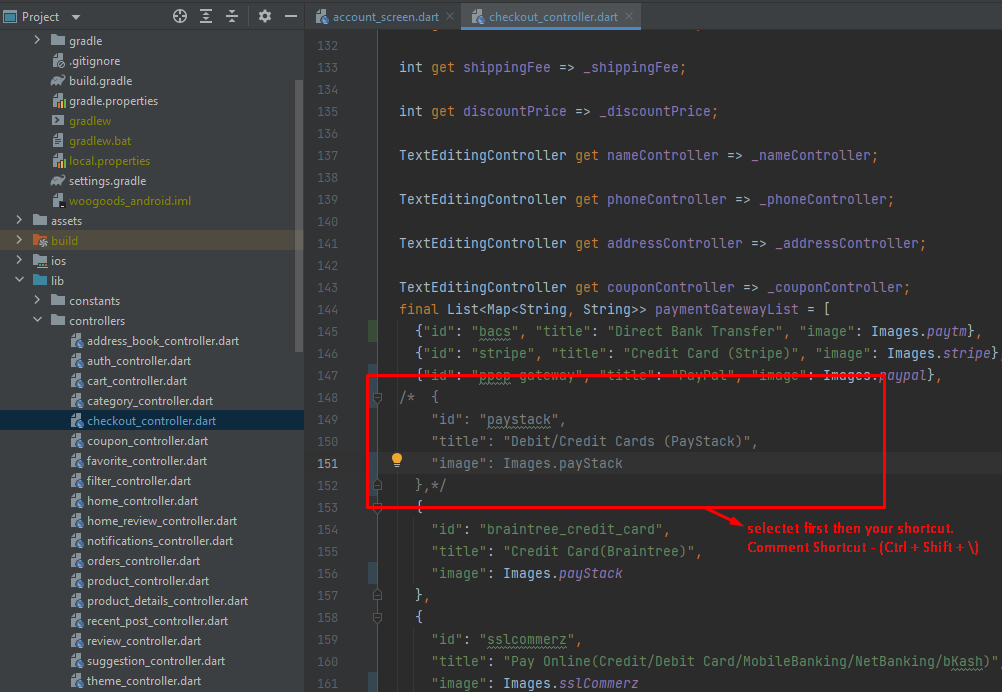
- Open lib/controllers/checkout_controller.dart file. Then your website enable gateway just added this list others comments(full object comment).
WordPress
WordPress is a free and open-source content management system written in PHP and paired with a MySQL or MariaDB database referred to within WordPress as Themes.
JWT Authentication
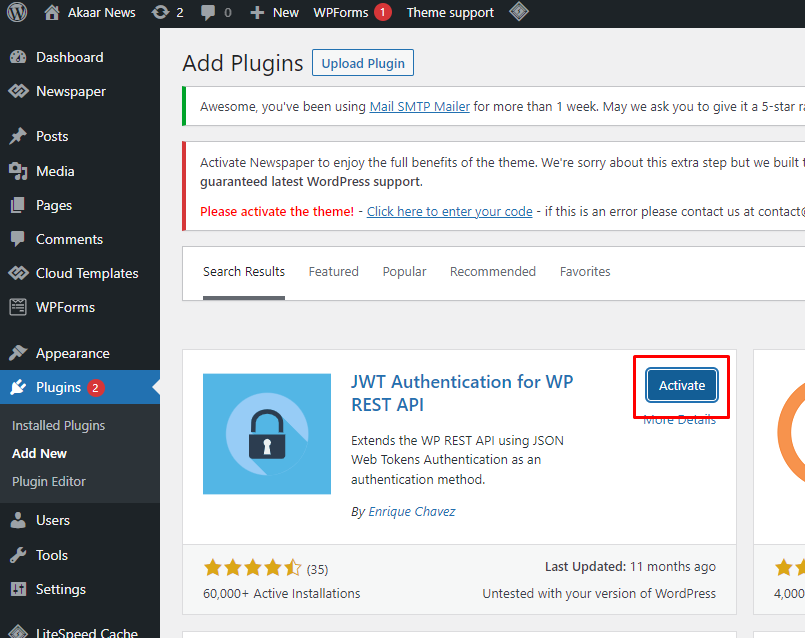
- 1. Open your wordpress admin panel and flow instructions
- 2. Click Add New and Search
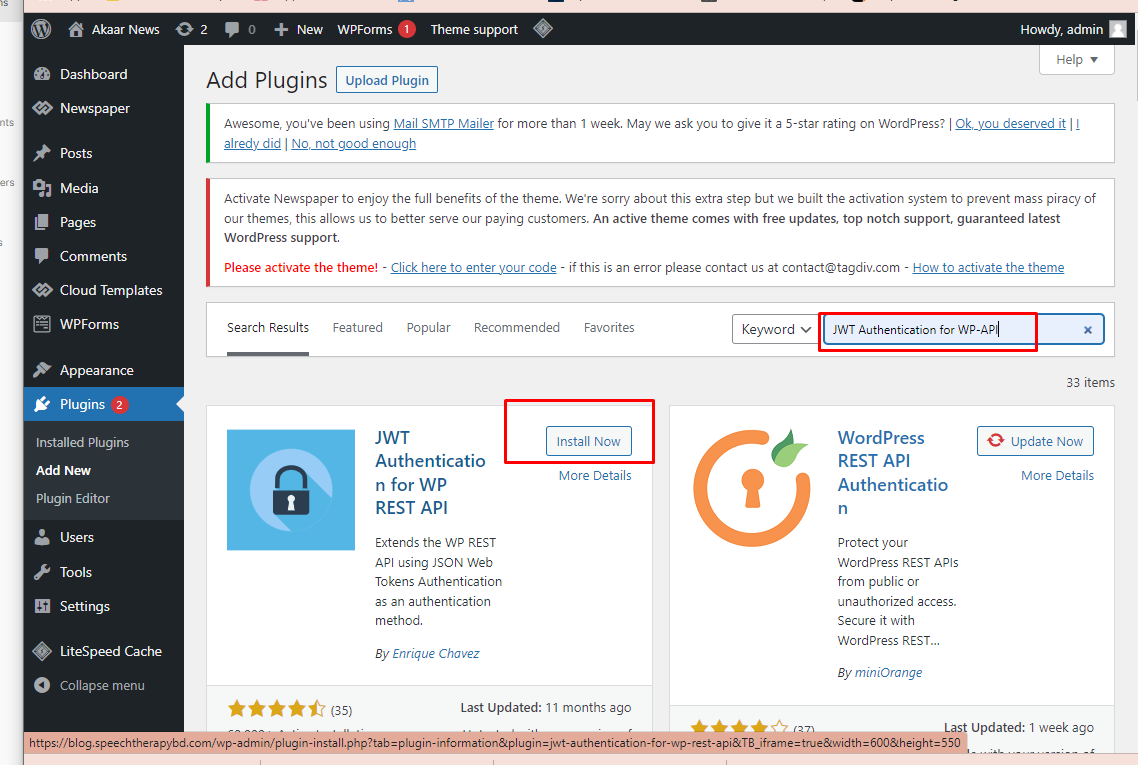
- 3. Click Install now and then click active
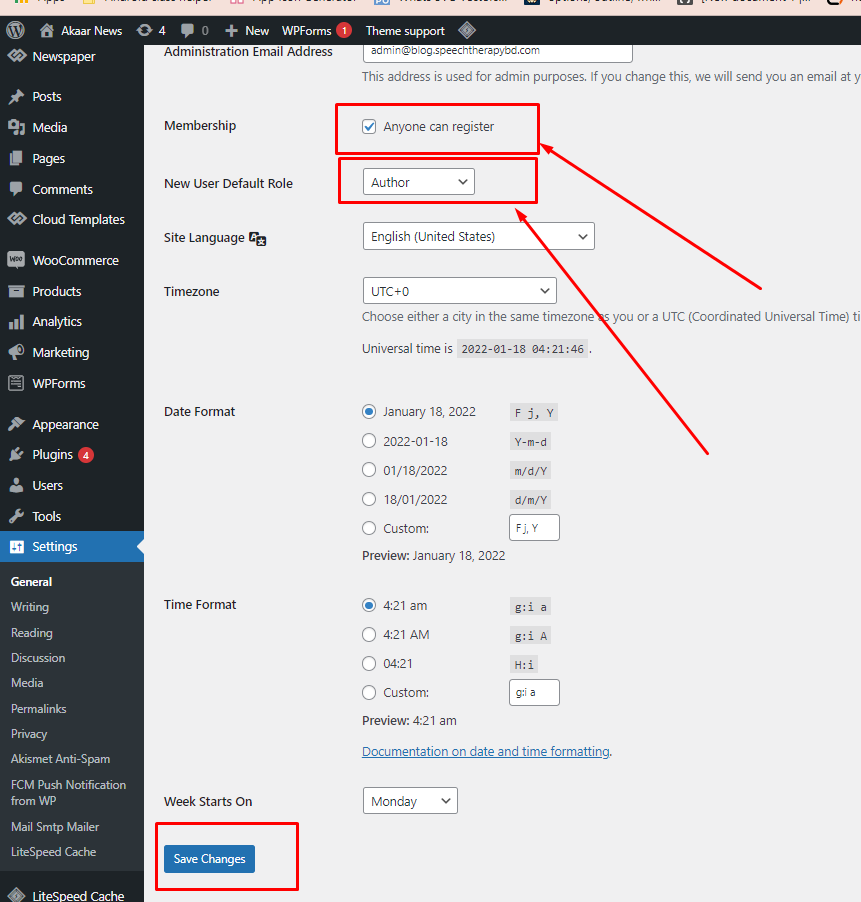
- 4. Open General Settings and flow instructions
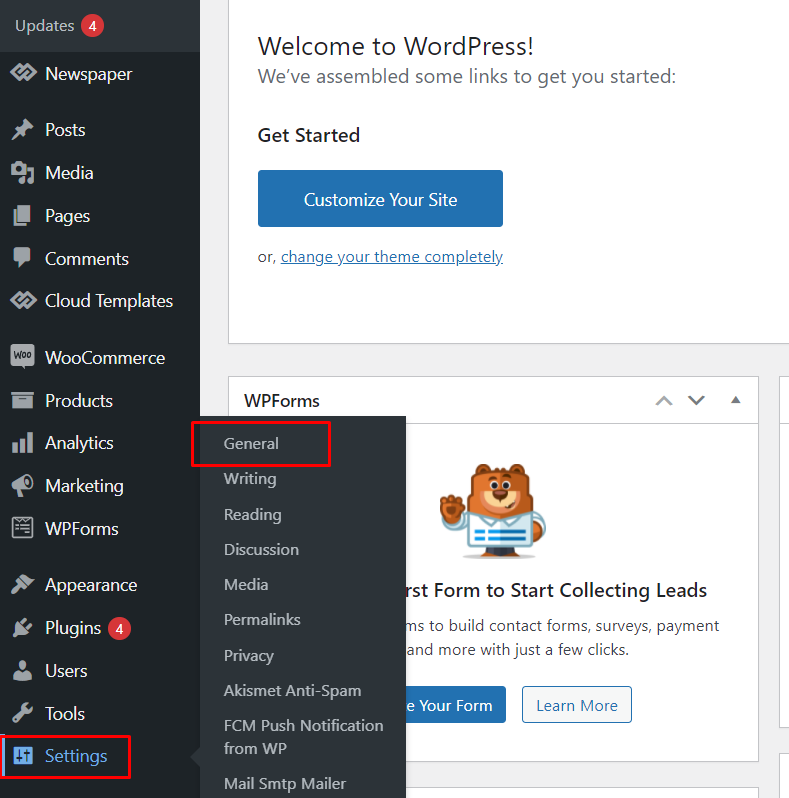
- 5. Membership checked Anyone can register and new user role set in Auther then click Save change button
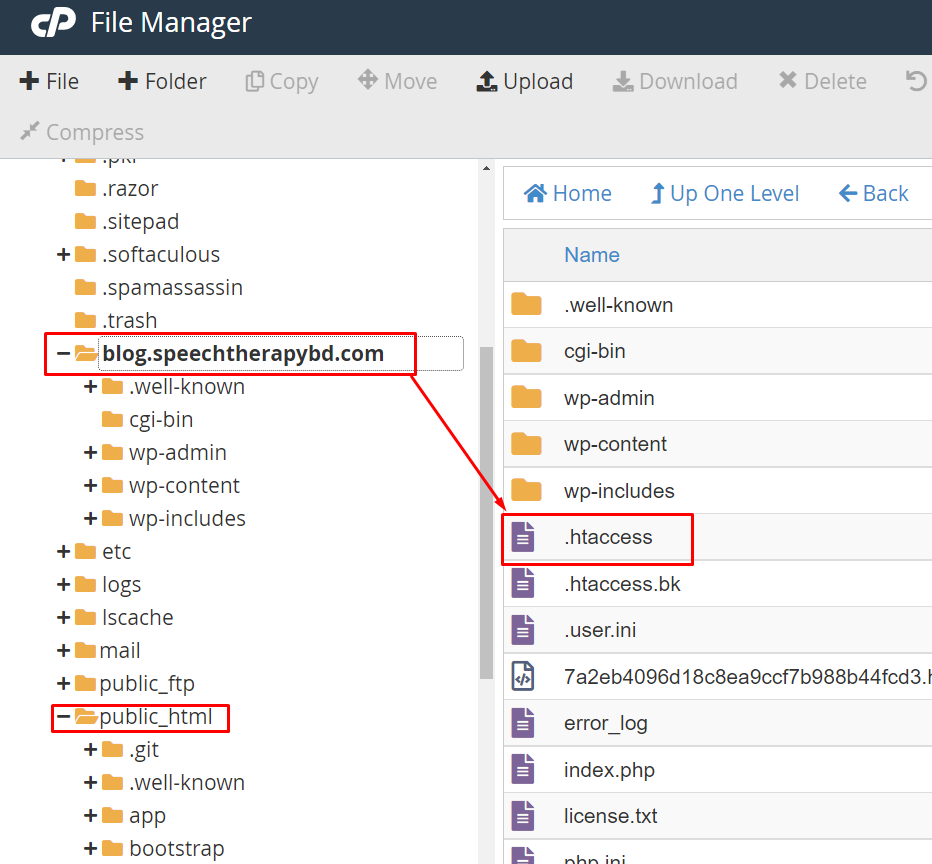
- 6. Login cPanel then open your main file and find .htaccess file (Click your domain name or public_html)
- 7. Click Edit button open a new tab
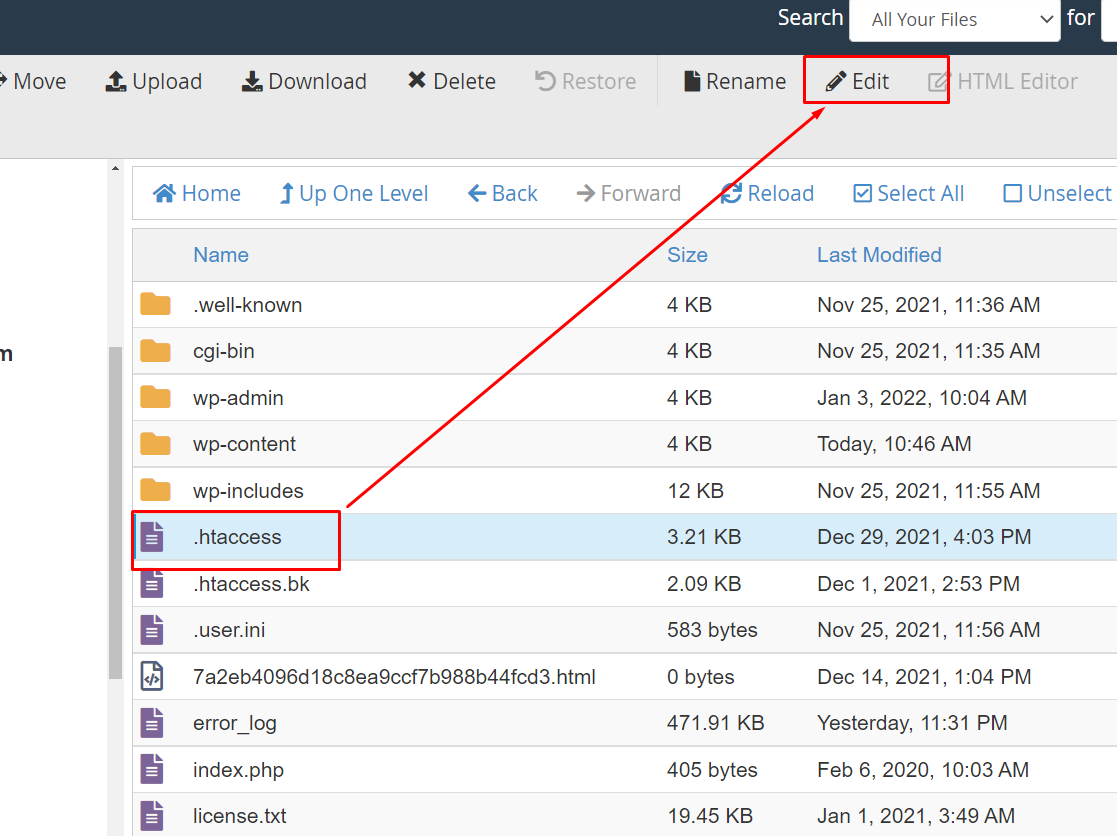
- 8. Added blew data and save Change button click. Flow the instructions
	<IfModule mod_rewrite.c>
	RewriteEngine On
	RewriteRule .* - [E=HTTP_AUTHORIZATION:%{HTTP:Authorization}]
	RewriteBase /
	RewriteRule ^index\.php$ - [L]
	RewriteCond %{REQUEST_FILENAME} !-f
	RewriteCond %{REQUEST_FILENAME} !-d
	RewriteRule . /index.php [L]
	</IfModule>

	# END WordPress
	# php -- BEGIN cPanel-generated handler, do not edit
	# Set the “ea-php74” package as the default “PHP” programming language.
	<IfModule mime_module>
	  AddHandler application/x-httpd-ea-php74 .php .php7 .phtml
	</IfModule>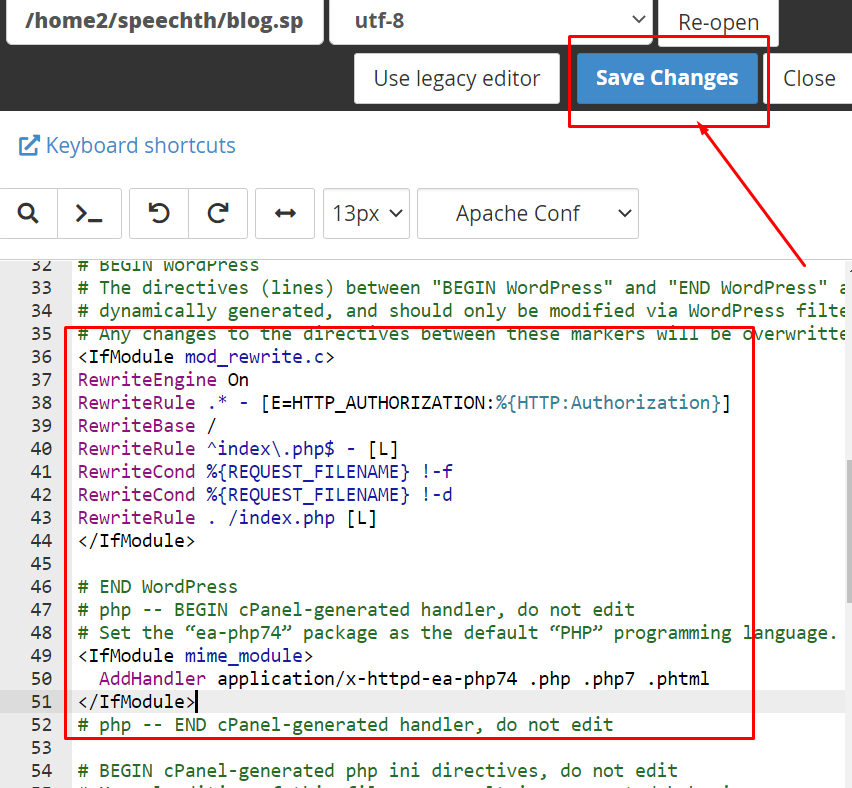
- 6. Open your main file and find wp-config.php file (Click your domain name or public_html)

- 7. Click Edit button open a new tab
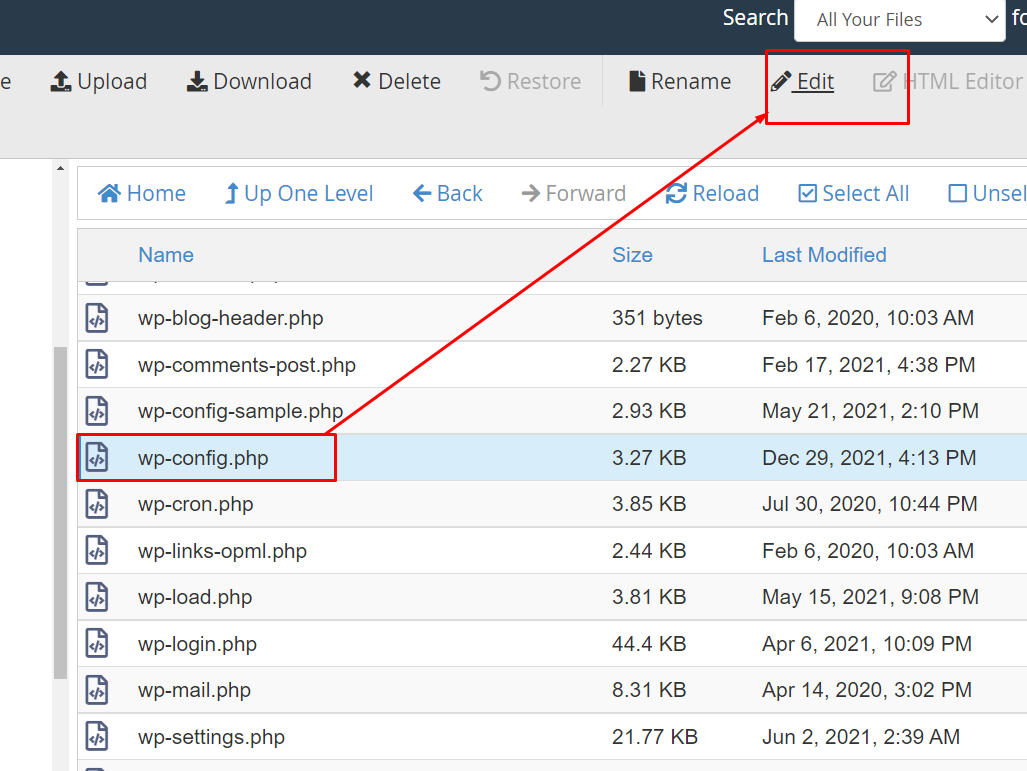
- 8. Added blew data and save Change button click. Flow the instructions
   define('JWT_AUTH_SECRET_KEY', 'g=lT!w-`1(B.0j! ^=qfpb/|wNB%::kI|4qwl.a=AZoJML9>C(6|v`UmUl3IC]k9');
   define('JWT_AUTH_CORS_ENABLE', true);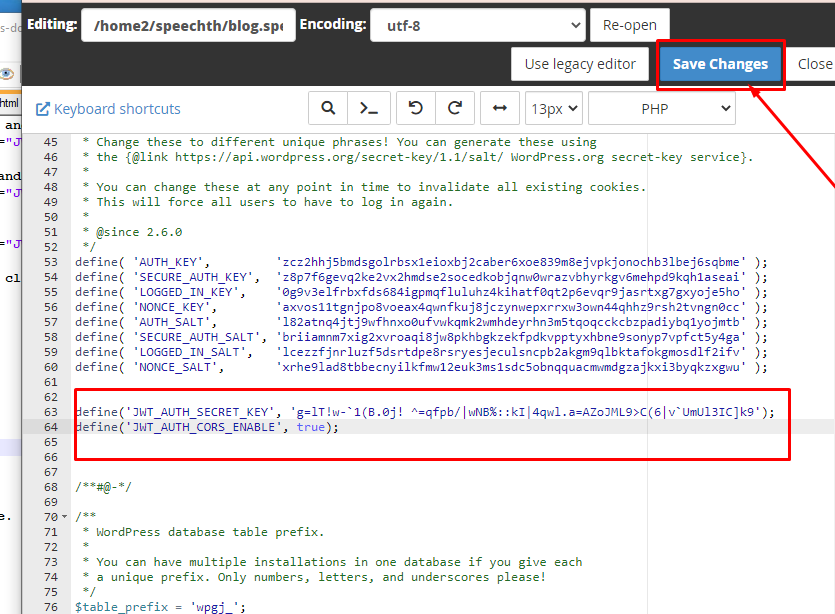
Reset Password Configuration
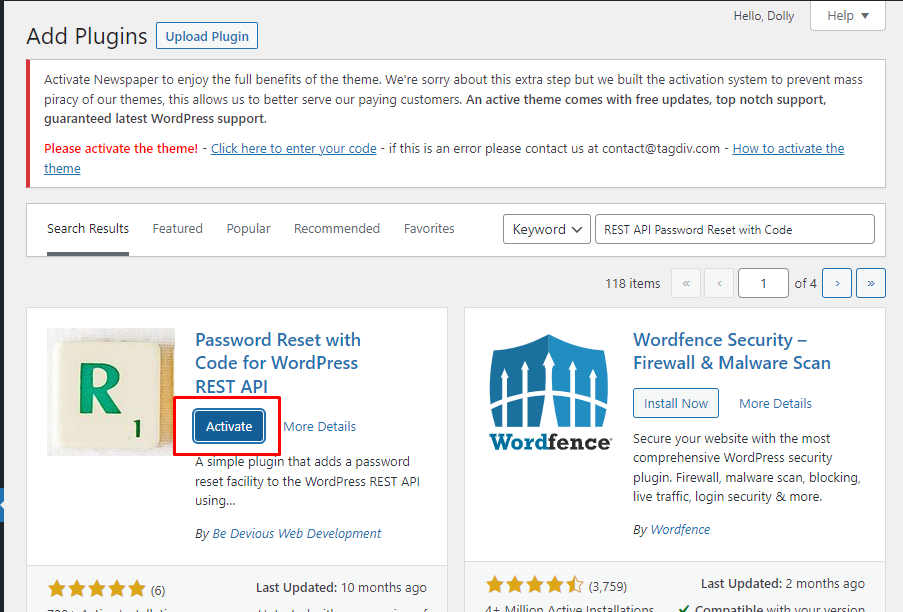
- 1. Click Add New and Search - REST API Password Reset with Code
- 2. Clieck Install button
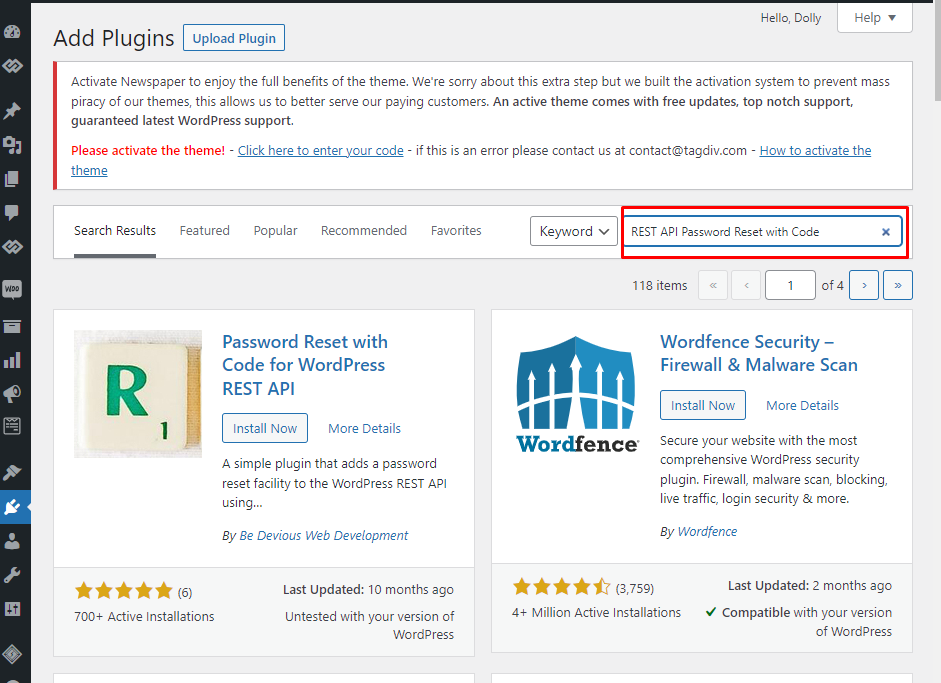
- 3. Then click Active button
Meta Slider
- 1. Search meta slider and click Install Now button
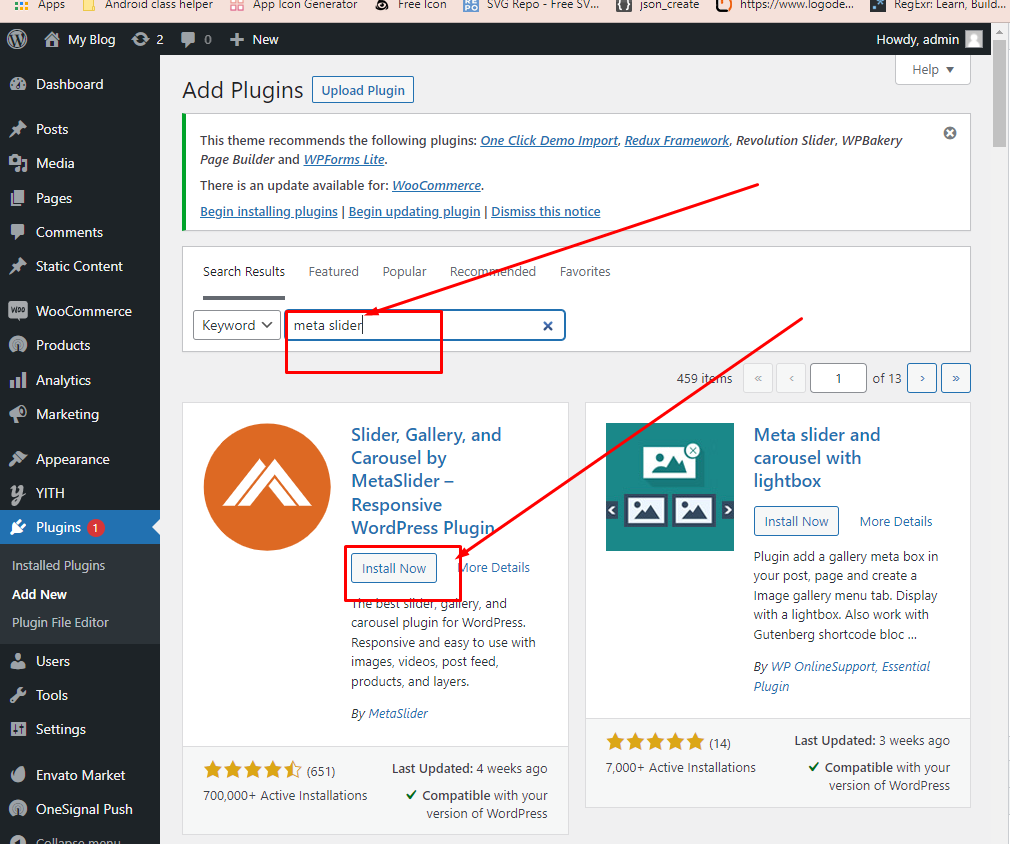
- 2. Then Active this plugin
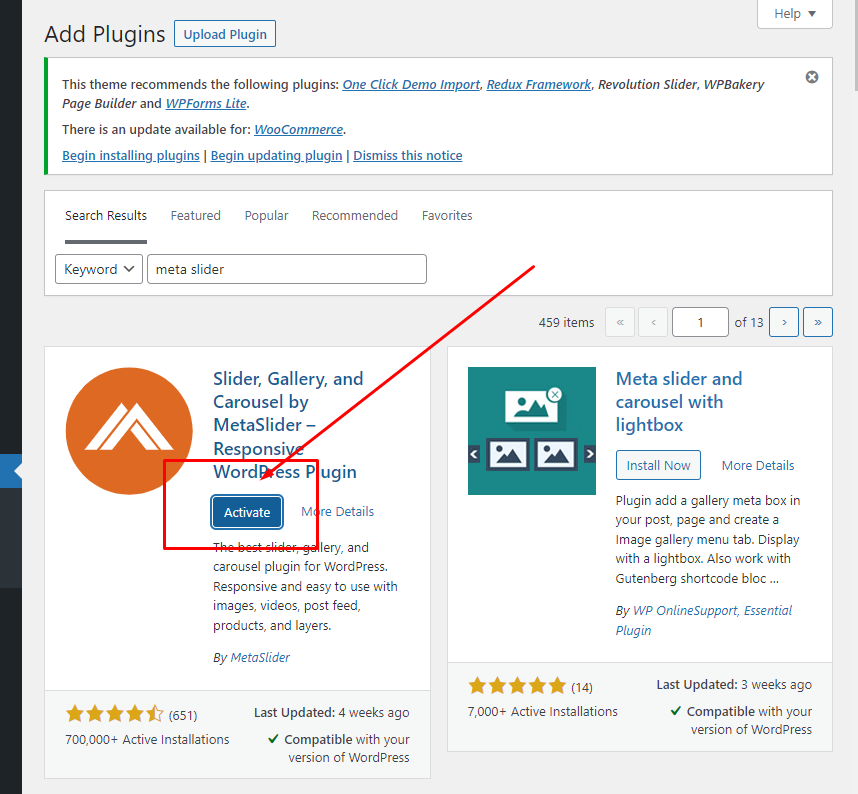
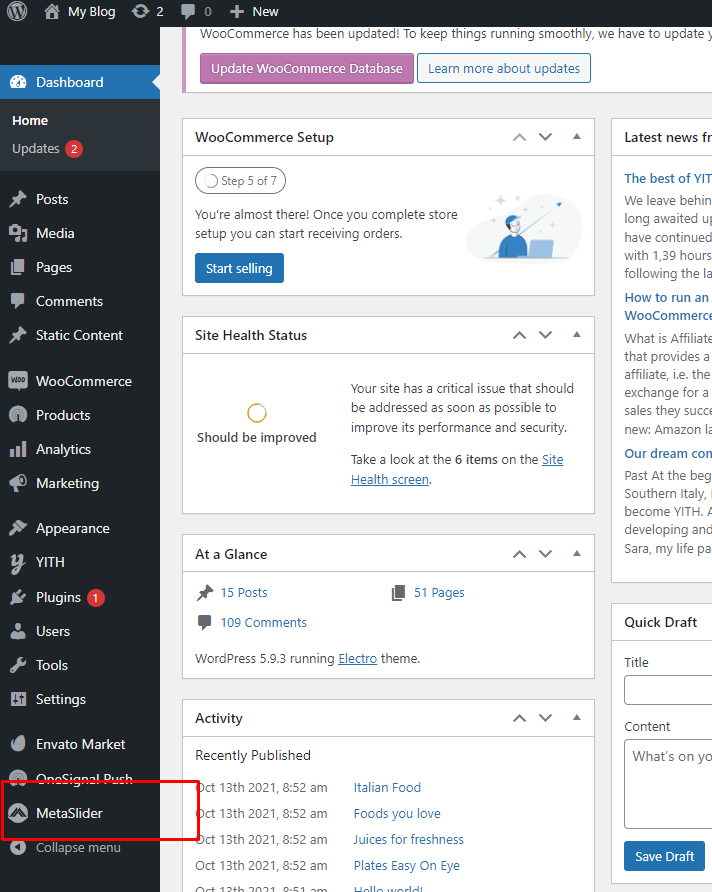
- 3. Then click Meta Slider Menu
- 4. CLick Add Slide button
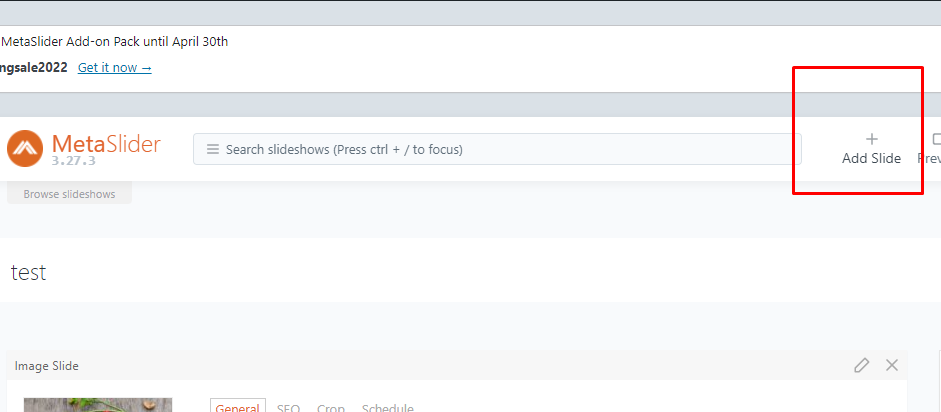
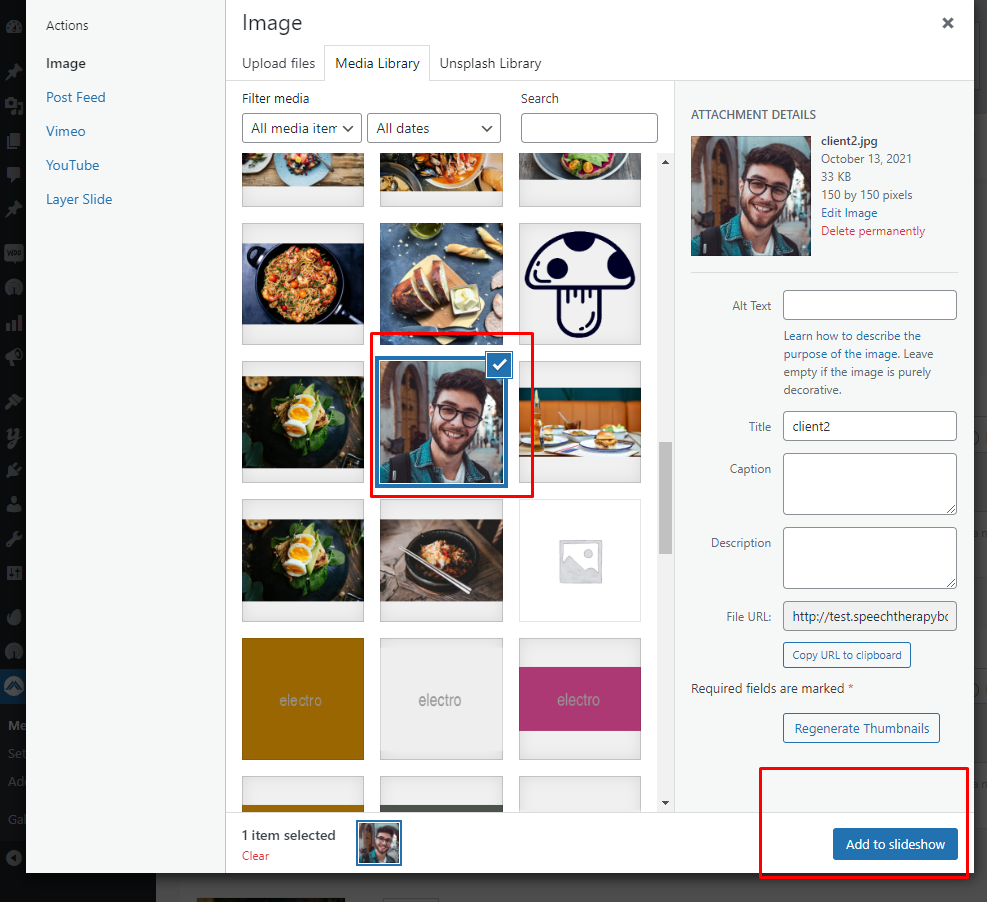
- 5. Select your slide image tab and then just click Add to slider flow the screenshot below
Push Notification Setup and Configurations
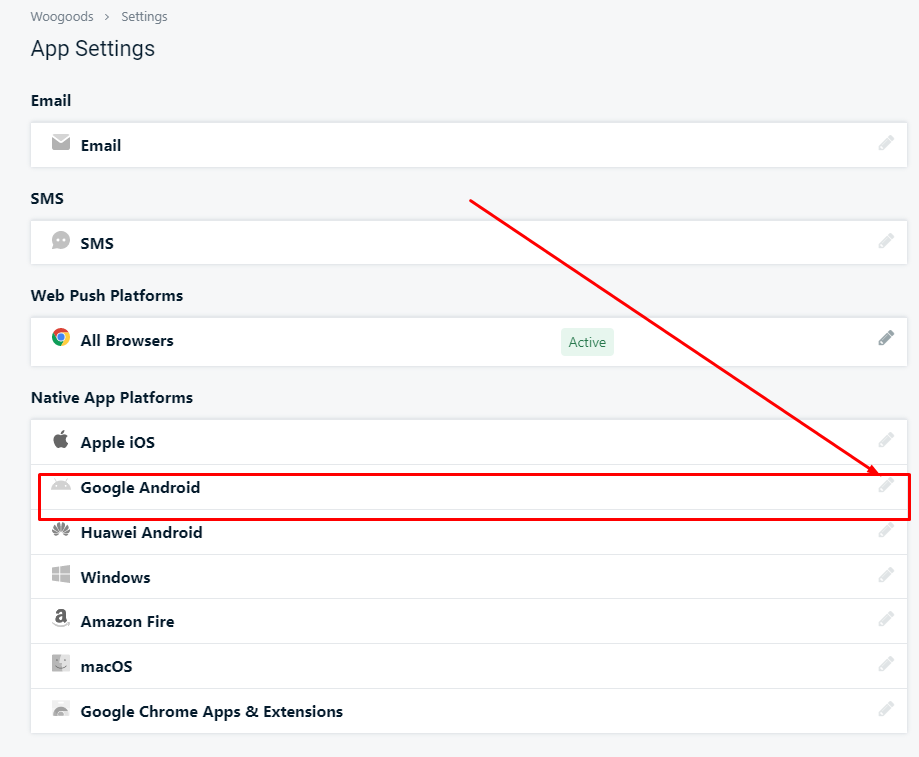
- 1. Onesignal Setup Reference: https://documentation.onesignal.com/docs/wordpress
- 3. Open Onesignal setting page select platform Google Android
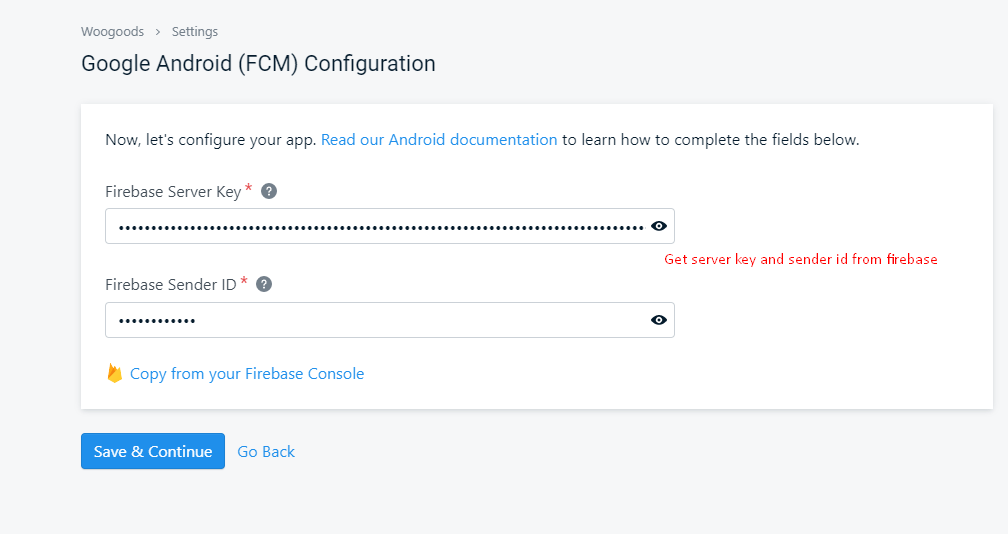
- 3. Open firebase project setting and copy server and sender id
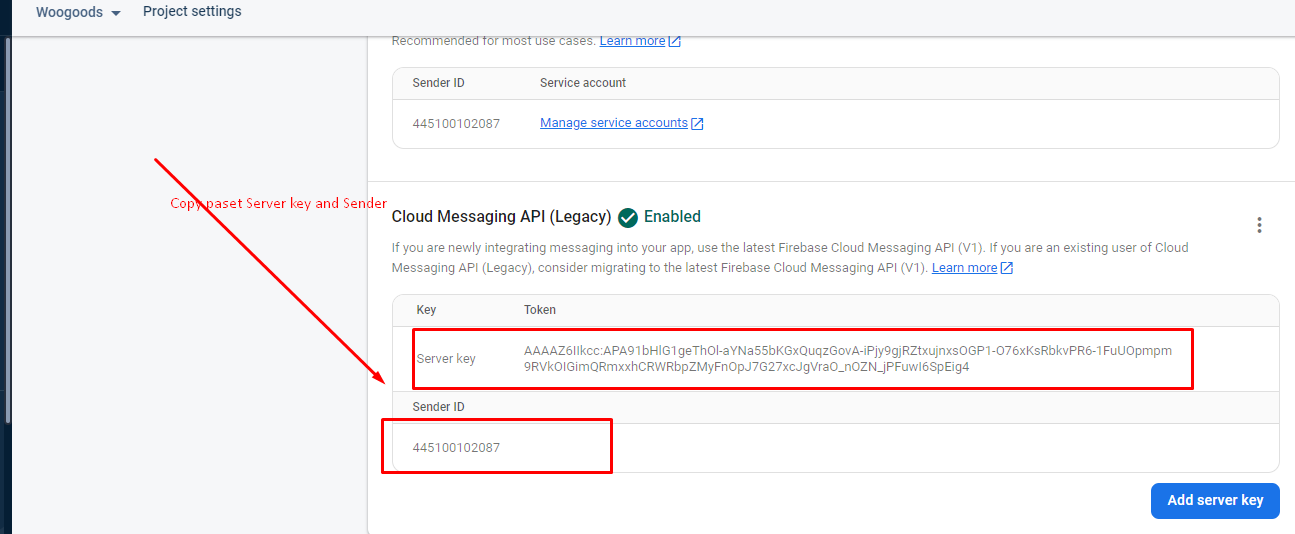
- 3. Paste server key & serder id then save And Continue
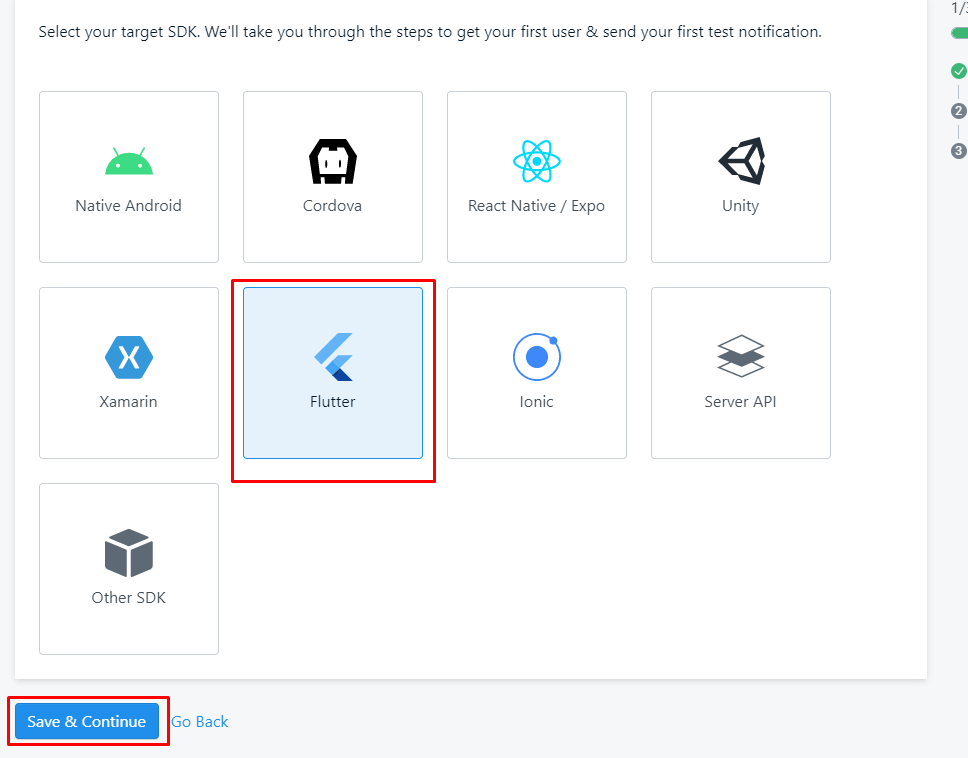
- 3. Select your target SDK and save And Continue
- 3. Click Done button Then Flutter project Run and check notificaions
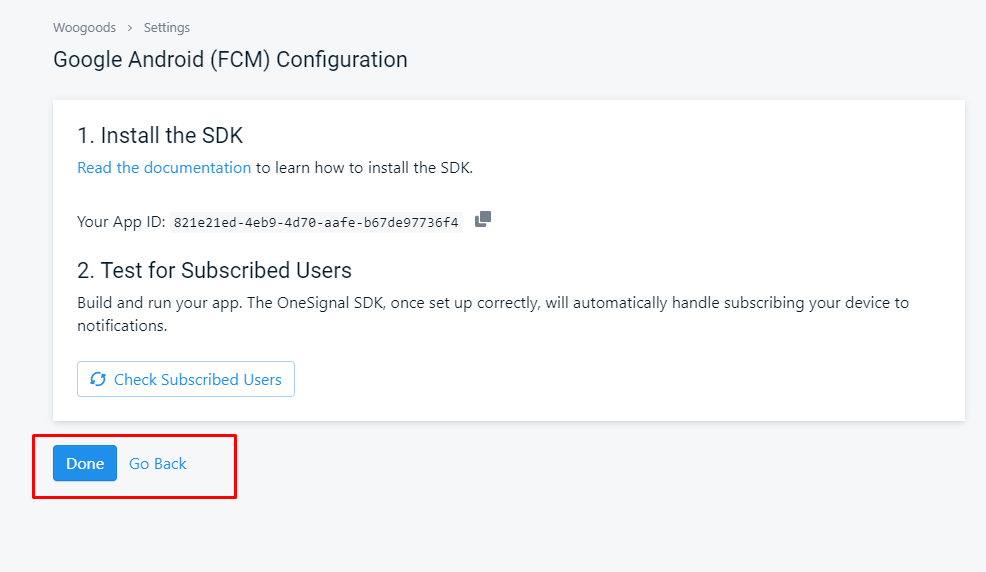
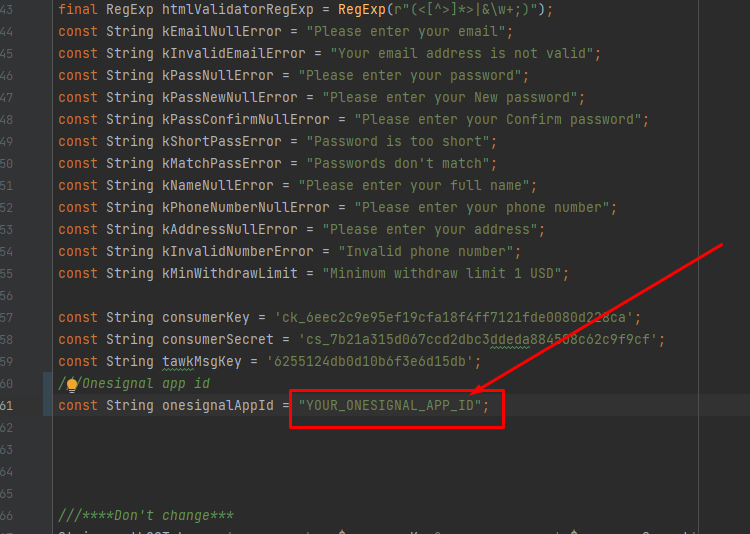
- 3. Add the OneSignal APP_ID to your project, edit your project's strings.dart file:
- 3. Then Flutter project Run and check notification
Shipping Config
Flat Rate Shipping is a shipping method included in WooCommerce that allows you define a standard rate per item, per shipping class, or per order.
Flat Rate Shipping works with Product Shipping Classes, adding more power and flexibility.
Setup and Configuration
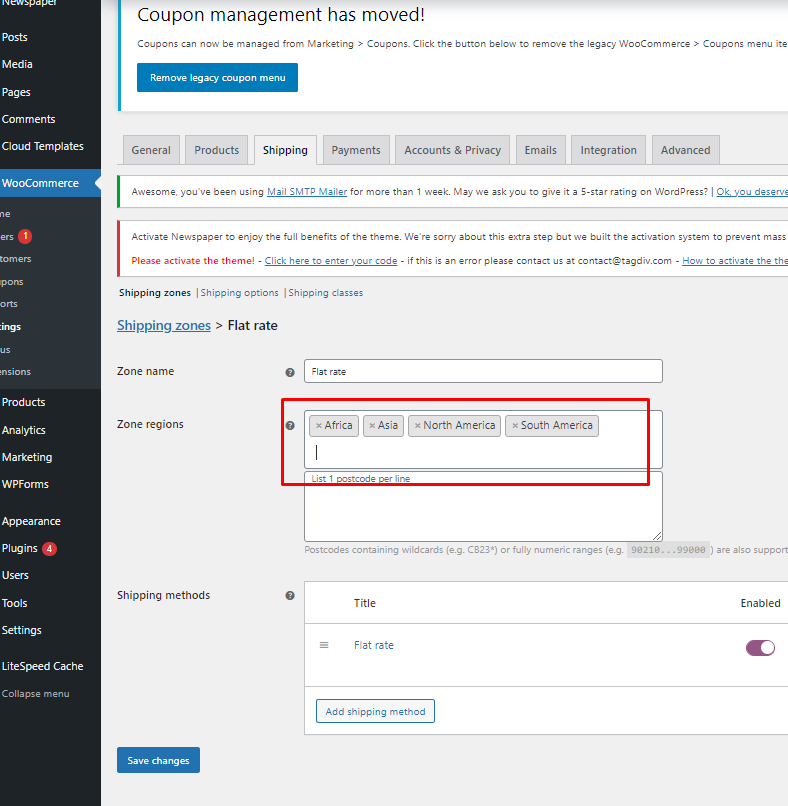
To use this method it must be added to a Shipping Zone.
- Head to: WooCommerce > Settings > Shipping.
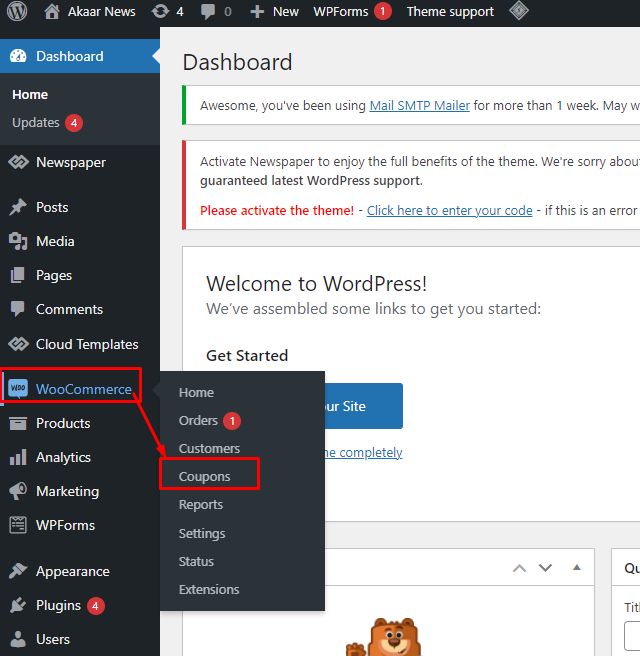
- 1. Open your admin panel and flow screenshot below and click Coupons-
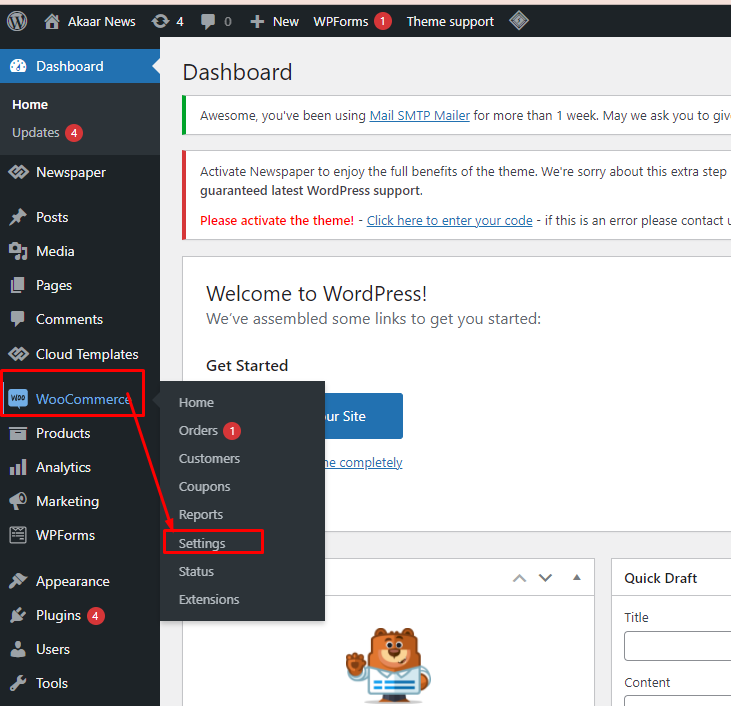
- 2. Then select Shipping and click Add shipping zone button

- 3. Added shiping zone name(Same to same shipping zone name Added flow under screenshot) and added your spipping regions
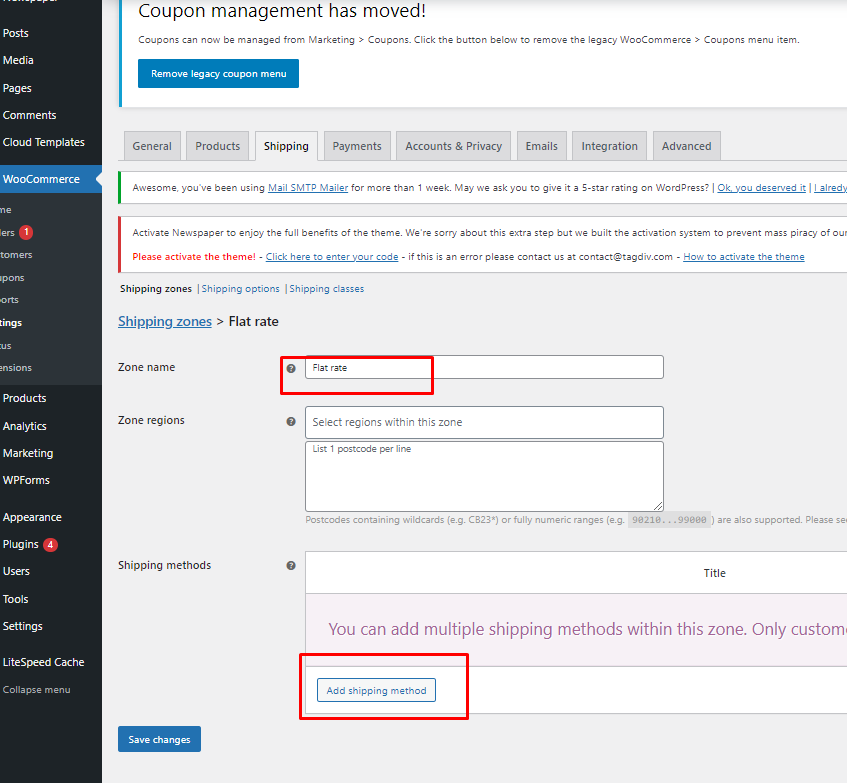
- 4. Then click Add shipping method button
- 5. Open dailog select flat rate and click Add shipping method button
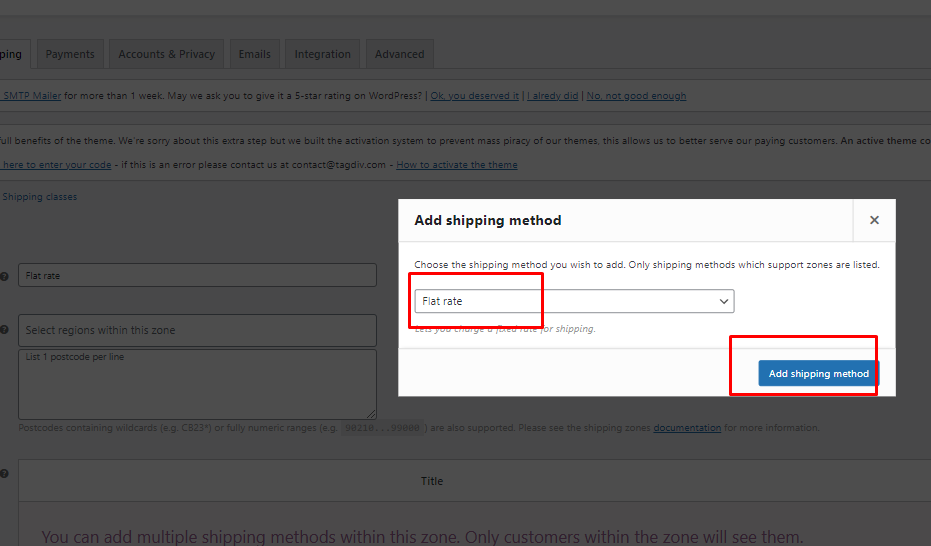
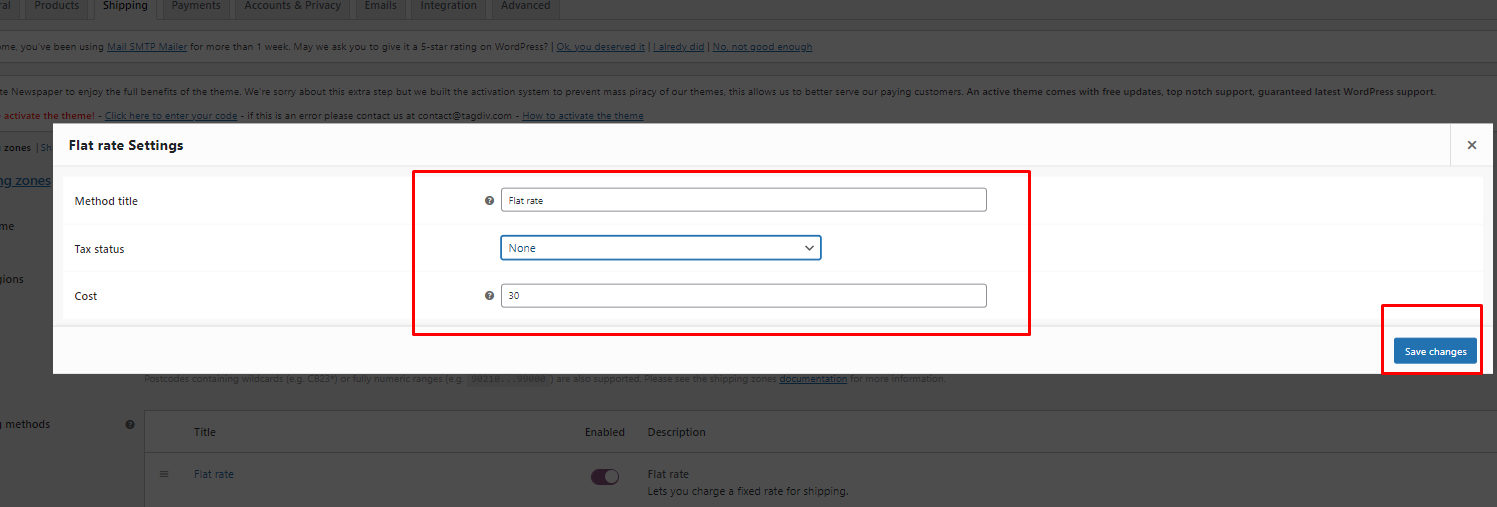
- 6. Click Flat rate Edit button
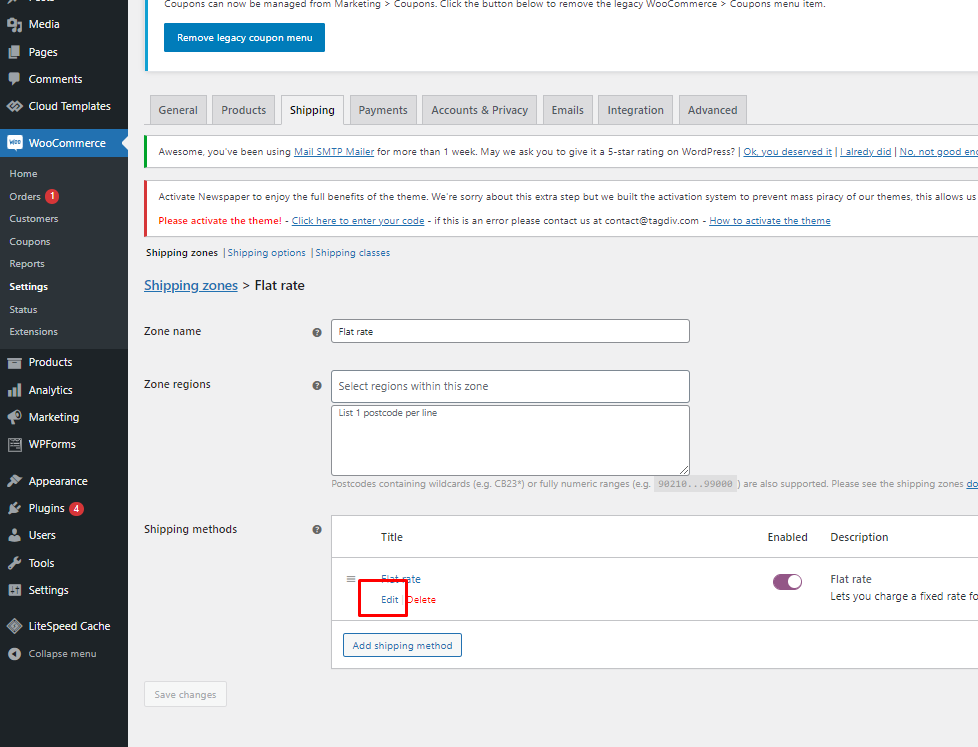
- 6. Added Method title(Same to same method title Added flow under screenshot) and your shipping cost then click Save cahnge button
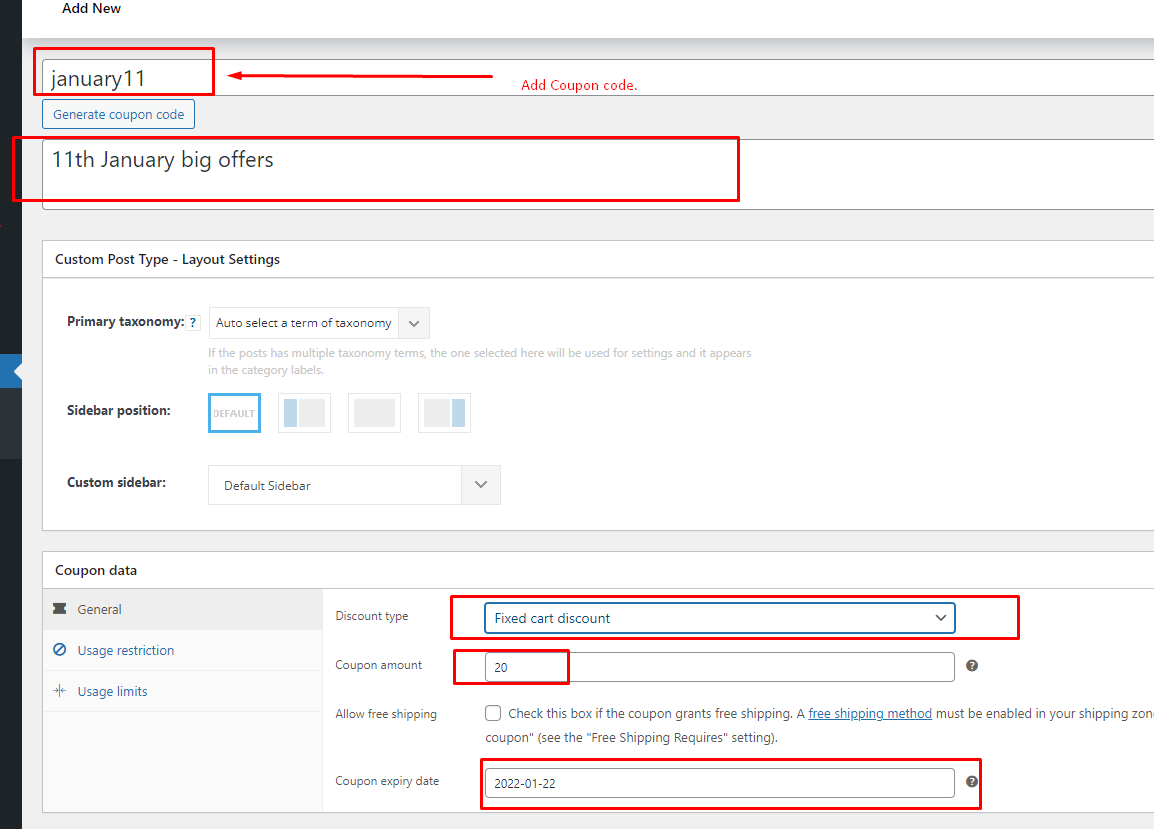
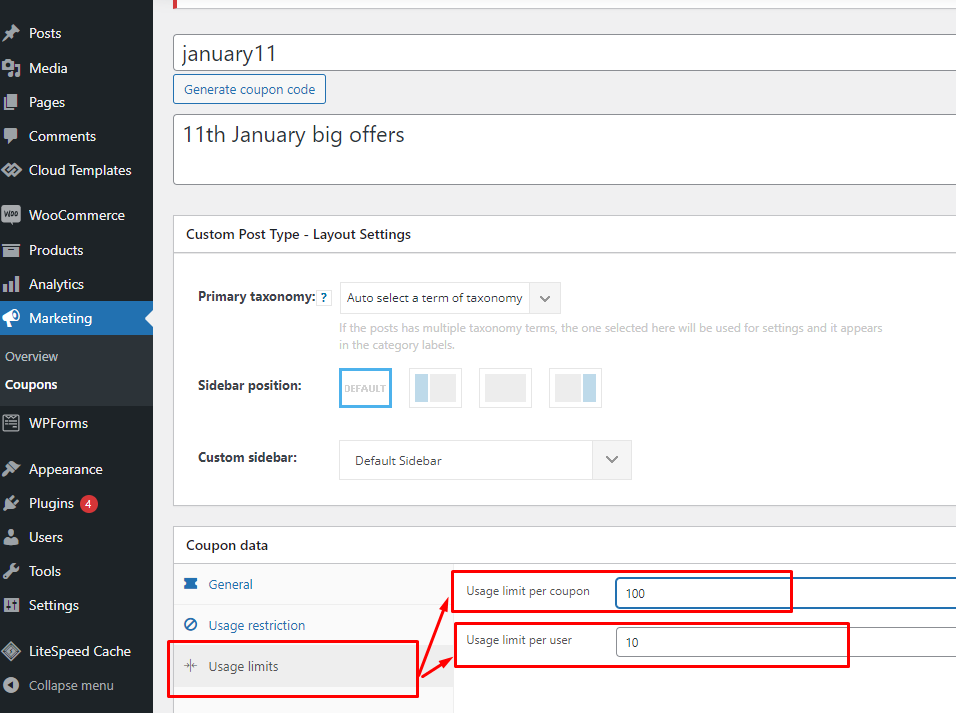
Setup Coupon
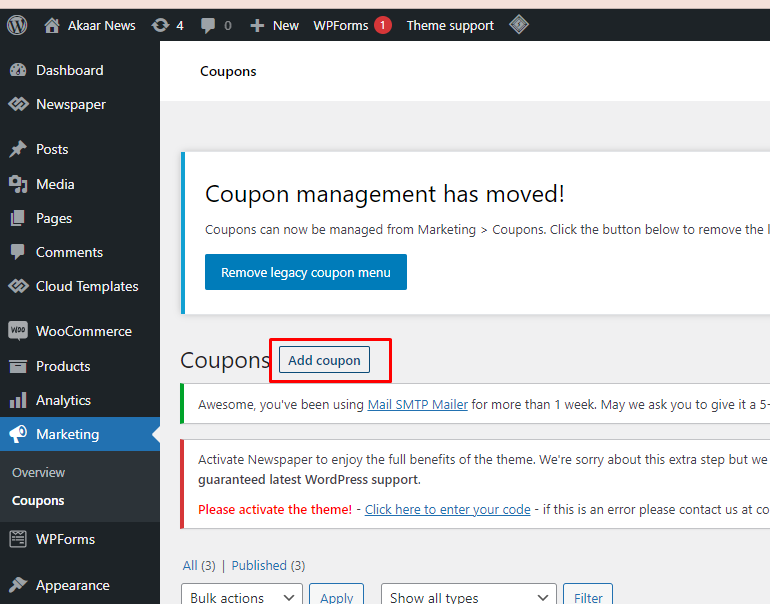
- 1. Open your admin panel and flow screenshot below and click Coupons-
- 2. Then add coupon button-
- 3. Must added coupon code, coupon descriptions, discount type, coupon amount, coupon expiry
date and must added Usage limit Usage limit per coupon and Usage limit per user this coupon.
Change Setting
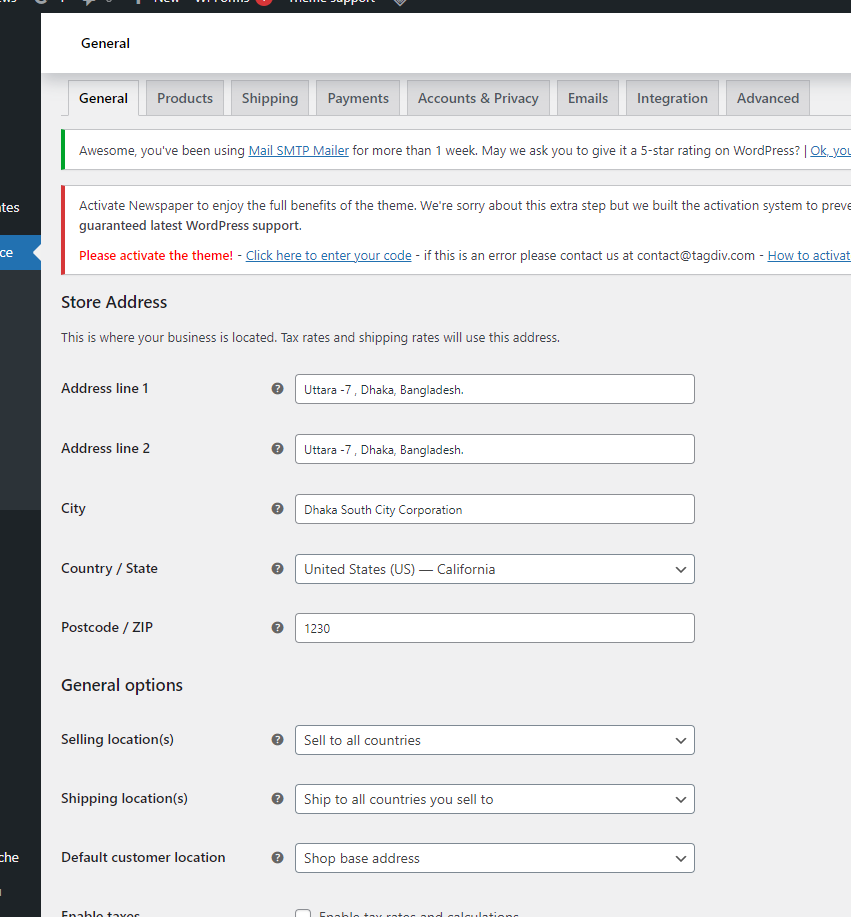
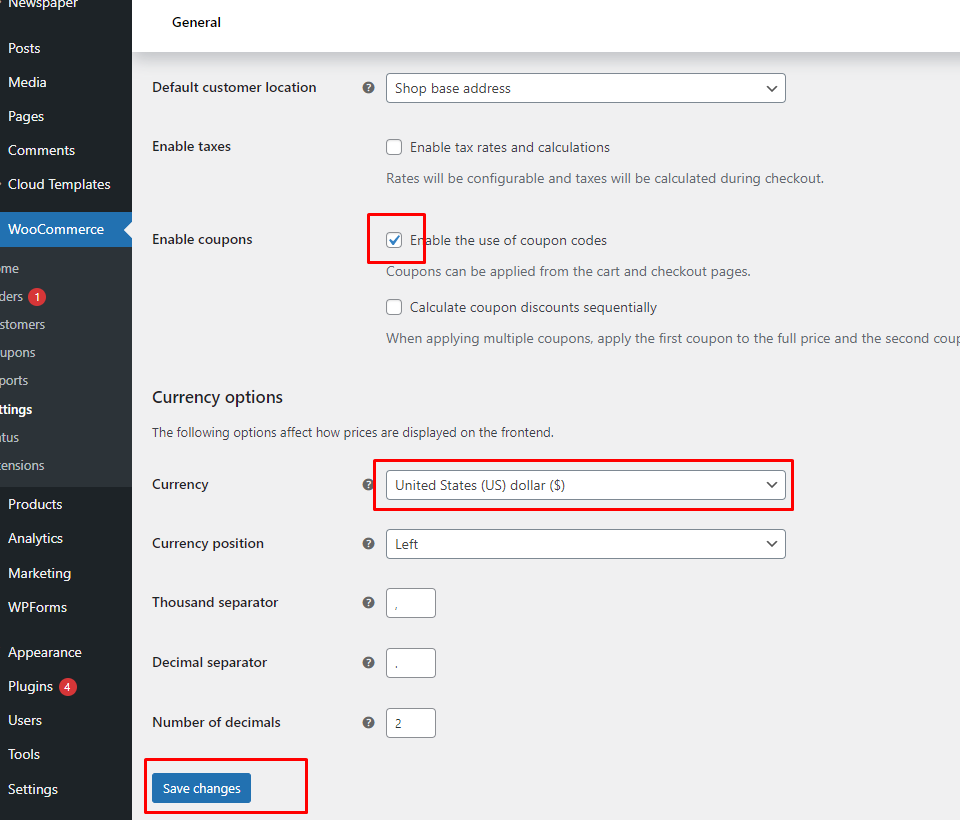
- 1. Open your admin panel and flow screenshot below and click Settings-
- 2. Select General tab and then Store Address info hare then flow below instructions
- 3. Then Enable Coupon code use and select Currency then click
Save change:
- 4. Select Payment tab and then just Enable cash on delivery then click Save change:
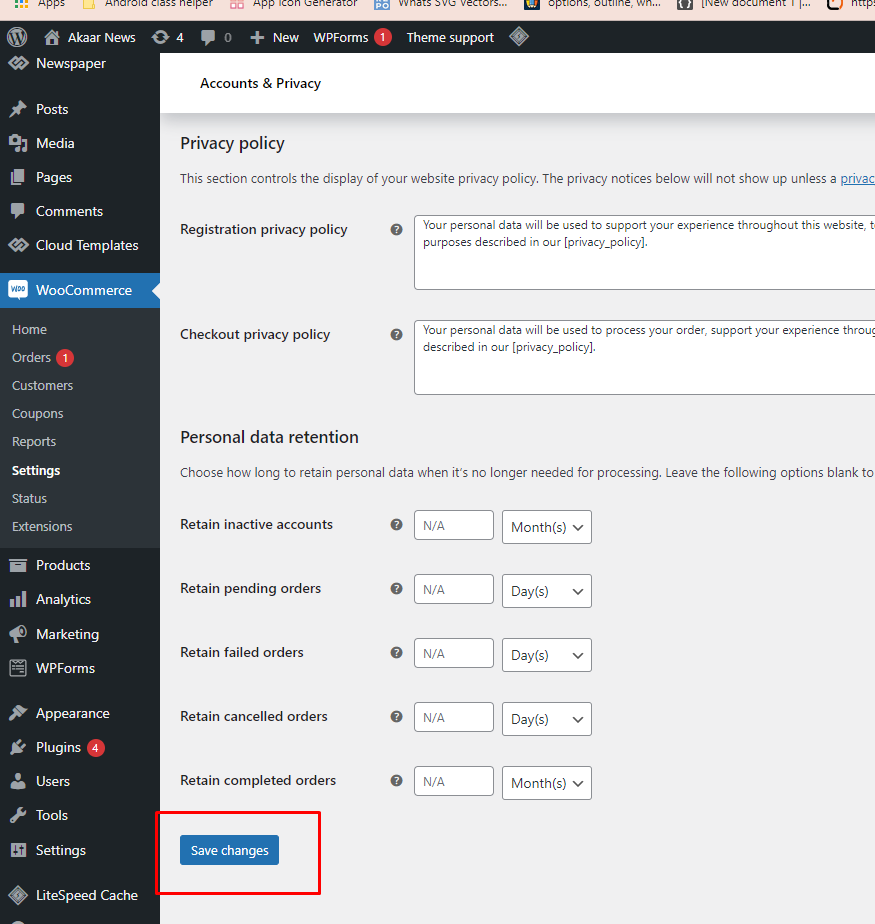
- 5. Select Account & Privacy tab and then just Enable mark options flow the screenshot below
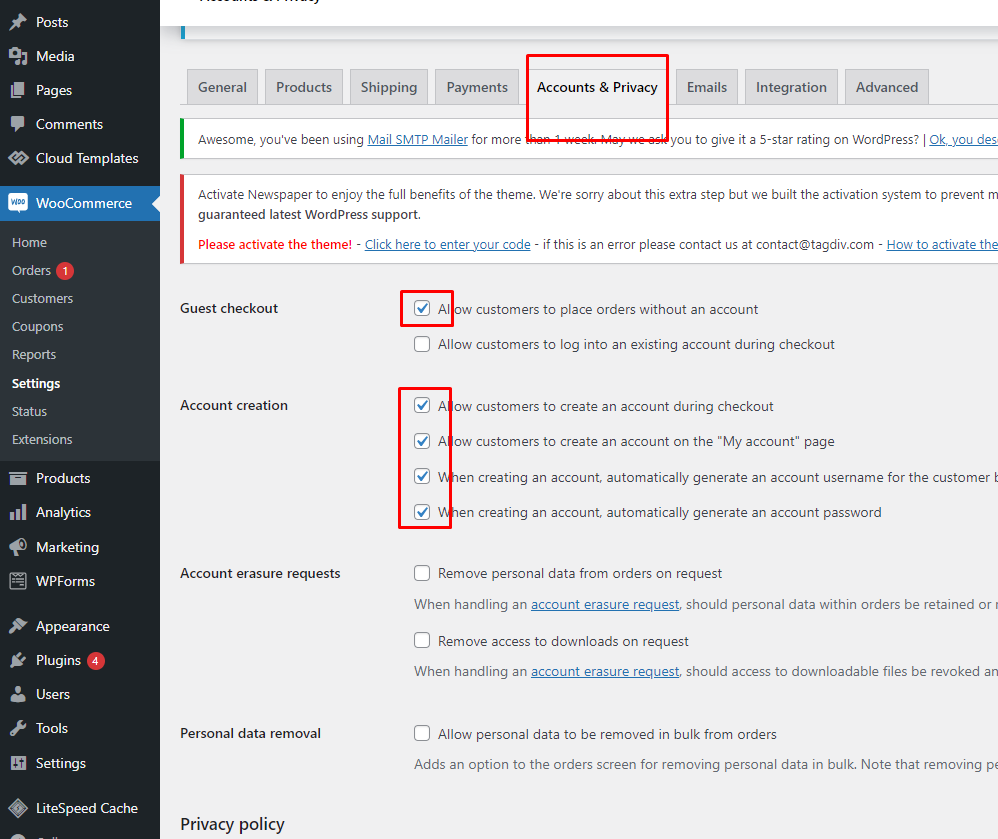
- 6. Then click Save change:
- 7. Select Advanced options but don’t change. Need the same field name.
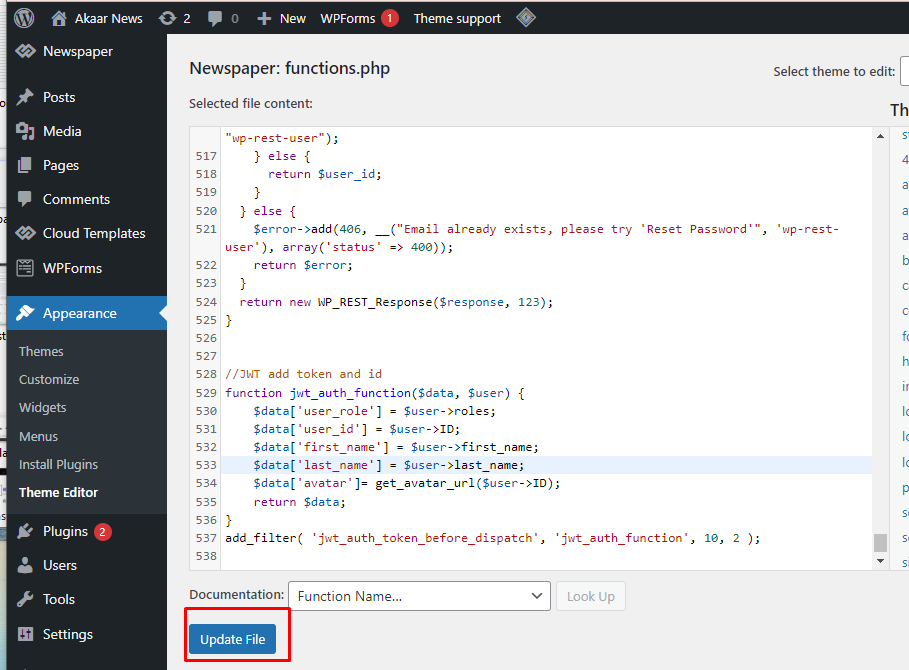
Add some code functions.php your wordpress admin panel
- 1. Open functions.php screen
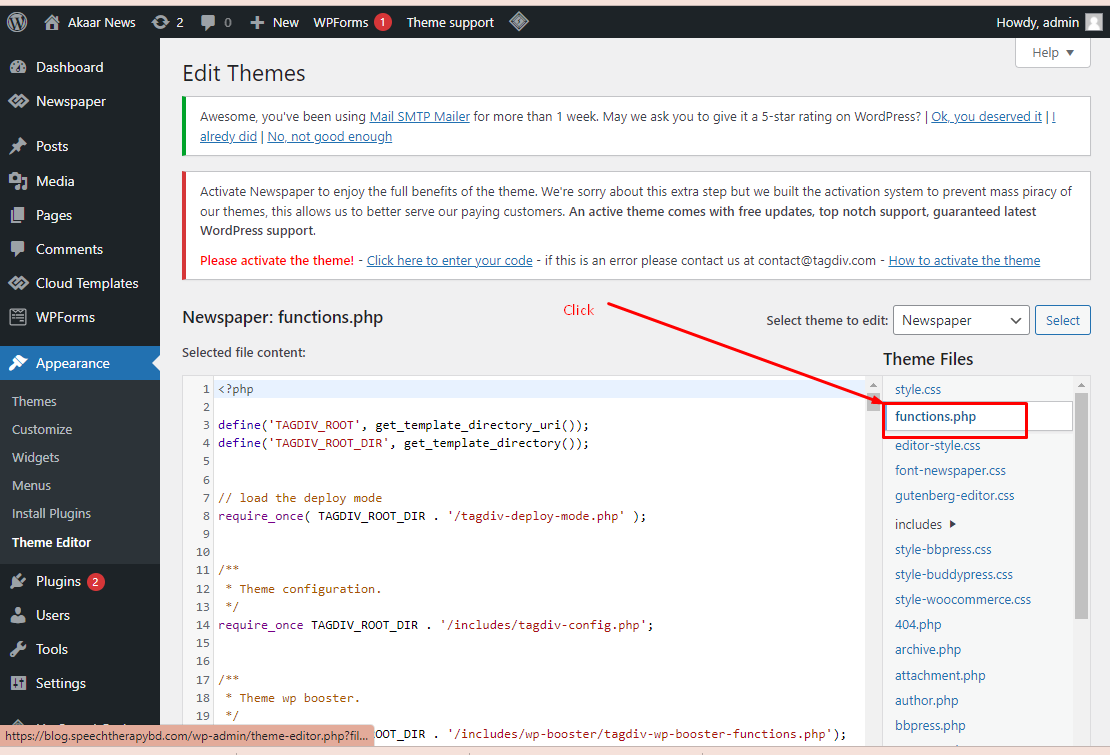
- 2. Then Copy the following code
    //Register custom funtions
    add_action('rest_api_init', 'wp_rest_user_endpoints');
    /**
        * Register a new user
        *
        * @param  WP_REST_Request $request Full details about the request.
        * @return array $args.
        **/
    function wp_rest_user_endpoints($request) {
        /**
        * Handle Register User request.
        */
        register_rest_route('wp/v2', 'users/register', array(
        'methods' => 'POST',
        'callback' => 'wc_rest_user_endpoint_handler',
        ));
    }
    function wc_rest_user_endpoint_handler($request = null) {
        $response = array();
        $parameters = $request->get_json_params();
        $username = sanitize_text_field($parameters['username']);
        $email = sanitize_text_field($parameters['email']);
        $password = sanitize_text_field($parameters['password']);
        // $role = sanitize_text_field($parameters['role']);
        $error = new WP_Error();
        if (empty($username)) {
        $error->add(400, __("Username field 'username' is required.", 'wp-rest-user'), array('status' => 400));
        return $error;
        }
        if (empty($email)) {
        $error->add(401, __("Email field 'email' is required.", 'wp-rest-user'), array('status' => 400));
        return $error;
        }
        if (empty($password)) {
        $error->add(404, __("Password field 'password' is required.", 'wp-rest-user'), array('status' => 400));
        return $error;
        }
        // if (empty($role)) {
        //  $role = 'subscriber';
        // } else {
        //     if ($GLOBALS['wp_roles']->is_role($role)) {
        //      // Silence is gold
        //     } else {
        //    $error->add(405, __("Role field 'role' is not a valid. Check your User Roles from Dashboard.", 'wp_rest_user'), array('status' => 400));
        //    return $error;
        //     }
        // }
        $user_id = username_exists($username);
        if (!$user_id && email_exists($email) == false) {
        $user_id = wp_create_user($username, $password, $email);
        if (!is_wp_error($user_id)) {
            // Ger User Meta Data (Sensitive, Password included. DO NOT pass to front end.)
            $user = get_user_by('id', $user_id);
            // $user->set_role($role);
            $user->set_role('subscriber');
            // WooCommerce specific code
            if (class_exists('WooCommerce')) {
            $user->set_role('customer');
            }
            // Ger User Data (Non-Sensitive, Pass to front end.)
            $response['code'] = 200;
            $response['message'] = __("User '" . $username . "' Registration was Successful", "wp-rest-user");
        } else {
            return $user_id;
        }
        } else {
        $error->add(406, __("Email already exists, please try 'Reset Password'", 'wp-rest-user'), array('status' => 400));
        return $error;
        }
        return new WP_REST_Response($response, 123);
    }


    //JWT add token and id
    function jwt_auth_function($data, $user) {
        $data['user_role'] = $user->roles;
        $data['user_id'] = $user->ID;
        $data['first_name'] = $user->first_name;
        $data['last_name'] = $user->last_name;
        $data['avatar']= get_avatar_url($user->ID);
        return $data;
    }
    add_filter( 'jwt_auth_token_before_dispatch', 'jwt_auth_function', 10, 2 );


    function post_featured_image_json( $data, $post, $context ) {
        $featured_image_id = $data->data['featured_media']; // get featured image id
        $featured_image_url = wp_get_attachment_image_src( $featured_image_id, 'original' ); // get url of the original size

        if( $featured_image_url ) {
        $data->data['featured_image_url'] = $featured_image_url[0];
        }

        return $data;
    }
    add_filter( 'rest_prepare_post', 'post_featured_image_json', 10, 3 );
And Paste Here.
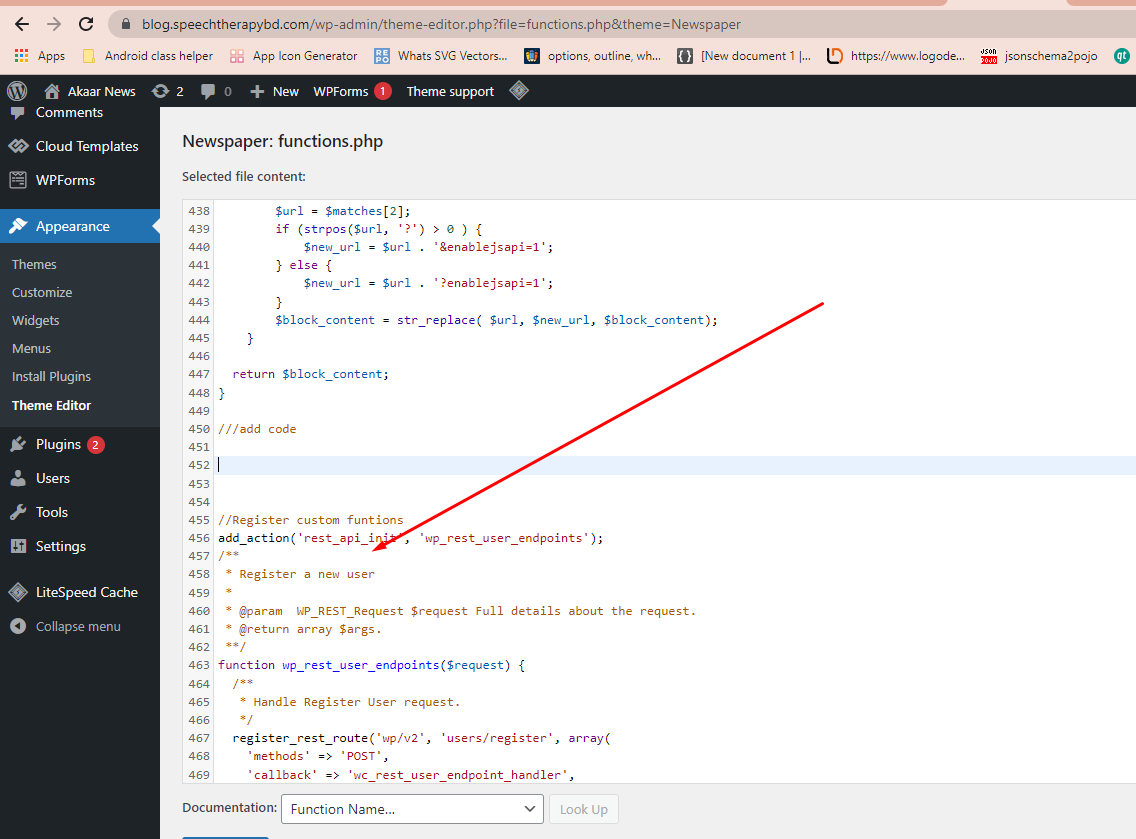
- 3. Click the update file button.
Mobile
Flutter is Google’s UI toolkit for building beautiful, natively compiled applications for MOBILE, WEB, and DESKTOP from a single codebase. It is very easy to learn and currently it is getting more popular. With this blog post, you will learn some basic stuff about Flutter and after reading it, you will be able to create a simple application using this technology.
Change Package Name
This is very important. Your app cannot have the same package name as other apps. If it does, the play store will not accept it as an unique application. So rename your app according to your business/brand name.Try to write an unique package name.
Naming convention : https://docs.oracle.com/javase/tutorial/java/package/namingpkgs.html
For example
- Let’s say your package is : com.rmb.ournews And your app name is "Our News"
- Run this command inside your flutter project root.
- Run the command in android studio terminal :
- futter pub run rename --bundleId com.rmb.ournews
- futter pub run rename --appname "Our News"
Try uninstalling the app from the emulator , then run the commands and then restart the app. If it does not work, first uninstall, then restart the app then run the commands.
In IOS:
for package name just change in build build.gradle only (android/app/build.gradle)
                        defaultConfig {

                            applicationId "bundleId com.rmb.ournews"
                            ……………...
                            }
In Android:
Change the bundle identifier from your Info.plist file inside your ios/Runner directory.
                        CFBundleIdentifier

                        bundleId com.onatcipli.networkUpp
If you face issues consult a flutter developer
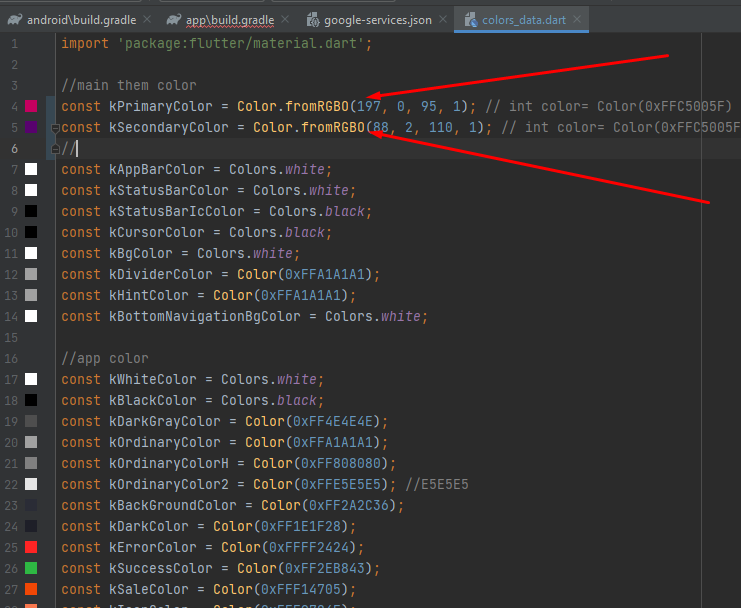
Theme Config
This helps you change your app’s colors according to your theme/branding Open lib/constants/colors_data.dart You can change the kPrimaryColor, kSecondaryColor variable. Flutter by default does not support hex color. Do not change the other variables. See the Screenshot below
Use https://www.rapidtables.com/convert/color/hex-to-rgb.html To get the RGB value if you do not already know your theme’s RGB color. You should keep the Opacity value 1 (Opacity can be 0, 0.1, 0.2, …….. ,0.9 ,1) See the screenshot below.
Configure the launcher icon
This helps you change your app’s launcher icon.
- Change the logo.png in the assets/images folder with your own logo.
- Your file name should also be logo.png and it should be a 512x512 png image.
- The image format should be the same.
- After replacing the file , uninstall your app from your emulator.Otherwise the logo will not be changed.
- Then in your android studio terminal run: flutter pub get
- Then run flutter pub run flutter_launcher_icons:main
- Then run your app (shift +10). The app will be installed again with your given launcher icon.
Configure other logos
In the asset folders we have other logos that you may want to change according to your branding.
- This logos will be found in : assets/images/home_logo.png (100x100)
- Change this logo with your own logo.File name , image format and size should be the same for each logo.
- Then in your android studio terminal run: flutter pub get
- Then restart your app (shift +10). You should see your own logo in these places.
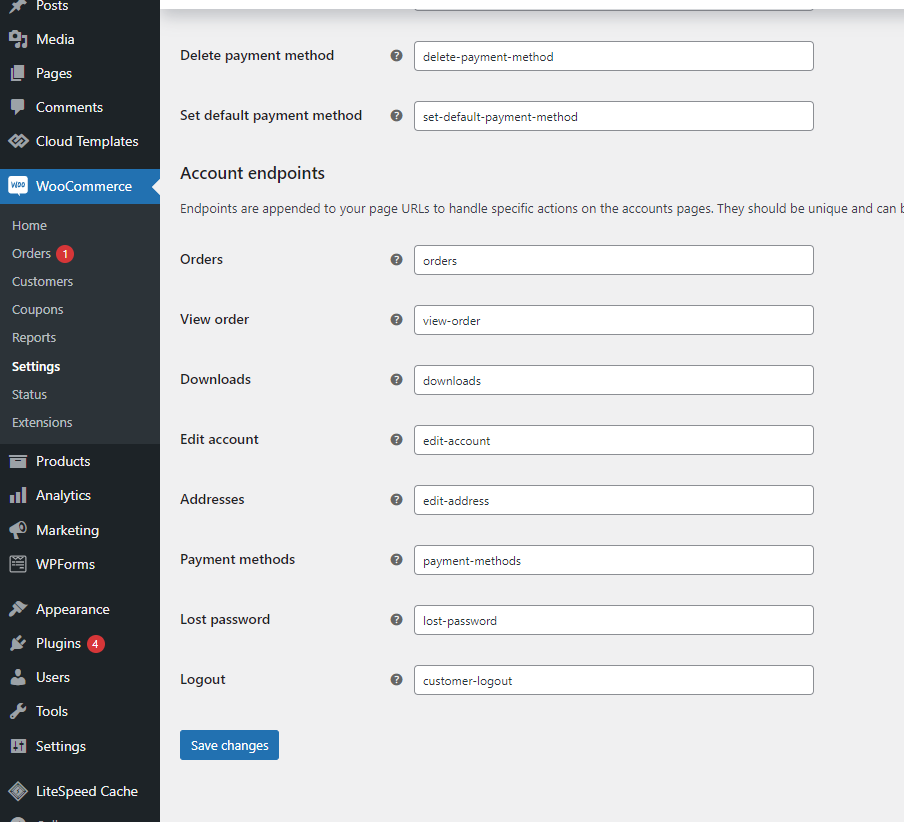
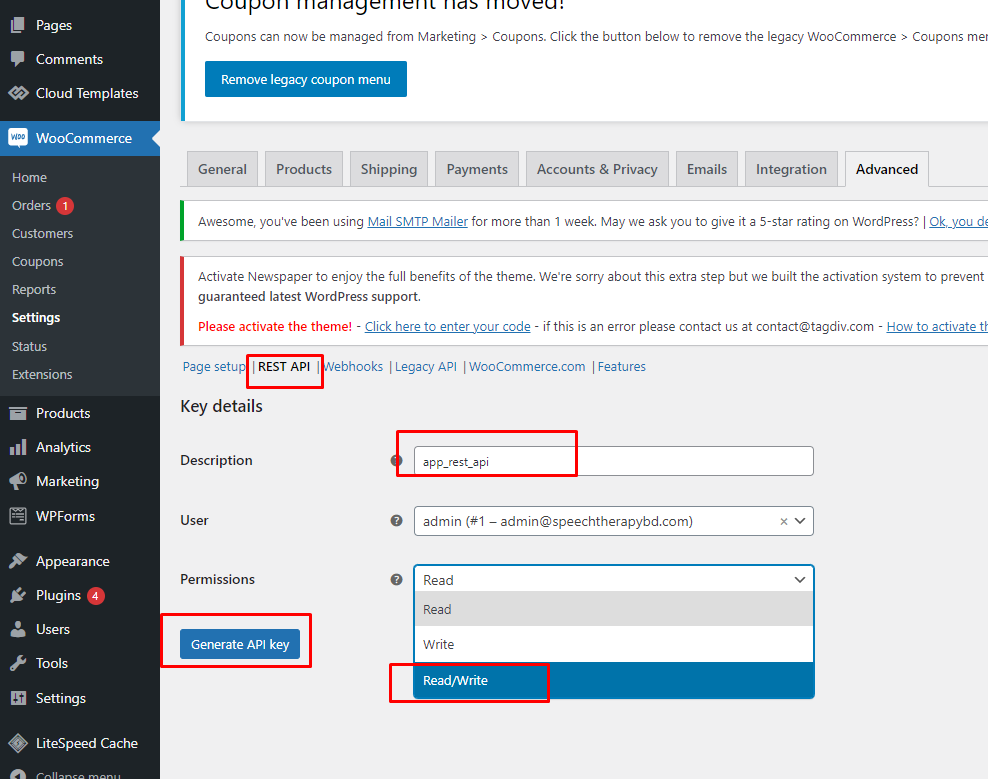
Woo-commerce Rest Api Setup
- 1. .Open your admin panel and flow screenshot below and click Settings-
- 2. Select Advanced tab then click REST API
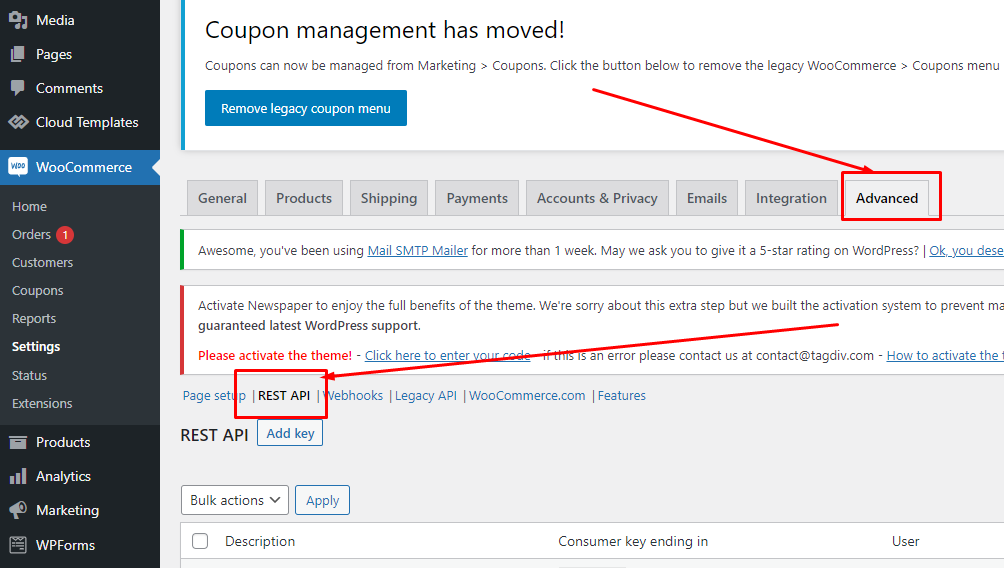
- 3. Add key details description field name, permissions selected and click Generate api key
Save change:
- 4. Then copy Consumer key and Consumer secret then Again open Android studio
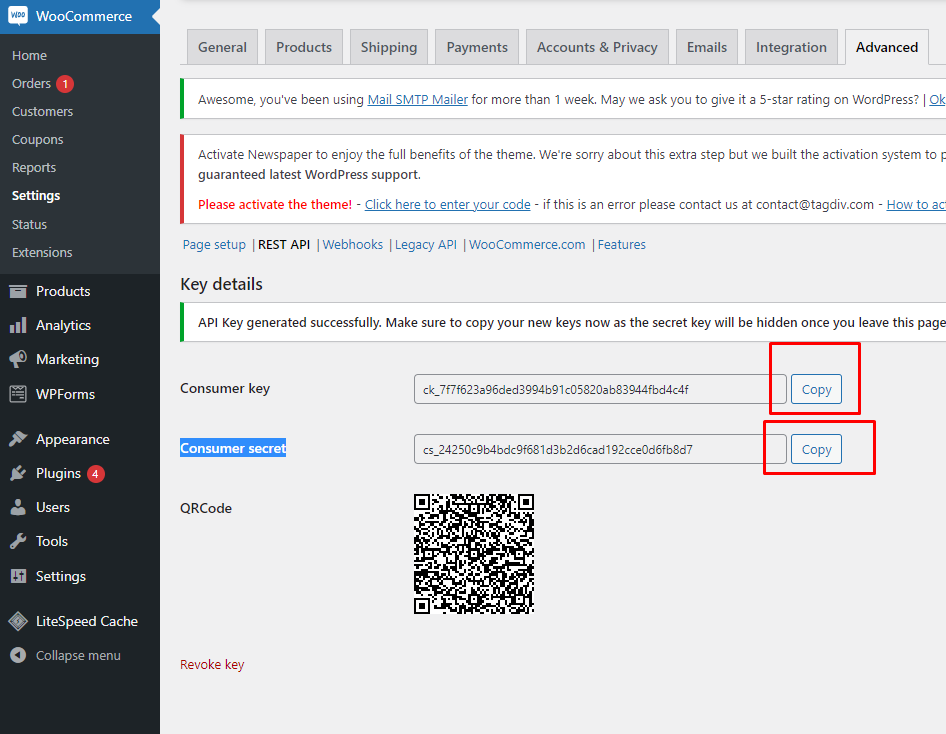
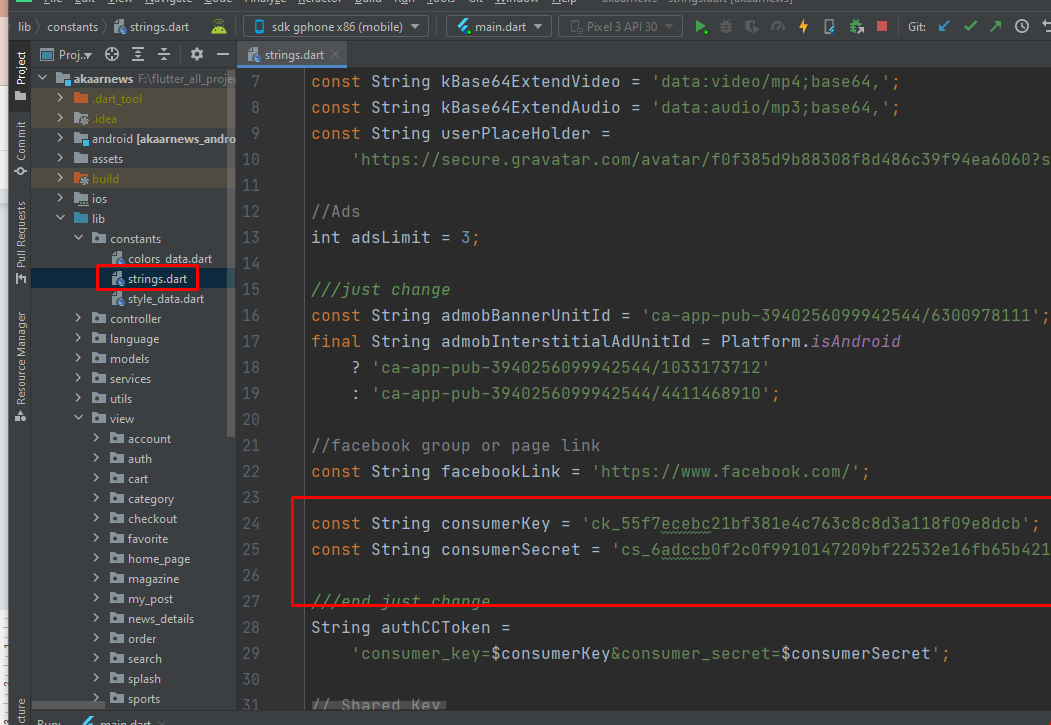
- 5. Open Android studio project - \lib\constants\strings.dart file and paste Consumer key and Consumer secret
Error Solved
- 1. \lib\view\checkout\checkout_home_screen.dart class open long press mouse middle wheel
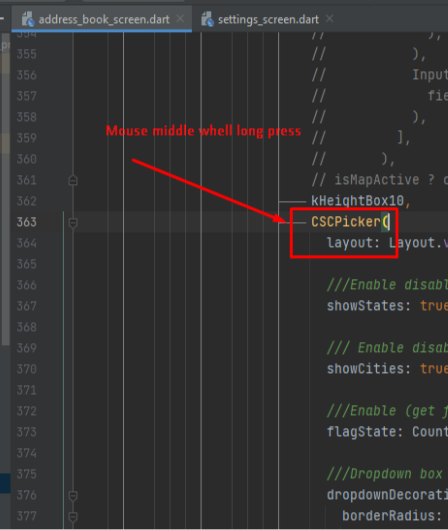
- 2. Then https://akaarit.com/csc_picker.dart click and click Download file and copy and paste code.
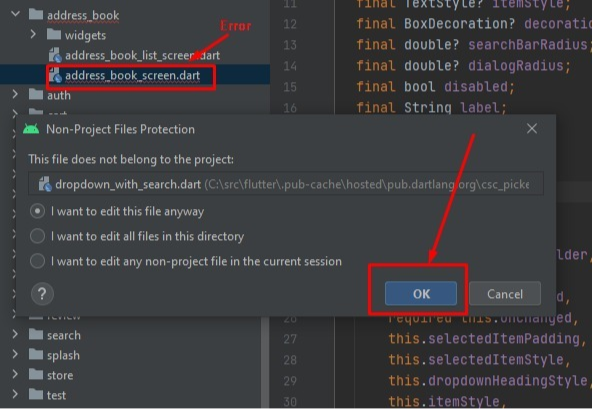
- 3. Then in your android studio terminal run: flutter pub get.
- 4. Then restart your app (shift +10). You should see your own logo in these places.
Social Login
Social Login is single sign-on for end users. Using existing login information from a social network provider like Facebook, Twitter, or Google, the user can sign into a third party app instead of creating a new account specifically for that App. This simplifies registrations and logins for end users.
Package Used : https://pub.dev/packages/futter_facebook_login
See its documentation and steps:
Android Setup:https://facebook.meedu.app/docs/4.x.x/android
iOS Setup:https://facebook.meedu.app/docs/4.x.x/ios
Configure the below file with facebook credentials:
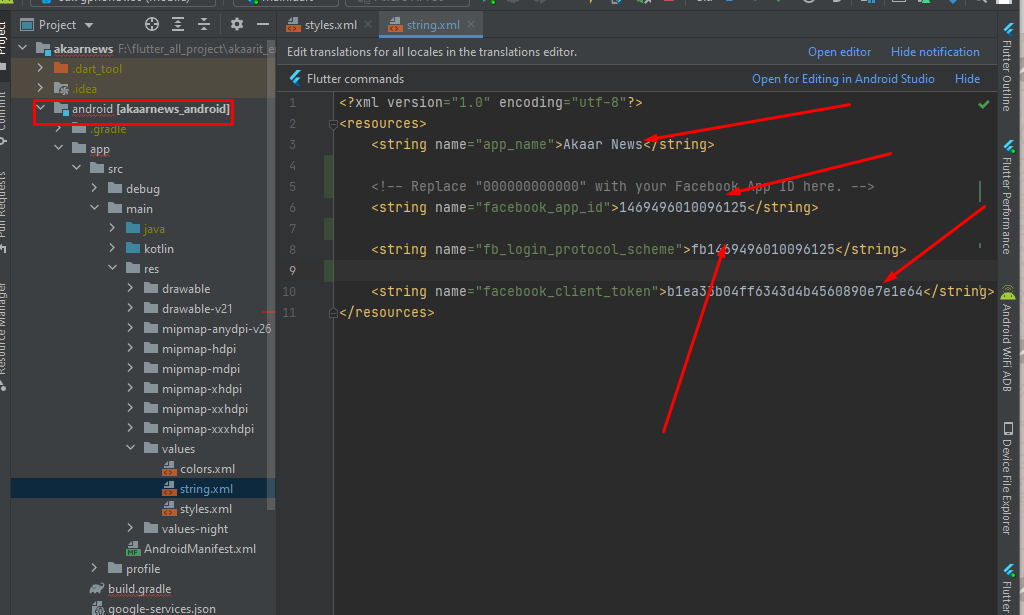
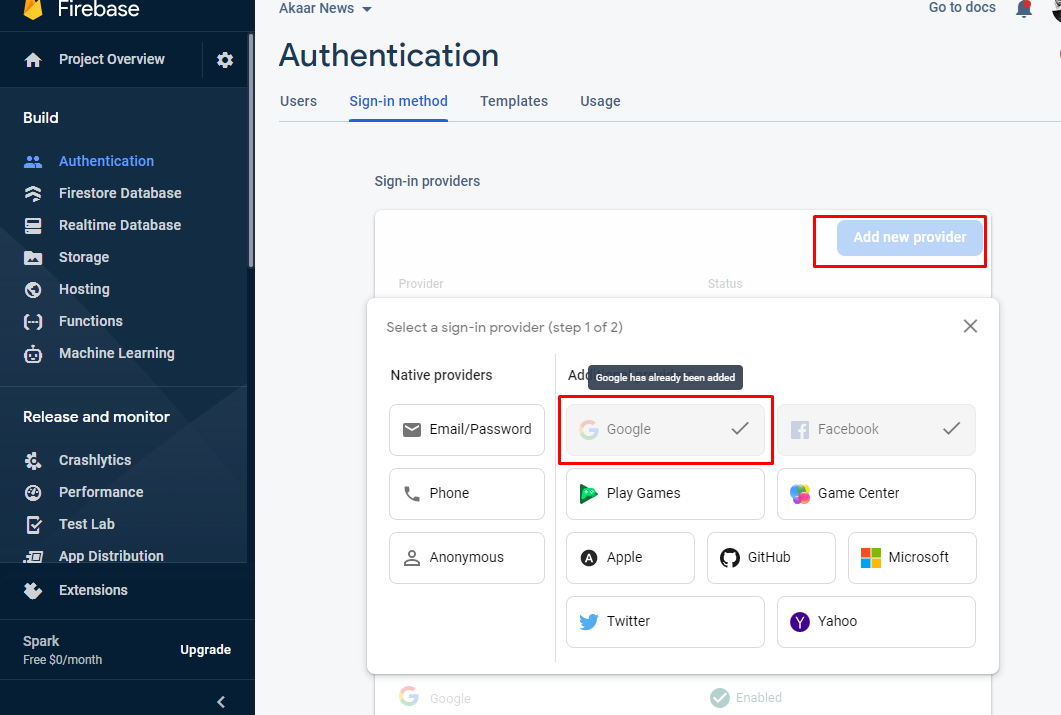
Package Used : https://pub.dev/packages/google_sign_in
See its documentation and steps:
These files below are already configured:
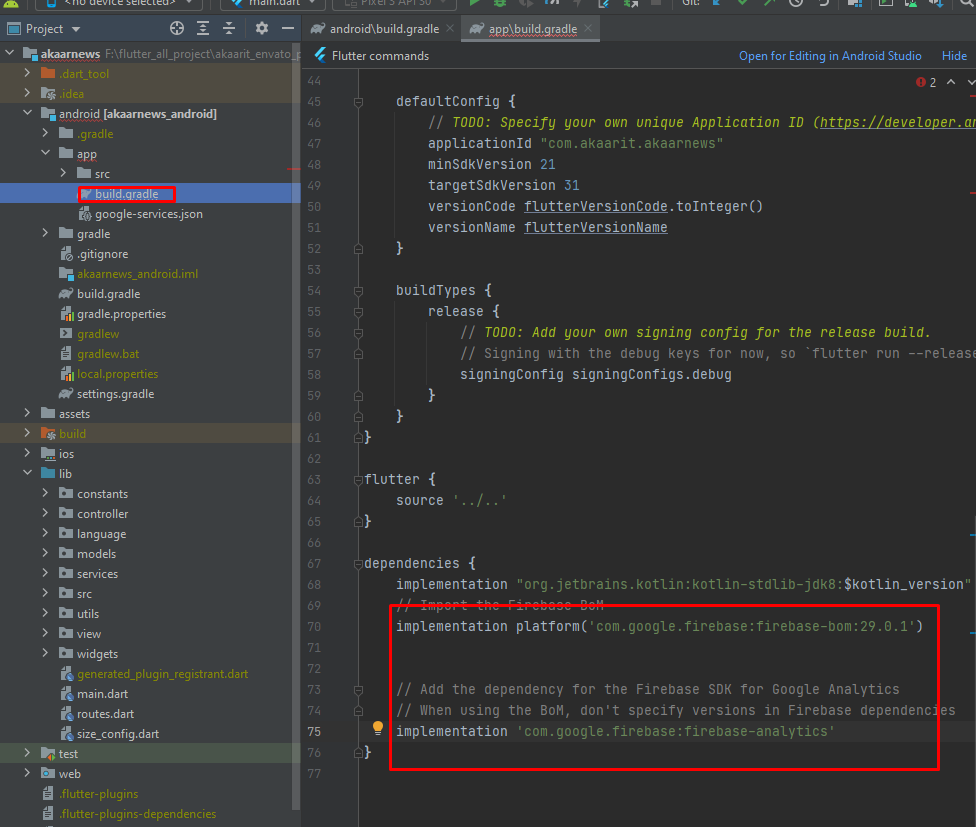
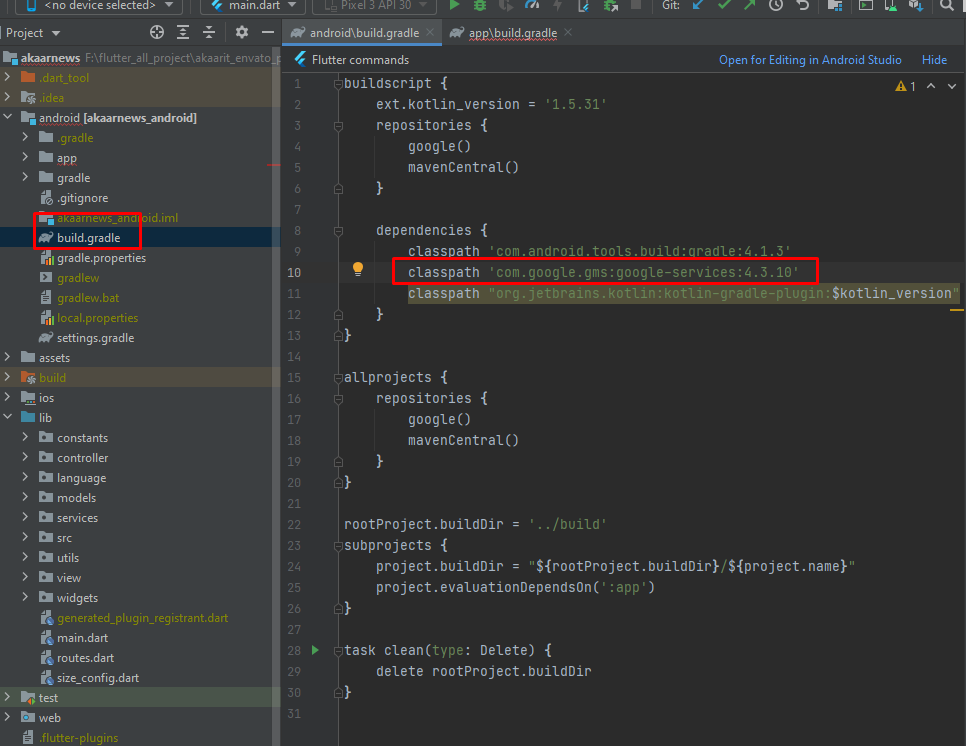
You will need to generate your own google-services.json. Do not use ours - it will not work for you

Firebase console: https://console.frebase.google.com/u/0/
Follow the guideline from here https://pub.dev/packages/google_sign_in
You need to create an app. You need to provide your fingerprints here (sha1 and sha 256)
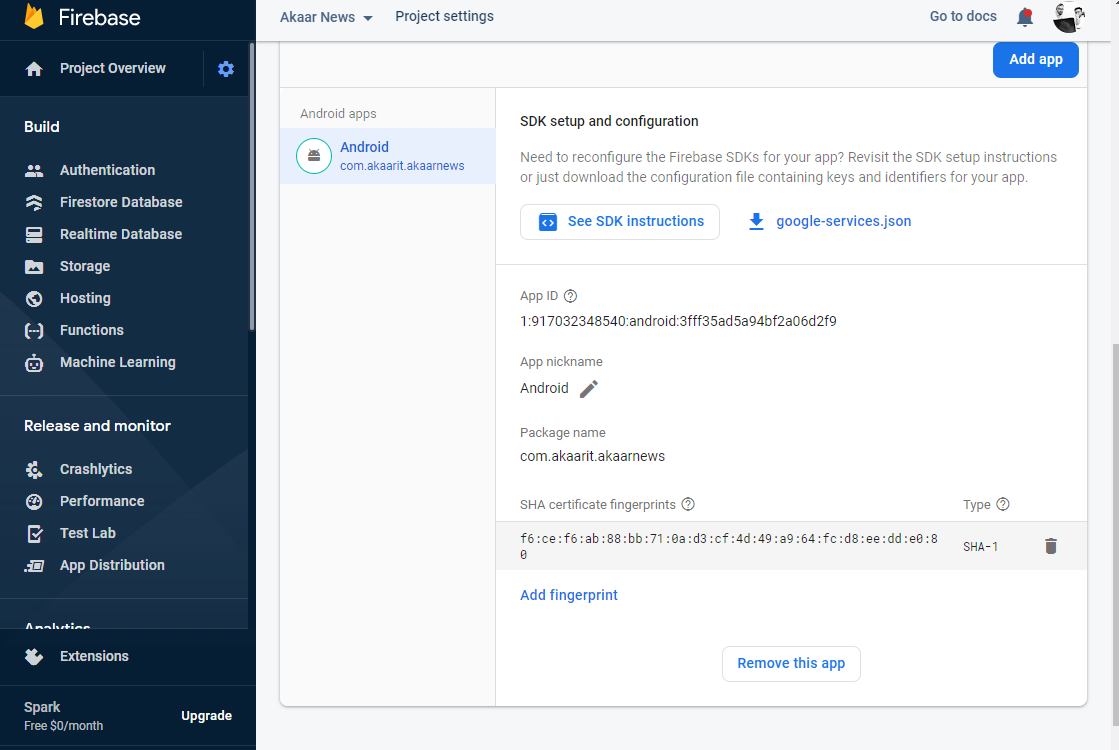
You will find your signature/fingerprints from here ( Provided that you already have generated the key). You will also need the path of your key.jks. You may have already kept it in the root folder.
See reference https://stackoverflow.com/questions/51845559/generate-sha-1-for-flutter-react-native-android-native-app
Flow under step by step
- 1. Open Android Studio
- 2. Open Project
- 3. Reveal android folder
- 4. Right click "gradlew" file and select Open in Terminal -
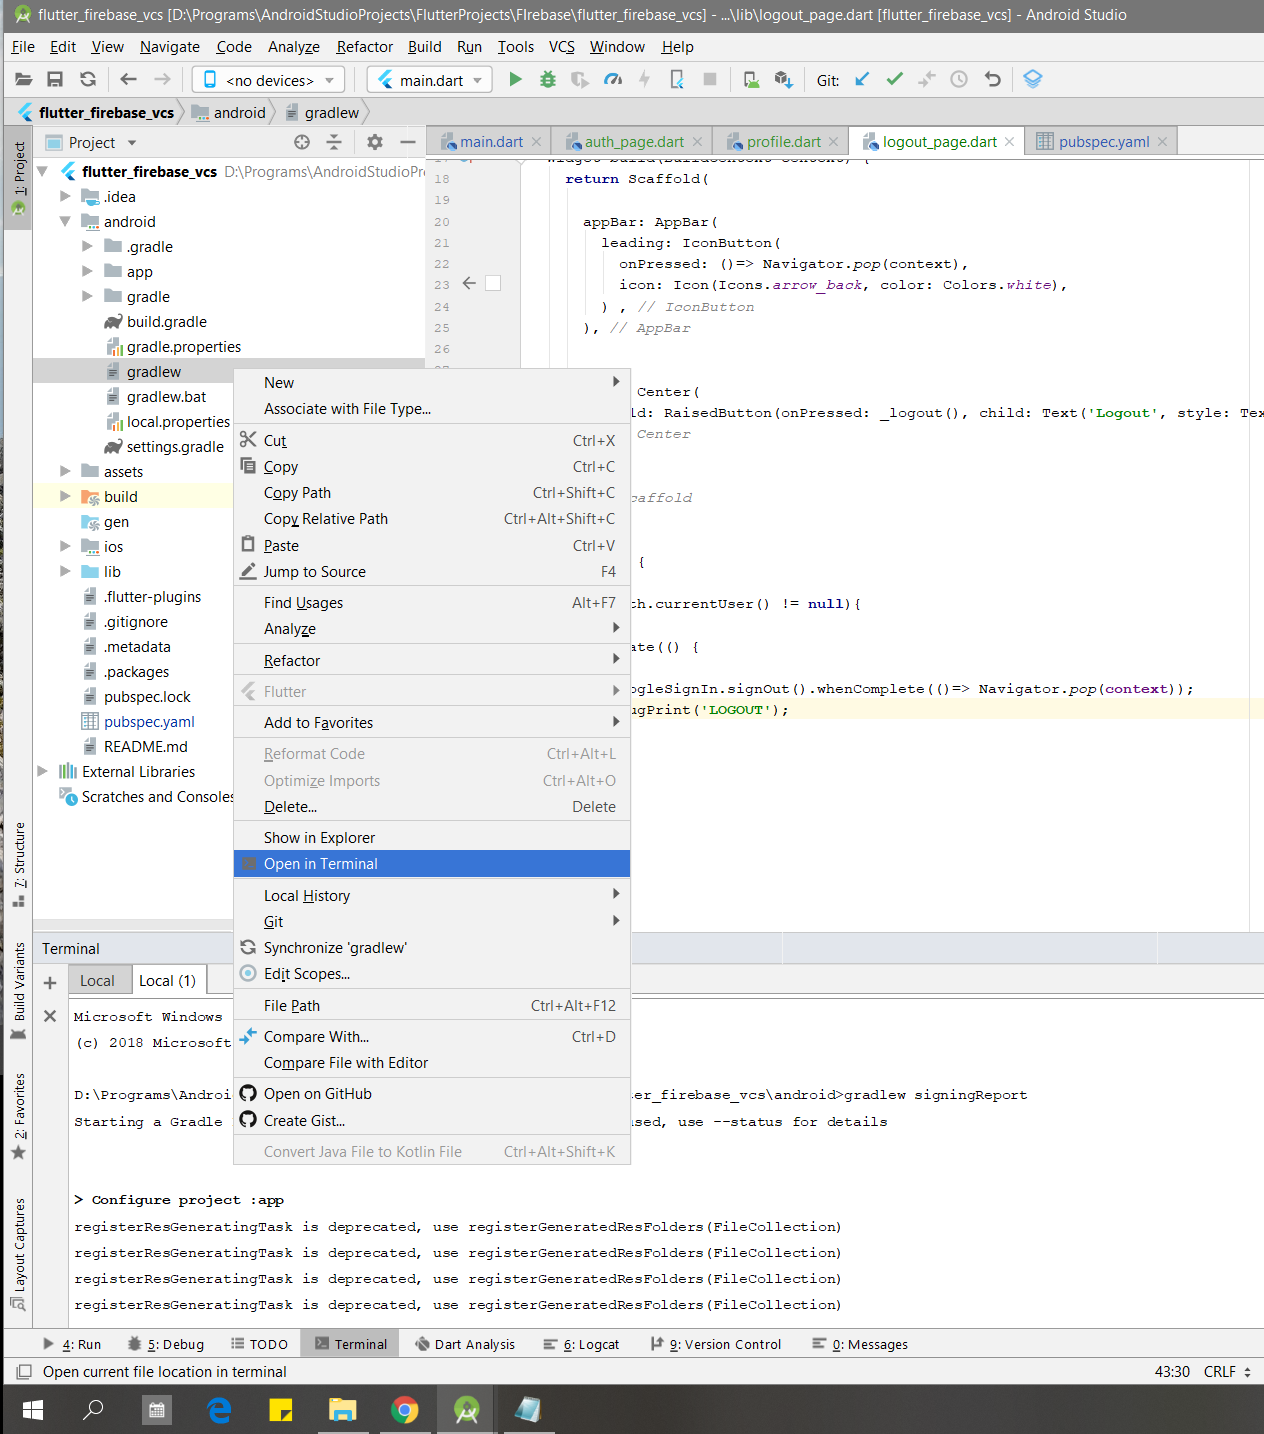
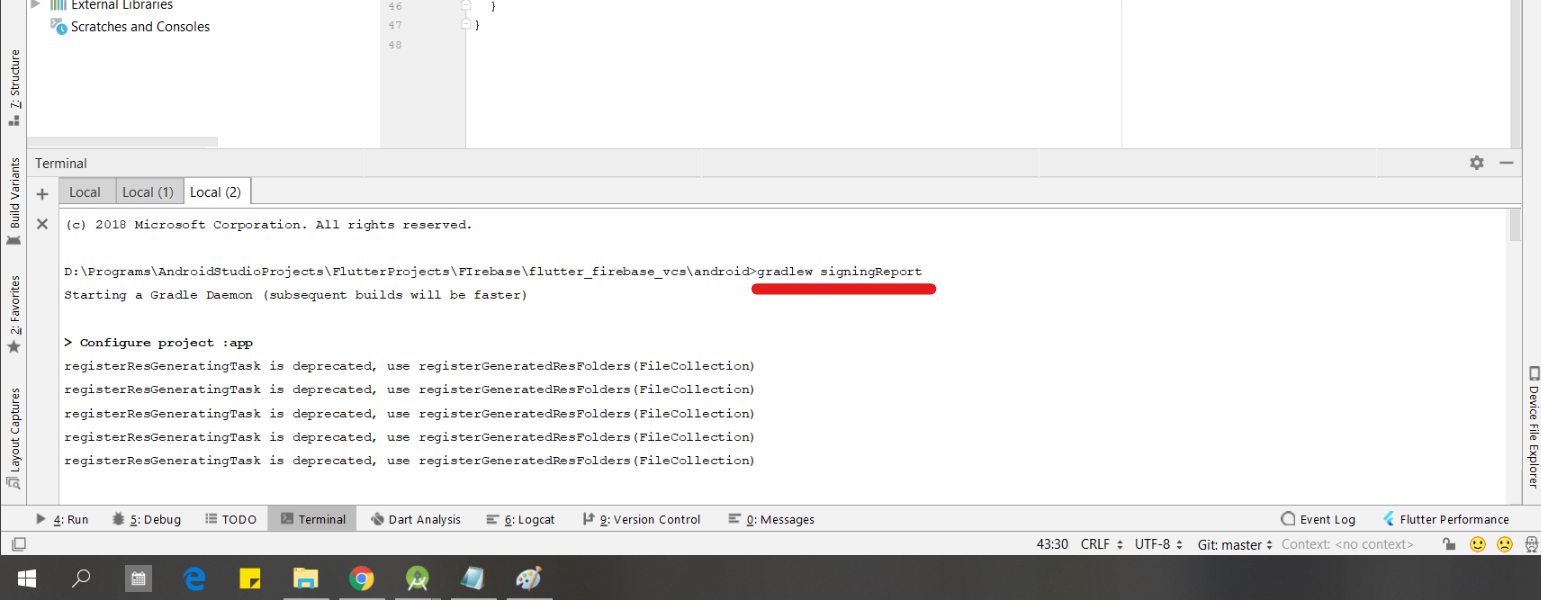
- 5. Go to the terminal view and paste: gradlew signingReport
(edit based on Venkat D. suggestion below: on unix-based systems like mac, you need
to specify the current directory like this- ./gradlew signingReport)
- 6. Press enter and scroll to "Variant: debug" to get the SHA1 key
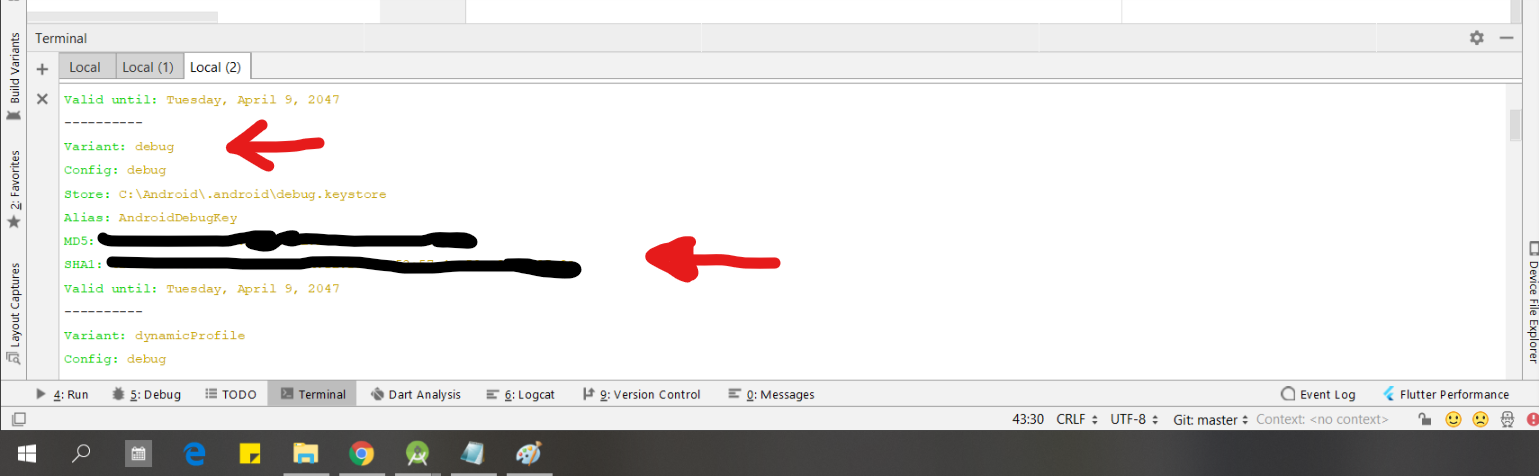
- 7. Copy and use wherever you need it and paste Firebase. Good Luck!
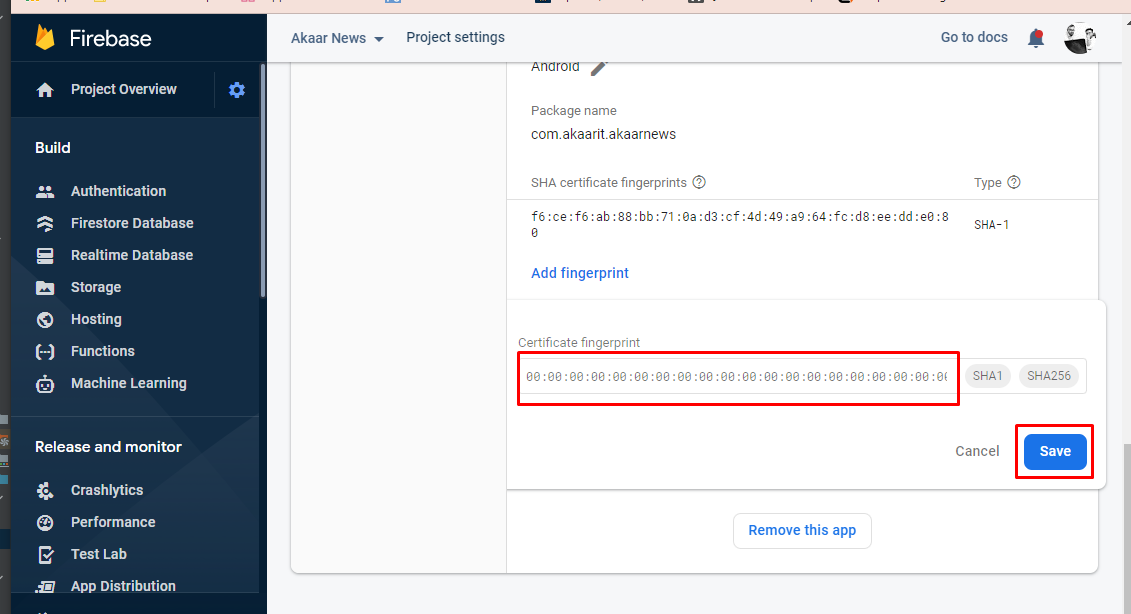
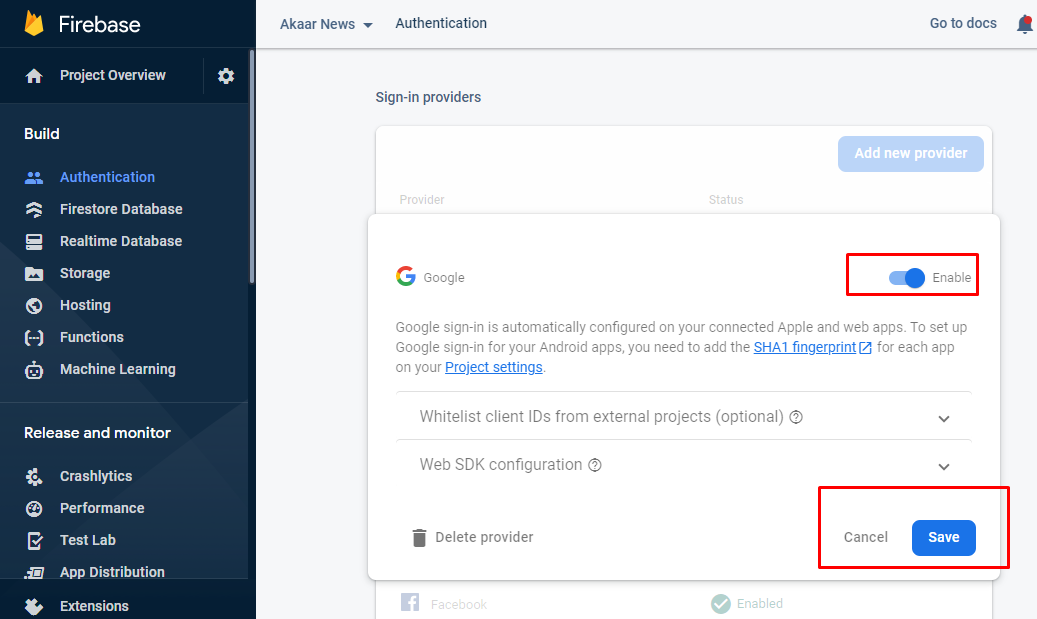
- 8. Add new provider and Enable Google
FAQs
Section intro goes here. You can list all your FAQs using the format below.
FAQ About Apps
How About Woogoods?
Woodgoods Shop Flutter App is all about creating a ecommerce related accessories selling mobile app for Shopkeepers and businesses.
Is it compatible with all android version?
Android is designed to run on many different types of devices, from phones to tablets and televisions. As a developer, the range of devices provides a huge potential audience for your app. In order for your app to be successful on all these devices, it should tolerate some feature variability and provide a flexible user interface that adapts to different screen configurations.
Is it compatible with all iOS version?
Restricting stories significantly limits the variety of stories that appear in the Today feed and all other feeds. For example, if you restrict stories and follow only one entertainment-related channel, your Entertainment topic feed will contain stories only from that channel. When you restrict stories, you don’t see Top Stories and Trending Stories
Future Update
Can We Have Update?
Apps installed via Google Play download app updates automatically. Users receive a push notification that an app has updated. iOS prompts users to download updates through app store badging.
Would New Update Demand Charge?
If you really only want updates from your regional newspaper, go ahead and download that dedicated app. But for news stories from around the world and across topics including entertainment, science, tech, politics, and beyond, find yourself the best news app for you that's customizable.
Customization Cost?
This Apps adds a “level cost text” field to Membership Levels and Discount Codes, allowing you to override PMPro’s default level cost text. You can also modify the cost text globally via Advanced Settings. Please use with care as sometimes the level cost text is the only way a user will know how much their credit card is being charged.